


HOBO
MX
CO
2
Data
Logger
(MX1102A)
Manual
1
‐
800
‐
LOGGERS
4
www.onsetcomp.com
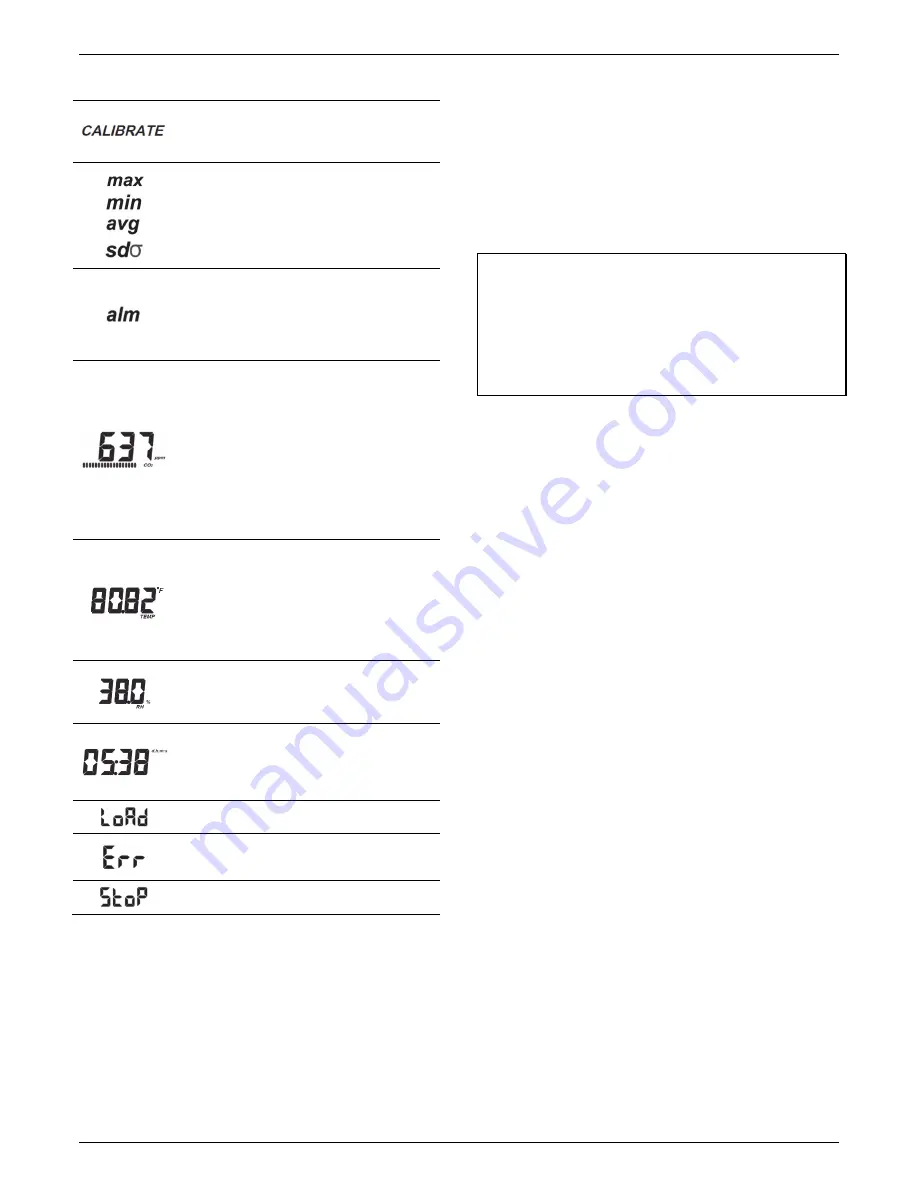
LCD
Symbol
Description
Press
this
button
for
5
seconds
to
manually
calibrate
the
CO
2
sensor
(if
enabled).
“Calibrate”
and
“CO
2
”
will
blink
on
the
LCD
during
the
5
‐
minute
manual
calibration
process.
These
symbols
show
the
maximum,
minimum,
average,
and
standard
deviation
values
most
recently
calculated
by
the
logger
(if
enabled).
Press
the
Next/Clear
button
for
1
second
to
cycle
through
the
available
statistics
and
then
back
to
the
current
sensor
reading
(or
to
the
alarm
value
if
applicable).
This
is
the
farthest
out
‐
of
‐
range
sample
displayed
during
the
logger
deployment.
Press
the
Clear/Next
button
to
view
this
reading.
Press
the
Clear/Next
button
again
to
cycle
through
any
statistics
(defined
above)
and
ultimately
back
to
the
current
sensor
reading.
This
is
an
example
of
a
CO
2
reading
in
parts
per
million.
If
the
logger
is
powered
by
battery:
A
new
segment
appears
in
the
status
bar
every
15
seconds
to
indicate
how
long
until
the
display
will
be
updated.
In
this
example,
there
are
18
segments.
This
means
it
has
been
4
minutes
and
30
seconds
since
the
CO
2
reading
was
updated
on
the
LCD.
There
are
30
seconds
left
(two
segments)
before
the
reading
will
be
updated
on
the
LCD.
If
the
logger
is
powered
by
USB
cable:
The
segmented
status
bar
is
not
displayed
and
the
current
reading
is
updated
every
second.
This
is
an
example
of
a
temperature
reading.
Temperature
units
are
determined
by
the
settings
in
the
software.
To
switch
between
Celsius
and
Fahrenheit,
change
the
units
in
the
software
and
then
reconfigure
the
logger.
Temperature
readings
are
updated
on
the
LCD
every
15
seconds
if
the
logger
is
battery
‐
powered
or
every
second
if
it
is
USB
‐
powered
regardless
of
logging
interval.
This
is
an
example
of
an
RH
reading.
RH
readings
are
updated
on
the
LCD
every
15
seconds
if
the
logger
is
battery
‐
powered
or
every
second
if
it
is
USB
‐
powered
regardless
of
logging
interval.
The
logger
has
been
configured
to
start
logging
on
a
particular
date/time.
The
display
will
count
down
in
days,
hours,
minutes,
and
seconds
until
logging
begins.
In
this
example,
5
minutes
and
38
seconds
remain
until
logging
will
begin.
The
configure
settings
are
being
loaded
onto
the
logger
from
the
software.
An
error
occurred
while
loading
the
configure
settings
onto
the
logger
from
the
software.
Try
reconfiguring
the
logger.
The
logger
has
been
stopped
with
the
software
or
because
the
memory
is
full.
Notes:
You
can
disable
the
LCD
screen
in
the
software.
When
the
LCD
is
turned
off
for
logging,
you
can
still
temporarily
view
the
LCD
screen
by
pushing
the
Start/Stop
or
Clear/Next
button.
The
LCD
will
then
remain
on
for
10
minutes.
When
the
logger
is
connected
to
the
computer
with
the
USB
cable,
the
LCD
screen
refreshes
every
second
regardless
of
logging
interval.
When
the
logger
has
stopped
logging,
the
LCD
screen
will
remain
on
with
“STOP”
displayed
until
the
logger
is
offloaded
(unless
the
LCD
screen
was
turned
off
in
the
software).
Once
the
logger
has
been
offloaded,
the
LCD
will
turn
off
automatically
after
2
hours.
The
LCD
screen
flashes
“HELLO”
when
you
page
the
logger
from
the
app
(see
Getting
Started
with
the
App
).
The
LCD
screen
flashes
“CHIRP
OFF”
when
an
audible
alarm
is
cleared.
Setting
up
the
Logger
Important:
The
CO
2
sensor
within
this
logger
can
experience
measurement
drift
during
storage
and
shipment.
It
is
strongly
recommended
that
a
manual
calibration
be
performed
prior
to
deploying
the
logger.
Start
the
logger
as
described
in
this
section
and
perform
a
manual
calibration.
See
Calibrating
the
Logger
for
more
details;
follow
the
manual
calibration
steps
in
that
section.
Improper
manual
calibration
can
cause
incorrect
sensor
readings.
Install
the
batteries
in
the
logger.
Use
a
Phillips
‐
head
screwdriver
to
open
the
battery
cover
on
the
back
of
the
logger
and
insert
four
AA
batteries
observing
polarity
(see
Battery
Information
).
Screw
the
cover
back
in
place.
You
can
use
both
the
app
and
HOBOware
software
with
this
logger.
The
following
sections
provide
an
overview
for
using
the
logger
with
both
programs.
You
can
switch
back
and
forth
between
the
two
programs
(for
example,
configure
the
logger
in
HOBOware,
and
read
it
out
in
the
app).
However,
you
can
only
connect
to
one
program
at
a
time.
You
cannot
use
the
app
with
the
logger
while
it
is
connected
to
HOBOware.
If
you
attempt
to
use
the
logger
in
HOBOware
while
it
is
connected
to
the
app,
the
device
will
not
be
found.
If
you
want
to
connect
to
the
app
after
using
the
logger
with
HOBOware,
you
will
need
to
disconnect
the
USB
cable
once
you
are
done
with
HOBOware.
Getting
Started
with
the
App
These
steps
provide
an
overview
of
setting
up
the
logger
with
the
app.
1.
If
you
are
using
an
iPhone®
or
iPad®:
Download
HOBOmobile
from
the
App
Store®.
If
you
are
using
an
Android
phone
or
tablet:
Download
HOBOconnect
from
Play™.
2.
Open
the
app
and
enable
Bluetooth
in
your
device
settings
if
prompted.
3.
Tap
the
Devices
icon
in
the
app.
(In
HOBOmobile,
tap
Loggers
at
the
top
of
the
screen.)
Tap
the
logger
in
the
app
to
connect
to
it.
If
the
logger
does
not
appear
or
if
it
is
having
trouble
connecting,
follow
these
tips:
Make
sure
the
logger
is
within
range
of
your
mobile
device.
The
range
for
successful
wireless
communication
is
approximately
30.5
m
(100
ft)
with
full
line
‐
of
‐
sight.
If
your
device
can
connect
to
the
logger
intermittently
or
loses
its
connection,
move
closer
to
the
logger,
within
sight
if
possible.
If
the
logger
appears
in
the
In
Range
list,
but
you
cannot
connect
to
it,
close
the
app
and
power
cycle
the
mobile
device.
This
forces
the
previous
Bluetooth
connection
to
close.


