background image

57

Basic Operations

—Continued

The multichannel DVD input is for connecting a compo-
nent with a 7.1-channel analog audio output, such as a 
DVD-Audio or SACD-capable DVD player, or an 
MPEG decoder. See page 27 for hookup information.

Notes:

• While the multichannel DVD input is selected, the 

Speaker Configuration settings on page 75 are 
ignored, and signals from the multichannel input are 
fed to the speakers as they are.

• The multichannel DVD input cannot be used if 

“Speakers Type” is set to “Bi-Amp” (see page 47).

• This procedure can also be performed on the AV 

receiver/AV amplifier by using its [MULTI CH] but-
ton.

You can adjust the bass and treble for the front speakers, 
except when the Direct, Pure Audio or THX listening 
mode is selected.

Bass

You can boost or cut low-frequency sounds output by the 
front speakers from –10 dB to +10 dB in 2 dB steps.

Treble

You can boost or cut high-frequency sounds output by 
the front speakers from –10 dB to +10 dB in 2 dB steps.

Notes:

• This setting is not available when the multichannel 

DVD input is selected.

• This procedure can also be performed on the remote 

controller by using [AUDIO] button (see page 85).

You can display various information about the current 
input source as follows.

Note:

This procedure can also be performed on the AV 
receiver/AV amplifier by using its [DISPLAY] button.

The following information can typically be displayed for 
input sources.

*

If the input signal is analog, no format information is displayed. 
If the input signal is PCM, the sampling frequency is displayed. 
If the input signal is digital but not PCM, the signal format and 
the number of channels is displayed. For some digital input sig-
nals, including multichannel PCM, the signal format, number of 
channels, and sampling frequency is displayed. 
Information is displayed for about three seconds, then the previ-
ously displayed information reappears.


You can adjust the brightness of the AV receiver/AV 
amplifier’s display.

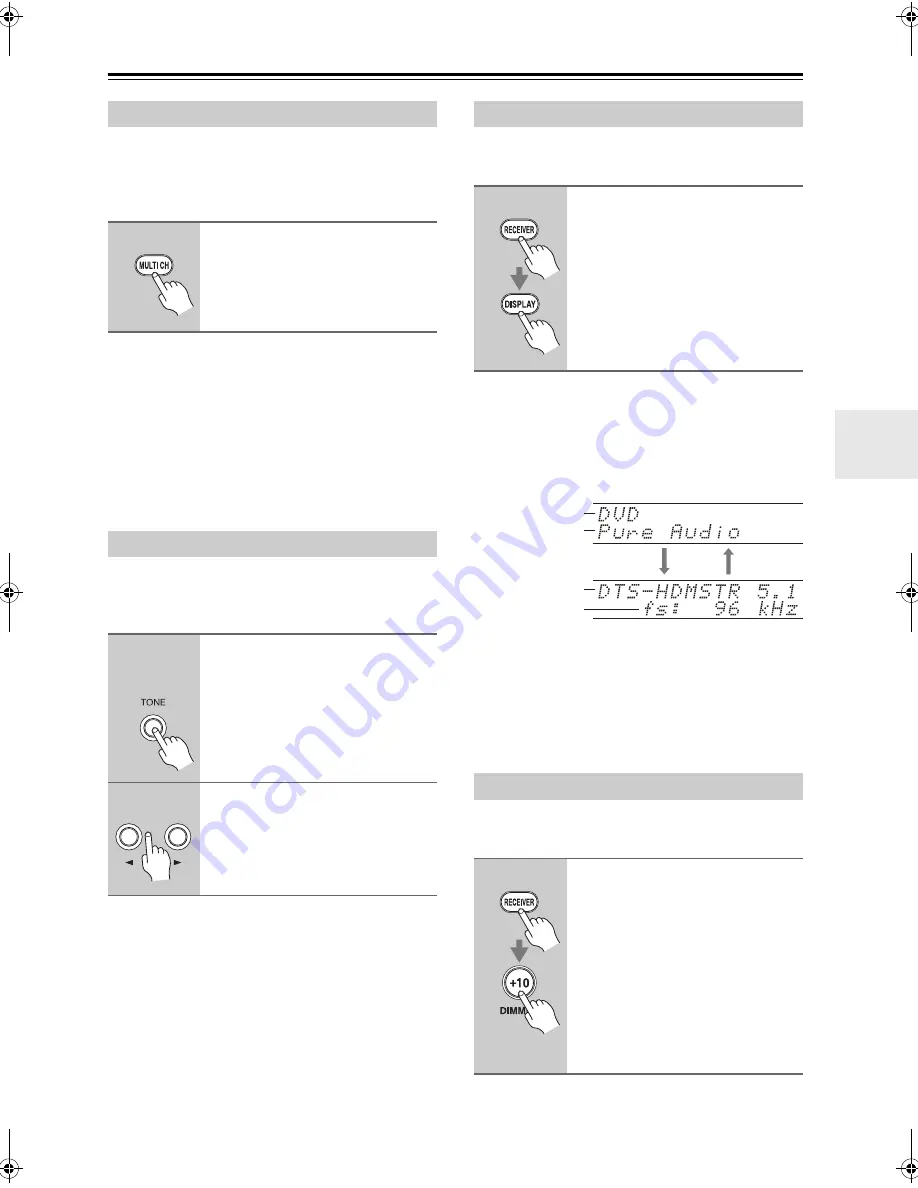
Using the Multichannel DVD Input

Remote

controller

Press the [MULTI CH] button.

“Multich” appears on the display.
Audio from the multichannel DVD 
input will now be used for the DVD 
input source.

Adjusting the Bass & Treble

1

AV receiver/
AV amplifier

Press the [TONE] button repeat-
edly to select either “Bass” or 
“Treble”.

2

Use the Up [

r

] and Down [

e

buttons to adjust.

Displaying Source Information

Remote

controller

Press the [RECEIVER] button, 
and then press the [DISPLAY] 
button repeatedly to cycle 
through the available informa-
tion.

Setting the Display Brightness

Remote

controller

Press the [RECEIVER] button, 
and then press the [DIMMER] 
button repeatedly to select: 

•  VOLUME light on.
•  VOLUME light off.
• Dim + VOLUME light off.
•  VOLUME light off.
Alternatively, you can use the AV 
receiver/AV amplifier’s [DIMMER] 
button (North American models and 
TX-SA806 only).

Sampling

frequency

Input source

Signal format*

Listening

mode

TX-SR806_En.book  Page 57  Monday, August 4, 2008  10:25 AM

Summary of Contents for TX SR806

Page 1: ...ing in the unit Following the instructions in this manual will enable you to obtain optimum performance and listening enjoyment from your new AV Receiver AVAmplifier Please retain this manual for futu...

Page 2: ...ratus does not operate normally by following the operating instructions Adjust only those controls that are covered by the oper ating instructions as an improper adjustment of other controls may resul...

Page 3: ...rubber or plastic items on this unit for a long time because they may leave marks on the case This unit s top and rear panels may get warm after prolonged use This is normal If you do not use this un...

Page 4: ...l which is marked with the letter L or coloured red IMPORTANT The plug is fitted with an appropriate fuse If the fuse needs to be replaced the replacement fuse must approved by ASTA or BSI to BS1362 a...

Page 5: ...e 2 Right Zone 2 Right Front Left Front Left SP B Zone 2 Left SP B Zone 2 Left Front Right Front Right SP B Zone 2 Right SP B Zone 2 Right Front Right Front Right SP B Zone 2 Right SP B Zone 2 Right S...

Page 6: ...rk and the DTS logos Symbol DTS HD and DTS HD Master Audio are trademarks of DTS Inc 1996 2007 DTS Inc All Rights Reserved 3 Manufactured under license from Dolby Laboratories Dolby Pro Logic and the...

Page 7: ...Using the Multichannel DVD Input 57 Adjusting the Bass Treble 57 Displaying Source Information 57 Setting the Display Brightness 57 Muting the AV receiver AV amplifier 58 Using the Sleep Timer 58 Usin...

Page 8: ...er than North American model TX SA806 The actual front panel has various logos printed on it They are not shown here for clarity Front Panel 5 2 3 4 6 8 7 9 1 Front flap Push here to open the flap cr...

Page 9: ...LEVEL button 103 Used when adjusting the volume level of Zone 2 n TONE button 57 103 Used to adjust the tone bass and treble o HDMI OUT button 41 Used to set the Monitor Out setting p MOVIE TV button...

Page 10: ...Auto Tuning mode is selected for AM or FM radio Goes off when Manual Tuning mode is selected TUNED 59 Lights up when tuned to a radio station FM STEREO 59 Lights up when tuned to a stereo FM station e...

Page 11: ...n model TX SR806 other than North American model TX SA806 Rear Panel 1 2 9 bn bkblbm 8 7 4 56 3 cm cl co cp cn bs bt bq bp bo ck cqcr 1 2 bn 8 7 4 56 3 cm cl co cp cn bs bt bq bp bo ck cqcr 9bk 1 2 bn...

Page 12: ...TRIGGER OUT ZONE 2 This output can be connected to the 12 volt trigger input on a component in Zone 2 When Zone 2 is turned on on the AV receiver AV amplifier a 12 volt trigger signal is output h FM...

Page 13: ...dio output can be connected to the analog audio input on a multi channel power amplifier for when you want to use the AV receiver AV amplifier solely as a preampli fier The SUBWOOFER jack is for conne...

Page 14: ...er because the buttons may be pressed inadvert ently thereby draining the batteries The remote controller may not work reliably if the AV receiver AV amplifier is installed in a rack behind col ored g...

Page 15: ...hen changing set tings m AUDIO button 85 Used to change audio settings When the Audio TV Out setting is set to On page 95 this button is disabled n SLEEP button 58 Used with the Sleep function SP A B...

Page 16: ...left and right speakers Subwoofer The subwoofer handles the bass sounds of the LFE Low Frequency Effects channel The volume and quality of the bass output from your subwoofer will depend on its posit...

Page 17: ...SUBWOOFER to an input on your powered subwoofer as shown If your subwoofer is unpowered and you re using an external amplifier con nect the PRE OUT SUBWOOFER to an input on the amp Attaching the Spea...

Page 18: ...e sound quality and should be avoided If you use 4 or 5 speakers connect each of the two surround speakers to the SURR L R terminals Do not connect them to the SURR BACK L R terminals Be careful not t...

Page 19: ...eakers that support bi amping Refer to your speaker manual Bi amping Speaker Hookup Bi amping the Front Speakers 1 Connect the AV receiver AV amplifier s FRONT R positive terminal to the right speaker...

Page 20: ...odels Once your AV receiver is ready for use you ll need to tune into an FM radio station and adjust the position of the FM antenna to achieve the best possible reception 2 Use thumbtacks or something...

Page 21: ...antenna must be grounded in accordance with local regulations to prevent electrical shock haz ards Using a TV FM Antenna Splitter It s best not to use the same antenna for both FM and TV reception as...

Page 22: ...w Yellow Right Wrong Video Cable Jack Description HDMI HDMI connections can carry uncompressed stan dard or high definition digital video and audio and offer the best picture and sound quality Compone...

Page 23: ...signals are upconverted for the component video output or the HDMI output For optimal video performance THX recommends that video signals pass through the system without upconver sion e g component vi...

Page 24: ...put signals as they are HDMI input signals are not output Audio Connection Formats Audio equipment can be connected to the AV receiver AV amplifier by using any of the follow ing audio connection form...

Page 25: ...a TV or Projector Connection AV receiver AV amplifier Signal flow TV COMPONENT VIDEO MONITOR OUT Component video input MONITOR OUT S S Video input MONITOR OUT V Composite video input GAME TV IN L R A...

Page 26: ...Composite video output DVD FRONT L R Analog audio L R output DIGITAL COAXIAL IN 1 DVD Digital coaxial output DIGITAL OPTICAL IN 1 GAME TV Digital optical output Step 1 Video Connection Choose a video...

Page 27: ...acks to the 7 1 channel analog audio output on your DVD player If your DVD player has a 5 1 channel analog audio output don t connect anything to the AV receiver AV amplifier s SURR BACK L R jacks To...

Page 28: ...ite video output VCR DVR IN L R Analog audio L R output DIGITAL COAXIAL IN 2 VCR DVR Digital coaxial output DIGITAL OPTICAL IN 1 GAME TV Digital optical output Hint Step 1 Video Connection Choose a vi...

Page 29: ...ding VCR must be connected to a composite video output Similarly video signals connected to S Video inputs can only be recorded via S Video outputs If your TV VCR is connected to an S Video input the...

Page 30: ...output CBL SAT IN S S Video output CBL SAT IN V Composite video output CBL SAT IN L R Analog audio L R output DIGITAL COAXIAL IN 3 CBL SAT Digital coaxial output DIGITAL OPTICAL IN 2 CD Digital optica...

Page 31: ...osite video output GAME TV IN L R Analog audio L R output DIGITAL OPTICAL IN 1 GAME TV Digital optical output Step 1 Video Connection Choose a video connection that matches the game console or and the...

Page 32: ...R Analog audio L R output AUX INPUT DIGITAL Digital optical output Step 1 Video Connection Choose a video connection that matches the camcorder or and then make the connection A B Step 2 Audio Connect...

Page 33: ...Master Audio Your DVD player must also support HDMI output of the above audio formats About Copyright Protection The AV receiver AV amplifier supports HDCP High bandwidth Digital Content Protection 2...

Page 34: ...stening to an HDMI component through the AV receiver AV amplifier set the HDMI component so that its video can be seen on the TV screen on the TV select the input of the HDMI component connected to th...

Page 35: ...as a moving coil MC type cartridge you ll need a commercially available MC head amp or MC transformer Connect your turntable to the head amp or trans former and connect that to the AV receiver AV ampl...

Page 36: ...r DAT recorder TAPE IN L R TAPE OUT L R Analog audio L R output Analog audio L R input DIGITAL COAXIAL IN 3 CBL SAT Digital coaxial output DIGITAL OPTICAL IN 1 GAME TV Digital optical output c COAXIAL...

Page 37: ...er s PRE OUT SUBWOOFER jack Connecting a Power Amplifier 2 3 4 5 6 7 1 Power amplifier Powered subwoofer See Connecting a Powered Subwoofer on page 17 for more information 1 Front left speaker 2 Cente...

Page 38: ...ifier s GAME TV IN S jack Connecting an RI Dock Not all iPod models output video For information about which iPod models are supported by the RI Dock see the RI Dock s instruction manual AUDIO OUT L R...

Page 39: ...er manufacturer s components may cause a malfunction Some components may not support all u functions Refer to the manuals supplied with your other Onkyo components While Zone 2 is on the Auto Power On...

Page 40: ...eiver AV amplifier will enter Standby mode To prevent any loud surprises when you turn on the AV receiver AV amplifier always turn down the volume before you turn it off or Remote controller AV receiv...

Page 41: ...only You can specify the output resolution for the HDMI OUT and COMPONENT VIDEO MONITOR OUT and have the AV receiver AV amplifier upconvert the picture resolution as necessary to match the resolution...

Page 42: ...wed by the SETUP button The main menu appears onscreen If the main menu doesn t appear make sure the appropriate external input is selected on your TV 2 Use the Up and Down q w but tons to select 6 Mi...

Page 43: ...the RETURN button to return to the previous menu 1 2 1 2 MENU 1 Input Assign 2 Speaker Setup 3 Audio Adjust 4 Source Setup 5 Listening Mode Preset 6 Miscellaneous 7 Hardware Setup 8 Lock Setup MENU 1...

Page 44: ...ow buttons and ENTER button Video Input Setup 1 Press the RECEIVER button fol lowed by the SETUP button The main menu appears onscreen If the main menu doesn t appear make sure the appropriate externa...

Page 45: ...using its SETUP button arrow buttons and ENTER button Input selector Default assignment DVD IN1 VCR DVR CBL SAT IN2 GAME TV AUX TAPE TUNER TX SA806 only CD PHONO 1 Press the RECEIVER button fol lowed...

Page 46: ...Audio Input DVD VCR DVR CBL SAT GAME TV AUX TAPE TUNER CD PHONO COAX1 COAX2 COAX3 OPT1 FRONT OPT2 4 Use the Up and Down q w but tons to select an input selector and use the Left and Right e r buttons...

Page 47: ...enu appears 3 Use the Up and Down q w but tons to select 1 Speaker Set tings and then press ENTER The Speaker Settings menu appears If you change these settings you must run the auto matic speaker set...

Page 48: ...q w but tons to select 6 Miscella neous and then press ENTER The Miscellaneous menu appears 3 Use the Up and Down q w but tons to select 2 OSD Setup and then press ENTER The OSD Setup menu appears 6...

Page 49: ...appears onscreen If the main menu doesn t appear make sure the appropriate external input is selected on your TV 2 Use the Up and Down q w but tons to select 7 Hardware Setup and then press ENTER The...

Page 50: ...s Note DOCK can be selected for the TAPE input selector or GAME TV input selector but not both at the same time Changing the Input Display 1 Press the TAPE or GAME TV input selector button so that TAP...

Page 51: ...ement positions These are the other listening positions i e the places where the other listeners will sit You can measure up to six positions The following examples show some typical home theater seat...

Page 52: ...conditioners fluorescent lights home appliances light dimmers or other devices Cell phones should be turned off or placed away from all audio electron ics during the measurement process as Radio Frequ...

Page 53: ...ng screen appears 8 When the calculations are com plete the following screen appears Auto Speaker Setup Select Next to measure the next position or select Finish to calculate the Audyssey MultEQ room...

Page 54: ...l drivers are working The number of speakers detected on the second or third measurement was different to the number detected on the first measurement Make sure speakers that cannot be detected are co...

Page 55: ...interaction with the room you may notice irregular results when setting the level and or distance of the main speakers If this happens THX recommends setting them manually Using a Powered Subwoofer If...

Page 56: ...amplifier s HDMI OUT COMPONENT VIDEO MONITOR OUT or MONITOR OUT On some DVD players you may need to turn on the digital audio output 3 To adjust the volume use the MASTER VOLUME control or the remote...

Page 57: ...following information can typically be displayed for input sources If the input signal is analog no format information is displayed If the input signal is PCM the sampling frequency is displayed If th...

Page 58: ...t turned off When you connect a pair of headphones the listening mode is set to Stereo unless it s already set to Stereo Mono Direct or Pure Audio Only the Stereo Direct Pure Audio and Mono listen ing...

Page 59: ...AM and FM stations directly by enter ing the appropriate frequency Using the Tuner Use the TUNER input selector button to select either AM or FM In this example FM has been selected Each time you pres...

Page 60: ...s use the PRESET e r buttons to select a preset from 1 through 40 4 Press the MEMORY button again to store the station or channel The station or channel is stored and the preset number stops flashing...

Page 61: ...y type see page 62 TP Traffic Program This allows you to search for RDS radio stations that broadcast traffic information see page 62 Notes In some cases the text characters displayed on the AV receiv...

Page 62: ...ESET e r buttons to select the type of program you want See the table on page 61 RT PTY TP 1 3 4 2 3 To start the search press ENTER The AV receiver searches until it finds a station of the type you s...

Page 63: ...ources allowing you to overdub audio onto your video recordings This function takes advantage of the fact that when an audio only input source i e TAPE TUNER CD or PHONO is selected the video input so...

Page 64: ...with the Remote Controller LISTENING MODE buttons MOVIE TV button This button selects the listening modes intended for use with movies and TV MUSIC button This button selects the listening modes inten...

Page 65: ...ot be selected with some source formats Dolby PLII Music Dolby PLIIx Music 3 4 Dolby PLII Game Dolby PLIIx Game 3 Dolby EX 4 Neo 6 Cinema Neo 6 Music THX Cinema Music Games 5 5 Available only when usi...

Page 66: ...ack speakers or Powered Zone 2 is being used Dolby Pro Logic II is used 3 3 Cannot be selected with some source formats 3 Dolby PLII Music Dolby PLIIx Music 2 3 3 Dolby PLII Game Dolby PLIIx Game 2 Do...

Page 67: ...ic Dolby PLIIx Music 2 3 Dolby PLII Game Dolby PLIIx Game 2 Dolby EX 3 Neo 6 Cinema Neo 6 Music THX Cinema Music Games 4 4 Available only when using surround speakers Dolby PLII Dolby PLIIx Movie THX...

Page 68: ...d 2 2 Cannot be selected with some source formats Dolby PLII Music Dolby PLIIx Music 1 2 Dolby PLII Game Dolby PLIIx Game 1 Dolby EX 2 Neo 6 Cinema Neo 6 Music THX Cinema Music Games 3 3 Available onl...

Page 69: ...ng used Dolby Pro Logic II is used 2 2 Cannot be selected with some source formats 2 Dolby PLII Music Dolby PLIIx Music 1 2 2 Dolby PLII Game Dolby PLIIx Game 1 Dolby Digital EX Dolby EX 2 2 Neo 6 Cin...

Page 70: ...d back speakers or Powered Zone 2 is being used Dolby Pro Logic II is used 3 3 Cannot be selected with some source formats Dolby PLII Music Dolby PLIIx Music 2 3 Dolby PLII Game Dolby PLIIx Game 2 Dol...

Page 71: ...be used instead of Dolby Pro Logic IIx Dolby PLIIx Movie Button Use this mode with any stereo or Dolby Surround Pro Logic movie e g TV DVD VHS Dolby PLIIx Music Button Use this mode with any stereo or...

Page 72: ...r use with DTS ES Matrix soundtracks which use a matrix encoded back channel for 6 1 7 1 channel playback Use it with DVDs that bear the DTS ES logo especially those with a DTS ES Matrix soundtrack DT...

Page 73: ...hannel playback THX Surround EX Button This mode expands 5 1 channel sources for 6 1 7 1 channel playback It s especially suited to Dolby Digital EX sources THX Surround EX also known as Dolby Digital...

Page 74: ...2 Speaker Setup 1 Speaker Settings 2 Speaker Configuration 3 Speaker Distance 4 Level Calibration 5 Equalizer Settings 6 THX Audio Setup 3 Audio Adjust 1 Multiplex Mono 2 PLIIx Neo 6 3 Dolby EX 4 Thea...

Page 75: ...um crossover frequencies Please note that THX recommends any THX main speakers be set to 80Hz THX If you set up your speakers using the Automatic Speaker Setup function please make sure manually that...

Page 76: ...step 5 is set to anything other than Full Band Full Band cannot be selected here 8 Use the Up and Down q w but tons to select Surr Back and then use the Left and Right e r buttons to select a crossov...

Page 77: ...nd a subwoofer If you re using THX certified speakers select Off THX Note This procedure can also be performed on the AV receiver AV amplifier by using its SETUP button arrow buttons and ENTER button...

Page 78: ...s 2 Speaker Configuration 3 Speaker Distance 4 Level Calibration 5 Equalizer Settings 6 THX Audio Setup 4 Use the Up and Down q w but tons to select 3 Speaker Dis tance and then press ENTER The Speake...

Page 79: ...ally by the Automatic Speaker Setup function see page 51 1 6 2 5 1 2 3 2 Speaker Setup 1 Speaker Settings 2 Speaker Configuration 3 Speaker Distance 4 Level Calibration 5 Equalizer Settings 6 THX Audi...

Page 80: ...Level Calibration 5 Equalizer Settings 6 THX Audio Setup 3 Use the Up and Down q w but tons to select 5 Equalizer Set tings and then press ENTER The Equalizer Settings menu appears 4 Use the Left and...

Page 81: ...ncy You can select 63Hz 160Hz 400Hz 1000Hz 2500Hz 6300Hz or 16000Hz And for the subwoofer 25Hz 40Hz 63Hz 100Hz or 160Hz The volume at each frequency can be adjusted from 6 to 6 dB in 1 dB steps Tip Lo...

Page 82: ...s to turn off BGC On Select this to turn on BGC Note This setting is only available if THX Ultra2 Select2 Subwoofer is set to Yes step 5 7 Use the Up and Down q w but tons to select Loudness Plus and...

Page 83: ...c II Music or Dolby Pro Logic IIx Music listening mode Audio Adjust Functions 1 Remote controller Press the RECEIVER button fol lowed by the SETUP button The main menu appears onscreen If the main men...

Page 84: ...ines how Dolby EX encoded signals are handled This setting is unavailable if no surround back speakers are connected This setting is effective with Dolby Digital Dolby Digital Plus and Dolby TrueHD on...

Page 85: ...material there will be little or no effect when you select the different options On the TX SA806 this procedure can also be per formed on the AV amplifier by using its LATE NIGHT button Re EQ Functio...

Page 86: ...dio input signals with a sampling rate below 48 kHz and analog audio input signals The Music Opti mizer is disabled when the Pure Audio or Direct listen ing mode is selected Speaker Levels You can adj...

Page 87: ...listening mode Only listening modes that can be used with each input signal format can be selected see page 65 The Last Valid option means that the listening mode selected last will be used Analog PC...

Page 88: ...2 dB to 12 dB in 1 dB steps Note IntelliVolume does not apply for Zone 2 5 When you ve finished press the SETUP button The setup menu closes Source Setup 1 Remote controller Press the input selector b...

Page 89: ...then press ENTER Repeat this step to enter up to 10 characters 2 When you ve finished to store a name be sure to use the arrow q w e r buttons to select OK and then press ENTER Otherwise it will not...

Page 90: ...t is 0 20 is the strongest green 20 is the strongest red Saturation With this setting you can adjust saturation Can be adjusted from 20 to 20 in steps of 1 default is 0 20 is the weakest color 20 is t...

Page 91: ...the range is Last dB 81 dB to 18 dB To use the same volume level that was used when the AV receiver AV amplifier was turned off select Last The Power On Volume cannot be set higher than the Maximum Vo...

Page 92: ...eration details are displayed onscreen when an AV receiver AV amplifier function is adjusted Even when On is selected operation details may not be output if the input source is connected to a COMPO NE...

Page 93: ...IRIUS Otherwise select None See the sepa rate Satellite Radio Guide for more information Antenna Aiming on North American model The ID of the Sirius Connect Home Tuner is displayed here You must sign...

Page 94: ...to match the resolu tion supported by your TV See the Video Resolution Chart on page 122 to see how the AV receiver AV amplifier handles video input at different resolutions Note For optimal video per...

Page 95: ...ough its speakers When TV Control is enabled this setting is set to Auto With some TVs and input signals no sound may be output even when this setting is set to On When the Audio TV Out setting is set...

Page 96: ...patible components that support it and may not work properly with some components due to their settings or compatibility When set to Enable power consumption will increase When set to Enable regardle...

Page 97: ...esn t appear make sure the appropriate external input is selected on your TV 2 Use the Up and Down q w but tons to select 8 Lock Setup and then press ENTER The Lock Setup menu appears 3 Use the Left a...

Page 98: ...n input selector see page 44 When this option is selected the relevant HDMI digital and analog inputs will be checked for the presence of an audio signal If signals are present at more than one input...

Page 99: ...ting Your Zone 2 Speakers to an Amp in Zone 2 This setup allows 7 1 channel playback in your main lis tening room and 2 channel stereo playback in Zone 2 with a different source in each room Hookup Us...

Page 100: ...r by using its SETUP button arrow buttons and ENTER button Setting the Powered Zone 2 1 Press the RECEIVER button fol lowed by the SETUP button The main menu appears onscreen If the main menu doesn t...

Page 101: ...doesn t appear make sure the appropriate external input is selected on your TV 2 Use the Up and Down q w but tons to select 7 Hardware Setup and then press ENTER The Hardware Setup menu appears 3 Use...

Page 102: ...orth American model you can also select XM or SIRIUS To select the same source as that of the main room press the ZONE 2 button repeatedly until Z2 Selector Source appears on the display Note You cann...

Page 103: ...l balance and tone functions have no effect on the ZONE 2 PRE OUT when the Zone2 Out setting is set to Fixed page 101 1 AV receiver AV amplifier On the AV receiver AV amplifier press the ZONE 2 button...

Page 104: ...plifier located in the cabinet via the con necting block Using a Multiroom Kit with Other Components In this setup an IR emitter is connected to the AV receiver AV amplifier s IR OUT jack and placed i...

Page 105: ...with u page 113 Onkyo RI Dock with u page 112 Entering Remote Control Codes REMOTE MODE RECEIVER DISPLAY Number buttons 1 Look up the appropriate remote control code in the separate Remote Control Cod...

Page 106: ...h an u cable and an analog audio cable RCA See page 39 for details 2 Enter the appropriate remote control code for the REMOTE MODE button DVD button 31612 Onkyo DVD player with u CD button 71327 Onkyo...

Page 107: ...ENTER buttons Used to navigate menus and select items f SETUP button Displays a menu g 1 3 2 5 4 7 6 buttons Play Pause Stop Rewind Fast forward Previous and Next These buttons works for combination...

Page 108: ...button works as a 10 button or button l DISPLAY button Displays information about the current disc title chapter or track including elapsed time remaining time total time and so on m MUTING button 58...

Page 109: ...orders setup menu h Previous 7 button Previous or instant replay function i Number button Enter numbers The 0 button enters 11 on some components The 10 button works as a 10 but ton or button j DISPLA...

Page 110: ...red buttons or A B C D buttons f Number buttons Enter numbers The 10 button works as a 10 button or button g DISPLAY button Displays information h MUTING button 58 Mutes or unmutes the AV receiver AV...

Page 111: ...playback function g SEARCH buttons Used to locate specific points h Number buttons Used to enter track numbers and times for locating specific points The 10 button works as a 10 button or button i DI...

Page 112: ...ER buttons Used to navigate menus and select items d Previous 7 button Restarts the current song Press it twice to select the previous song e Rewind 5 button Press and hold to rewind f Pause 3 button...

Page 113: ...ay not work prop erly with some cassette tapes c Rewind and Fast Forward 5 4 buttons The Rewind 5 button starts rewind The Fast Forward 4 button starts fast forward d Reverse Play t button Starts reve...

Page 114: ...be lost and will have to be learned all over again so don t discard your other remote controllers Deleting Learning Commands 1 While holding down the REMOTE MODE button for the mode in which you want...

Page 115: ...3 seconds While holding down the RECEIVER button press and hold down the MACRO button 1 or 2 until the RECEIVER but ton lights up about 3 seconds 2 Press the buttons whose actions you want to program...

Page 116: ...Speaker Impedance 4 16 Input Sensitivity Output Level and Impedance 1 Vp p 75 Component andS VideoY 0 7 Vp p 75 Component PB CB PR CR 0 28 Vp p 75 S Video C 1 Vp p 75 Composite Component Video Freque...

Page 117: ...format Check the digital audio output setting on the con nected device On some game consoles such as those that support DVD the default setting is off With some DVD Video discs you need to select an a...

Page 118: ...maximum possible volume is reduced by 6 dB Noise can be heard Using cable ties to bundle audio cables with power cords speaker cables and so on may degrade the audio performance so don t do it An audi...

Page 119: ...ppear when the input signal from the HDMI IN is output to a device connected to the HDMI OUT Reception is noisy FM stereo reception is noisy or the FM STEREO indicator doesn t appear Relocate your ant...

Page 120: ...og audio connection RCA between the compo nent and AV receiver AV amplifier even if they are connected digitally page 39 The functions Auto Power On Standby and Direct Change don t work for components...

Page 121: ...ed to an S Video input connect your TV to an S Video output If the video source is connected to a composite video input connect your TV to a composite video output 2 On the main menu select 1 Input As...

Page 122: ...i HDMI 1080p 1080i 720p 480p 480i COMPONENT 1080i 720p 480p 480i S VIDEO 480i COMPOSITE 480i PAL HDMI 1 COMPONENT S VIDEO COMPOSITE 1080p 1080i 720p 576p 576i 1080i 720p 576p 576i 576i 576i HDMI 1080p...

Page 123: ...123 Memo...

Page 124: ...Fax 201 785 2650 http www us onkyo com ONKYO EUROPE ELECTRONICS GmbH Liegnitzerstrasse 6 82194 Groebenzell GERMANY Tel 49 8142 4401 0 Fax 49 8142 4401 555 http www eu onkyo com ONKYO EUROPE UK Office...

Reviews: