background image

2

1. Read Instructions – All the safety and operating instructions

should be read before the appliance is operated.

2. Retain Instructions – The safety and operating instructions

should be retained for future reference.

3. Heed Warnings – All warnings on the appliance and in the op-

erating instructions should be adhered to.

4. Follow Instructions – All operating and use instructions should

be followed.

5. Water and Moisture – The appliance should not be used near

water – for example, near a bathtub, washbowl, kitchen sink,
laundry tub, in a wet basement, or near a swimming pool, and
the like.

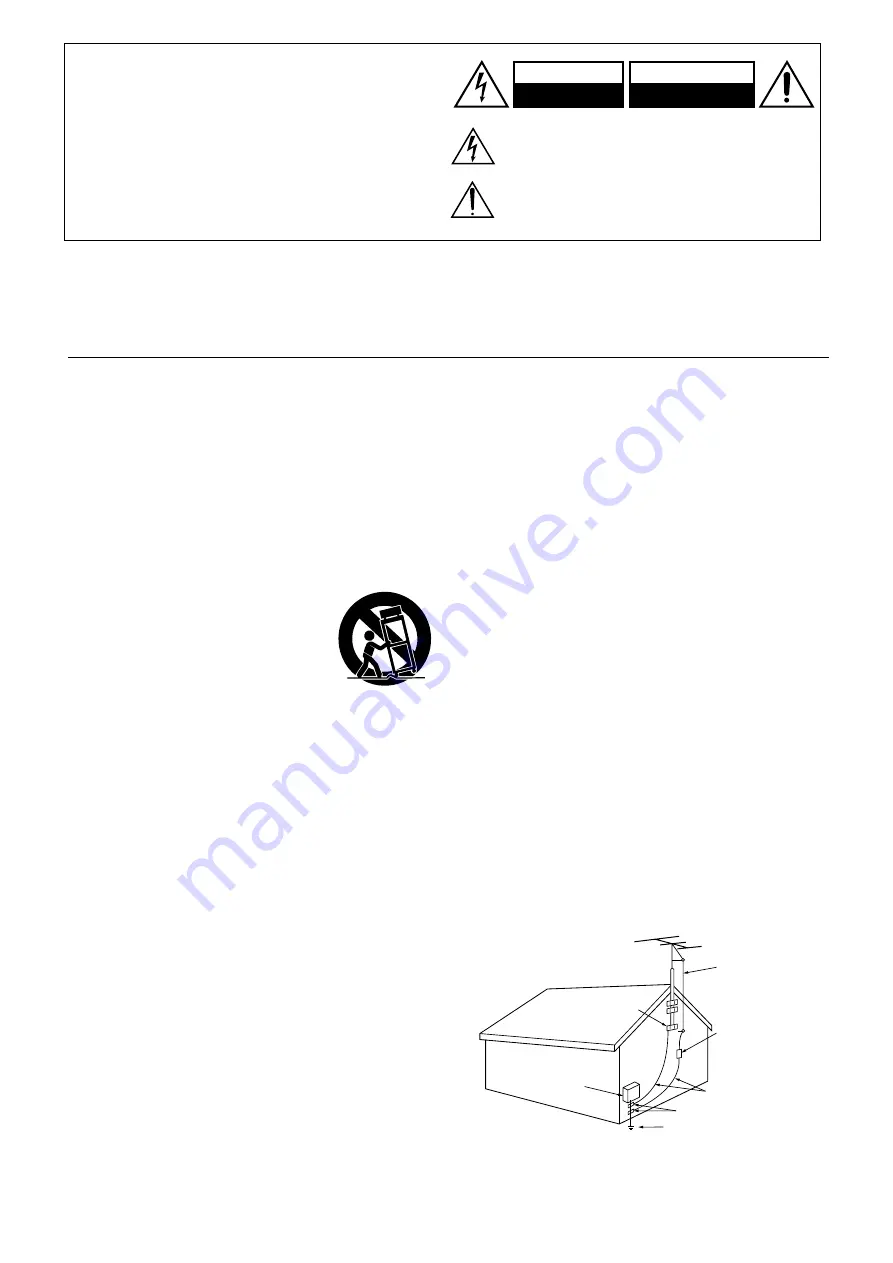
6. Carts and Stands – The appliance

should be used only with a cart or stand
that is recommended by the manufac-
turer.

6A.An appliance and cart combination

should be moved with care. Quick
stops, excessive force, and uneven sur-
faces may cause the appliance and cart
combination to overturn.

7. Wall or Ceiling Mounting – The appliance should be mounted

to a wall or ceiling only as recommended by the manufacturer.

8. Ventilation – The appliance should be situated so that its loca-

tion or position does not interfere with its proper ventilation. For
example, the appliance should not be situated on a bed, sofa,
rug, or similar surface that may block the ventilation openings;
or if placed in a built-in installation, such as a bookcase or cabi-
net that may impede the flow of air through the ventilation open-
ings, there should be free space of at least 20 cm (8 in.) and an
opening behind the appliance.

9. Heat – The appliance should be situated away from heat sources

such as radiators, heat registers, stoves, or other appliances (in-
cluding amplifiers) that produce heat.

10. Power Sources – The appliance should be connected to a power

supply only of the type described in the operating instructions or
as marked on the appliance.

11. Polarization – If the appliance is provided with a polarized

plug having one blade wider than the other, please read the
following information:
The polarization of the plug is a safety feature. The polarized
plug will only fit the outlet one way. If the plug does not fit
fully into the outlet, try reversing it. If there is still trouble, the
user should seek the services of a qualified electrician. Under
no circumstances should the user attempt to defeat the
polarization of the plug.

12. Power-Cord Protection – Power-supply cords should be

routed so that they are not likely to be walked on or pinched by
items placed upon or against them, especially near plugs, conve-
nience receptacles, and the point where they exit from the appli-
ance.

13. Cleaning – The appliance should be cleaned only as recom-

mended by the manufacturer.

14. Power Lines – An outdoor antenna should be located away

from power lines.

15. Nonuse Periods – The power cord of the appliance should be

unplugged from the outlet when left unused for a long period of
time.

16. Object and Liquid Entry – Care should be taken so that objects

do not fall and liquids are not spilled into the enclosure through
openings.

17. Damage Requiring Service – The appliance should be

serviced by qualified service personnel when:
A. The power-supply cord or the plug has been damaged; or
B. Objects have fallen, or liquid has been spilled into the

appliance; or

C. The appliance has been exposed to rain; or
D. The appliance does not appear to operate normally or

exhibits a marked change in performance; or

E. The appliance has been dropped, or the enclosure damaged.

18. Servicing – The user should not attempt to service the appliance

beyond that described in the operating instructions. All other
servicing should be referred to qualified service personnel.

19. Outdoor Antenna Grounding – If an outside antenna is con-

nected to the receiver, be sure the antenna system is grounded so
as to provide some protection against voltage surges and built up
static charges. Article 810 of the National Electrical Code,
ANSI/NFPA 70, provides information with regard to proper
grounding of the mast and supporting structure, grounding of
the lead-in wire to an antenna-discharge unit, size of grounding
conductors, location of antenna-discharge unit, connection to
grounding electrodes, and requirements for the grounding elec-
trode. See Figure 1.

FIGURE 1:
EXAMPLE OF ANTENNA GROUNDING AS PER NATIONAL
ELECTRICAL CODE

Important Safeguards

WARNING:

TO REDUCE THE RISK OF FIRE OR ELECTRIC SHOCK, 
DO NOT EXPOSE THIS APPLIANCE TO RAIN OR 
MOISTURE.

CAUTION:

TO REDUCE THE RISK OF ELECTRIC SHOCK, DO NOT 
REMOVE COVER (OR BACK). NO USER-SERVICEABLE 
PARTS INSIDE. REFER SERVICING TO QUALIFIED 
SERVICE PERSONNEL.

The lightning flash with arrowhead symbol, within an equilateral 
triangle, is intended to alert the user to the presence of uninsulated 
“dangerous voltage” within the product’s enclosure that may be of 
sufficient magnitude to constitute a risk of electric shock to persons.

The exclamation point within an equilateral triangle is intended to 
alert the user to the presence of important operating and maintenance 
(servicing) instructions in the literature accompanying the appliance.

WARNING

RISK OF ELECTRIC SHOCK

DO NOT OPEN

RISQUE DE CHOC ELECTRIQUE

NE PAS 

OUVRIR

AVIS

ANTENNA
DISCHARGE UNIT
(NEC SECTION 810-20)

GROUNDING CONDUCTORS
(NEC SECTION 810-21)

GROUND CLAMPS

POWER SERVICE GROUNDING
ELECTRODE SYSTEM
(NEC ART 250, PART H)

NEC – NATIONAL ELECTRICAL CODE

ELECTRIC
SERVICE
EQUIPMENT

GROUND
CLAMP

ANTENNA
LEAD IN
WIRE

S2898A

PORTABLE CART WARNING

S3125A

Summary of Contents for TX-DS777

Page 1: ...onnecting speakers 10 Connecting power amplifiers 12 Connecting an equalizer 13 Connecting the power 13 Making antenna connections 14 Appendix Using the remote controller 49 Programming the remote con...

Page 2: ...as recom mended by the manufacturer 14 Power Lines An outdoor antenna should be located away from power lines 15 Nonuse Periods The power cord of the appliance should be unplugged from the outlet whe...

Page 3: ...rician For U S model Note to CATV system installer This reminder is provided to call the CATV system installer s atten tion to Article 820 40 of the NEC ANSI NFPA 70 which provides guidelines for prop...

Page 4: ...nt 6 low impedance drive DVD audio capability Wide Range amplifier technology Discrete output stage circuits for all channels High quality extruded heat sink Oversized power transformer TX DS777 105 W...

Page 5: ...ndicator approx 5 m 16 feet Installing the remote controller batteries 1 Remove the battery compartment cover by pressing the tab and lifting up the cover 2 Insert two AA R6 or UM 3 size batteries int...

Page 6: ...PLAY DIGITAL OUTPUT DIGITAL INPUT COAXIAL 1 COAXIAL 2 OPTICAL 1 OPTICAL 2 OPTICAL FRONT FRONT CENTER SUB WOOFER SURROUND FRONT CENTER CD PHONO SUB WOOFER SURROUND AMP IN PRE OUT GND MONITOR OUT S V S...

Page 7: ...NT SPEAKERS B MULTI CHANNEL INPUT AV RECEIVER CAUTION SPEAKER IMPEDANCE 6 OHMS MIN SPEAKER ANTENNA AM FM 75 AC OUTLETS AC 120V 60Hz SWITCHED TOTAL 120W 1A MAX MODEL NO TX DS777 Capacity is total 120 w...

Page 8: ...instruction manual of each component when making any connections Video Disc Player Digital video equipment or Video cassette recorder AUDIO OUT VIDEO PUT AUDIO IN VIDEO IN AUDIO OUT VIDEO OUT VIDEO IN...

Page 9: ...sed the assigned digital input is used instead of the corresponding analog input See page 23 29 2 Connect your second video cassette deck 3 Connect your DVD player to COAXIAL or OPTICAL whichever appr...

Page 10: ...aker systems Before connecting the speakers place them correctly by consulting the instruction manuals that came with your speakers For surround playback see Using the listening modes on page 34 the c...

Page 11: ...to produce optimum sound quality when speakers with impedances within the specified ranges are connected Please check the following information and choose speakers with appropriate impedances for the...

Page 12: ...IGITAL INPUT COAXIAL 1 COAXIAL 2 OPTICAL 1 OPTICAL 2 OPTICAL FRONT FRONT CENTER SUB WOOFER SURROUND FRONT CENTER CD PHONO SUB WOOFER SURROUND AMP IN PRE OUT GMD MONITOR OUT S V S IN DVD MULTI CHANNEL...

Page 13: ...STAND BY AV RECEIVER TX DS777 POWER OFF ON A SPEAKERS B TI CH INPUT MUL FM AM PHONO CD TAPE VIDEO 1 DVD VIDEO 4 VIDEO 3 VIDEO 2 D O W N U P FM MUTE MODE CHARACTER MEMORY SP SYS SETUP MODE AUDIO ADJUST...

Page 14: ...Insert the end of the cable 2 Clamp it in place with pliers 4 Re install the cover Directional Iinkage Do not use the same antenna for both FM and TV or VCR recep tion since the FM and TV or VCR sign...

Page 15: ...ock grounding is necessary Follow item 19 of the Important Safeguards on page 2 when you install the outdoor antenna Connecting the AM loop antenna The AM loop antenna is for indoor use only Set it in...

Page 16: ...his button you can follow in reverse the sequence in which you have displayed each setting screen Finally the on screen display disappears Press the EXIT button The on screen display disappears immedi...

Page 17: ...ose Mode Normal Immediate Display ON Character Position Input Selector screen page 27 32 Rec Selector screen page 45 Listening Mode Setup screen page 38 Speaker Setup screen page 19 Screen Setup scree...

Page 18: ...R 6 Select the size of your surround speakers Large Large surround speakers are used Small Small surround speakers are used None Surround speakers are NOT used 7 Press the SMART SCAN CONTROLLER This c...

Page 19: ...he right or left edge of the button to set a parameter Subwoofer Set whether or not a subwoofer is connected Yes A subwoofer is connected No A subwoofer is NOT connected Front Select the size of your...

Page 20: ...r Press the SMART SCAN CONTROLLER 7 SW appears Set the distance from the subwoofer 8 Press the SMART SCAN CONTROLLER The speaker distance setup has been completed Loudspeaker Position Time Synchroniza...

Page 21: ...ained on the page 18 19 If the speaker level is set to 1dB or higher the maximum level indi cated on the display will change if you raise the volume level Setting the speaker Level Using the on screen...

Page 22: ...Test Tone ON 3 Press the SMART SCAN CONTROLLER The test tone is output and Turn SSC Up appears 4 Gently rotate the SMART SCAN CONTROLLER clockwise and just before sound is distorted press the SMART S...

Page 23: ...aker level Playing a digital source Digital Input Setup SPEAKERS A PCM DIGITAL DIRECT STEREO 3 4 Bass Peak Setup Bass Peak Level Limiter Yes Peak Level 18dB Starting The Test Tone Bass Peak Setup 1 Tu...

Page 24: ...NING UP DOWN but ton In FM if this button is held continuously for more than 0 5 sec onds the frequencies are scanned automatically FM auto tuning made When a broadcast is received scanning stops The...

Page 25: ...an be stored in the memory SPEAKERS A DSP AUTO TUNED CHARACTER MEMORY 3 PRESET MODE ADJ PUSH TO ENTER PRESET MODE ADJ PUSH TO ENTER 4 5 PRESET MODE ADJ PUSH TO ENTER 2 CHARACTER MEMORY 3 PRESET MODE A...

Page 26: ...1 Press the desired input selector button or the MULTI CH INPUT button The selected source name appears on the display If you have selected DVD CD VIDEO 1 VIDEO 2 VIDEO 3 or TAPE perform Digital Input...

Page 27: ...sound is heard from the speakers check the following items When you have selected DVD CD VIDEO 1 3 or TAPE check the digital input setup is correct See page 23 Make sure that the input signal format...

Page 28: ...ing process Analog Analog audio signal processing The audio signals input from the equipment connected to the analog input jacks are played PCM PCM signal processing A decoding process is executed onl...

Page 29: ...gi tal input jacks OPTICAL1 2 COAXIAL1 2 to connect the DTS source 2 If you play a CD or LD that supports DTS when the Auto matic or Digital setting is selected you may hear a noise for a short while...

Page 30: ...ay changes each time you press the DISPLAY button dur ing playback The European model allows you to receive RDS broadcasts See page 46 for details DISPLAY SPEAKERS A DSP AUTO TUNED ch SPEAKERS A DSP A...

Page 31: ...le levels with the on screen display 1 Press the OSD MENU button 2 Select Listening mode Setup and then press the right edge of the ENTER Cursor button 3 Select Listening Mode and then press the right...

Page 32: ...E AUDIO button and then the TUNER button Using the on screen display 1 Press the OSD MENU button 2 Select Input Selector and then press the right edge of the ENTER Cursor button 3 Select Input and the...

Page 33: ...Input Level Setup Left 0dB Center 5dB Right 0dB Left Sur 0dB Left Sur 0dB Subwoofer 10dB 3 3 Remote controller Setting the MULTI CHANNEL INPUT To play back an input source you connected with the MULT...

Page 34: ...modes MONO MOVIE TX DS777 only This mode is suitable for play back monaural recordings such as old movie soundtracks The center channel delivers unprocessed original sound whereas the other channels...

Page 35: ...ER DOWN TUNING UP THX DTS SURROUND MODE LISTENING MODE STEREO DIRECT DIGITAL ANALOG CH LEVEL DIMMER 3 MASTER VOLUME control knob 2 Use the LISTENING MODE buttons to select the desired listening mode a...

Page 36: ...oded in Dolby Digital sometimes you may see a brief message in the front panel display which will read Dial Norm XdB X being a numeric value Dialogue Normalization serves to let you know if the source...

Page 37: ...en the speakers are installed in a full configuration right left front center and right left surround speakers Without surround speakers set the listening mode to STEREO 3 Stereo or Direct Input sourc...

Page 38: ...LER to change the parameter setting 4 Press the SMART SCAN CONTROLLER 2 3 AUDIO ADJUSTMENT Listening Mode Setup Listening Mode Mono Movie Front Effect ON Reflect Level 0dB Reverb Level 0dB Room Size M...

Page 39: ...rce will be played as it is without any further reverberation Note The Front Effect function is effective only on the Action Musical MonoMovie Orchestra Unplugged Studio Mix and TV Logic sound Reflect...

Page 40: ...the ENTER Cursor button 3 Select Video Assign Setup and then press the right edge of the ENTER Cursor button Video Assign Setup screen is displayed When the cursor is on TAPE you can press the lower e...

Page 41: ...name 4 Press the TUNING DOWN UP button to select the character you wish to change 5 Rotate the SMART SCAN CONTROLLER to select the character you wish to enter and then press the SMART SCAN CONTROLLER...

Page 42: ...f each speaker in the range of 12 to 12 dB The adjustment range of the subwoofer is 30 to 10 dB To use the above setting from now on The above setting will be overwritten by the speaker output levels...

Page 43: ...ou wish to set IntelliVolume by pressing the corresponding input selector button 2 Press the SP SYS SETUP button repeatedly until IntelliVolume appears Press the SMART SCAN CON TROLLER Now you can per...

Page 44: ...nnected to the TAPE VIDEO 1 VIDEO 2 jacks Then start playing the source component you selected in step 1 Notes If you change the input source during recording you will record the signals from the newl...

Page 45: ...jack Notes If you change the input source during recording you will record the audio signals from the newly selected input source and the video signals assigned to that input source You cannot record...

Page 46: ...receives characters that cannot be displayed correctly This is not a malfunction PTY Classifications in Europe None No program type News reports Reports on current events and happenings Current affair...

Page 47: ...the displayed RDS information changes as shown at left If the current station you are listening to is not an RDS station only the frequency appear When RT signals are received it takes about 15 secon...

Page 48: ...m size Mid Multi ch input Left 0dB Center 0dB Right 0dB R Sur 0dB L Sur 0dB Subwoofer 0dB Digital input DVD OPT2 VIDEO1 COAX1 VIDEO2 None VIDEO3 COAX2 VIDEO4 None TAPE None CD OPT1 Intellivolume CD 0d...

Page 49: ...the POWER STNBY button will activate the power standby mode SEND LEARN indicator This indicator acts as a guide when commands are programmed into or sent by the remote controller It also warns the use...

Page 50: ...oward the sensor area on the DVD player 1 Press the MODE DVD button 2 Press the desired DVD operation button POWER ON STNBY Turning the power on and off to the DVD player DVD SET DVD setup DVD player...

Page 51: ...yo tape deck Note First connect an Onkyo tape deck using the zconnection See page 7 1 Press the MODE AUDIO TAPE button 2 Press the desired tape deck operation button Playback Stop Rewind Fast forward...

Page 52: ...MD recorder have already been pro grammed into the buttons on the RC 392M You may program other remote controller codes into these buttons If you wish to restore the Onkyo preset codes after you progr...

Page 53: ...cator flashes three times quickly then the RC 392M exits Learning mode Resume Step 1 Erasing a learned code from a MODE button 1 Press and hold down the MODE button from which you wish to erase the le...

Page 54: ...ress the MACRO MODE button to complete program ming The SEND LEARN indicator flashes twice slowly Repeat Steps 1 3 to program other series of button operations into another MODE button 4 Check to see...

Page 55: ...a while During transmission point the remote controller toward the device to be controlled Note You may program up to 16 button operations into the MACRO DI RECT button If you try to program the 17th...

Page 56: ...troller button operation from the MACRO DIRECT button 1 Press and hold down any one of the MODE buttons and press the MACRO DIRECT button Then release the but tons When you press the MODE button the S...

Page 57: ...he batteries in the correct direction After inserting the batteries release the buttons The SEND LEARN indicator flashes slowly 3 Press the ENT button The SEND LEARN indicator lights up for about ten...

Page 58: ...incorrect Turntable and speakers are too close together Stylus of turntable pick up is worn Turntable stylus tip is dirty Treble control too high AM loop antenna is not attached Noise from electrical...

Page 59: ...proper OSD selector setting Improper connection Improper video is assigned The digital input selector is not set properly The TV or monitor is not set to receive the out put signals from the receiver...

Page 60: ...2 3 4 VIDEO Composite 1 Vp p 75 ohms Output Level Impedance VIDEO 1 2 MONITOR VIDEO Composite 1 Vp p 75 ohms TX DS676 AMPLIFIER SECTION Continuous Average Power output FTC All channels 85 watts per c...

Page 61: ...to change without notice Power supply and voltage vary depending on the area in which the unit is purchased TX DS676 TUNER SECTION FM Tuning Range 87 5 108 0 MHz 50 kHz steps Usable Sensitivity Mono...

Page 62: ...indicator c Sleep indicator d PCM digital indicator e Listening mode or Digital input format indicators The MPEG indicator appears on the European model TX DS777 TX DS676 and the worldwide model TX DS...

Page 63: ...5 MODE buttons 13 27 49 56 6 DISPLAY DVD SET button 49 50 7 CH buttons 32 49 8 EXIT RETURN button 16 17 50 9 PREV CH button This button is not used for this receiver 10 TRACK button 50 11 CD TAPE DVD...

Page 64: ...Tel 201 825 7950 Fax 201 825 8150 E mail onkyo onkyousa com ONKYO EUROPE ELECTRONICS GmbH Industriestrasse 20 82110 Germering GERMANY Tel 089 84 93 20 Fax 089 84 93 226 E mail info onkyo de ONKYO CHI...

Reviews: