background image

40

Symptom

No power.

No picture.

No sound.

The picture occasionally
distorts.

Unstable brightness or
picture noise.

The DV-C501 won’t start
playback.

You hear a voice that
describes the action.

The buttons do not work.

The remote controller
does not work properly.

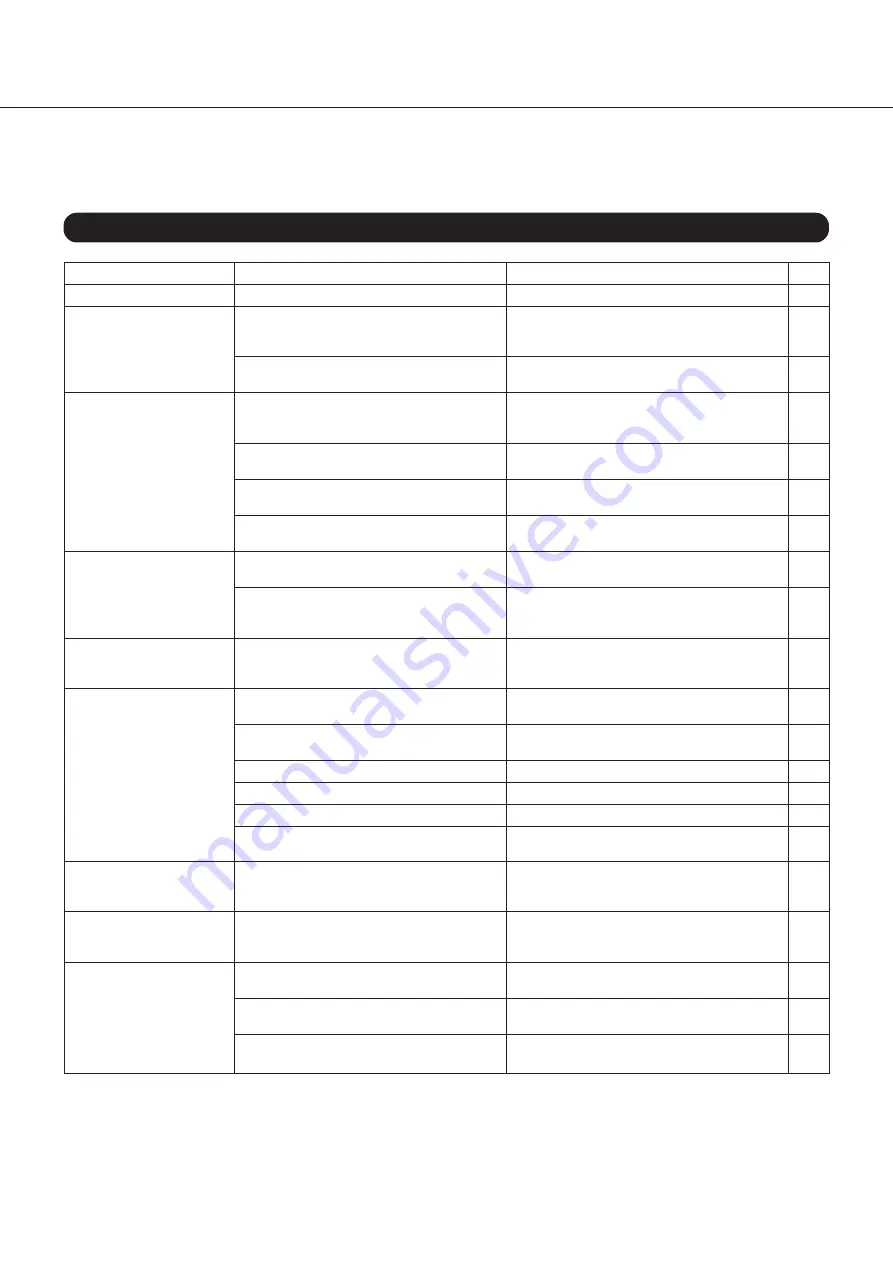
Troubleshooting

If your DV-C501 does not seem to work as expected, check the following table for the possible cause before
contacting your ONKYO dealer or service.

Symptoms and Corrections

This unit contains a sensitive microcomputer that, under certain circumstances, might fail to operate due to excessive noise
interference. In such case, disconnect the power cord from the wall outlet, wait five seconds and connect the power cord again.

Cause

• The power plug is disconnected.

• The TV is not set to receive DVD signal

output.

• The video cable is not securely connected.

• The DV-C501 has not been selected as

input source on the amplifier or receiver.

• The audio cables are not securely

connected.

• The device you connected the DV-C501’s

audio outputs to is switched off.

• The output sound type setting is not

correct.

• The disc is dirty.

• The Fast Forward or Fast Reverse function

is active.

• This is caused by the copy protection

signal.

• No disc is inserted.

• The inserted disc cannot be read.

• The disc is placed upside down.

• The disc is not placed within the guide.

• The disc is dirty.

• The Parental Lock function is on.

• The DVD video disc contains an Extended

Audio Feature track that is being played
back.

• Power supply fluctuations or other

abnormalities such as static electricity may
interrupt correct operation.

• The remote controller is not pointed at the

remote sensor of the DVD Changer.

• The remote controller is too far from the

DVD Changer.

• The batteries in the remote controller are

exhausted.

Correction

• Insert the power plug firmly.

• Select the appropriate video input mode on

the TV so that the DV-C501’s picture appears
on the TV screen.

• Connect the video cable into the jacks

securely.

• Select the input source on the amplifier or

receiver that corresponds to the input(s) the
DV-C501 is connected to.

• Connect the audio cable securely.

• Switch on the amplifier or receiver.

• Select the appropriate audio settings.

• Eject the disc and clean it.

• Sometimes a small amount of picture

distortion may be noticeable. This is not a
malfunction.

• Connect the DV-C501 directly to the TV.

Never route its picture signal via a VCR or
other video device (“daisy chain”).

• Insert a disc. (Check whether the “DVD”,

“VCD” or “CD” indicator lights.)

• Insert a playable disc. (Check the disc type

and color system.)

• Insert the disc with the playback side down.

• Place the disc correctly inside the guide.

• Clean the disc.

• Cancel the Parental Lock function or select

another Parental Lock level.

• Switch off the Extended Audio Feature.

• Turn the power on or off with the POWER

button. Or disconnect the power plug and
insert it into the wall outlet again.

• Point the remote controller at the remote

sensor of the DVD Changer.

• Operate the remote controller within about

5 m.

• Replace the batteries with new ones.

Page

10, 11

14

10-13

14

10-13

29,32
36

9

10

42

9

14

14

9

32,33
37

36

8

8

8

Summary of Contents for DV-C501

Page 1: ...to obtain optimum performance and listening enjoyment from your new DVD Changer Please retain this manual for future reference Contents 6 10 14 32 Getting Started Connections Function Setup Before Usi...

Page 2: ...attended and unused for long periods of time unplug it from the wall outlet and disconnect the antenna or cable system This will prevent damage to the appliance due to lightning and power line surges...

Page 3: ...in accordance with the instructions may cause harmful interference to radio communications However there is no guarantee that interference will not occur in a particular installation If this equipment...

Page 4: ...vier dirt dampen a soft cloth in a weak solution of mild detergent and water wring it out dry and wipe off the dirt Following this dry immediately with a clean cloth Do not use rough material thinners...

Page 5: ...VD Changer as CD player 25 Random Playback 26 DVD Video Disc Functions 27 Zooming in 27 Changing the Camera Angle 27 Audio Playback Settings 28 Using the Subtitle Feature 30 Using The On Screen Displa...

Page 6: ...h title DVD chapter CD track and time Still Frame to view single frames Frame Advance Slow Motion for DVD playback without sound at 1 2 1 4 or 1 8th the normal speed Fast Forward Reverse x2 x8 x30 Las...

Page 7: ...Y ONKYO EUROPE ELECTRONICS GmbH K OTSU declare in own responsibility that the ONKYO product described in this instruction manual is in compliance with the corresponding technical standards such as EN6...

Page 8: ...out six months but this will vary depending on usage Using the remote controller Point the remote controller toward the remote control sensor Notes Place the unit away from strong light such as direct...

Page 9: ...y in their case Stacking or placing objects on unprotected discs may cause warping and scratches About VIDEO CDs Your DVD Changer can play back version 1 1 and 2 0 Video CDs Version 2 0 discs support...

Page 10: ...C501 and your TV set Do not route the video signal through your VCR or other video component Otherwise the picture may be distorted due to the DVD disc s copy protection Connecting a power cable 1 Co...

Page 11: ...everal options for audio playback you can use the analog or one of the digital audio outputs If your amplifier only provides analog inputs use the DV C501 s ANALOG OUTPUTs and select them via the on s...

Page 12: ...Note Do not forget to select the DVD Changer s AUDIO OUTPUTs Analog 2ch See Audio Settings on page 36 for details Connecting to an Amplifier Equipped with a Dolby Digital Decoder Playback of Dolby Di...

Page 13: ...S encoded discs requires that you establish a digital connection with the amplifier The selection of the DV C501 s DIGITAL OUTPUT depends on the type of digital input provided on your amplifier Use ei...

Page 14: ...upplied remote controller to switch on the DVD Changer The display lights up and the STANDBY indicator goes dark Press the OPEN CLOSE button The disc drawer opens and the disc indicator lights up See...

Page 15: ...d to close the disc drawer Selecting the desired disc for playback Press one of the DISC 1 5 buttons on the main unit or on the remote controller The DV C501 starts playing the first title of the sele...

Page 16: ...a menu screen will appear after playback of a movie is completed Prolonged display of such a menu may damage your television set permanently etching that image onto the screen To avoid this press the...

Page 17: ...r resumes playback from the location where playback was stopped Resuming Playback from the Beginning of the Current Title If you do not wish to resume playback from the position where it was stopped p...

Page 18: ...g a title the DVD Changer resumes playback from the point where you first pressed the TOP MENU button Title Selection with the Numeric Buttons If the selected DVD video disc contains Title numbers you...

Page 19: ...NTER DOWN PLAY UP Numeric buttons SEARCH TOP MENU CLEAR DOWN UP Note Press the CLEAR button if you do not wish to start playback from the Chapter number you have just entered before pressing the PLAY...

Page 20: ...ime Location Here is how to enter the time location of the scene or passage you wish to play back Press the SEARCH button several times until the following message is dis played Time Enter the desired...

Page 21: ...Off Video CDs audio CDs Repeat Repeat Repeat Off Track All Repeat Disc To cancel the Repeat function at any time press the CLEAR button Note Some discs do not support these Repeat functions 2 3 4 Rep...

Page 22: ...hapter number Use the numeric buttons on the remote controller to enter the numbers you wish to include in your Memory se quence Use the buttons to move the cursor to the D T or C column depending on...

Page 23: ...page press the MEMORY button Correcting an entry of a previously programmed step a Use the buttons to move the cursor to the corre sponding memory number b Select the entry D T or C you wish to chang...

Page 24: ...uttons within 8 seconds after pressing NEXT SELECTION Otherwise the Next Selection function will be cancelled In that case start again with step 1 Tip You can also use the DISC SKIP button on the DV C...

Page 25: ...ll audio CDs will be repeated in sequence The indication changes in 2 3 seconds Press the CD PLAY button again to cancel CD Mode The RPT message disappears and the REPEAT indicator goes dark again to...

Page 26: ...ion with Memory playback see page 22 Select Random Off if you do not need the Random function after all Playing Chapters or Tracks in Random Order DVD VCD CD This Random function allows you to activat...

Page 27: ...zoom playback see above The magnification level varies depending on the picture size you select see page 32 35 Angle 2 Angle 3 Angle 1 Changing the Camera Angle One of the new features of the DVD car...

Page 28: ...ge Selecting Sound Channels of Video CDs A Video CD may have left and right sound channels with different information sound track on one channel dialogues on the other or one language on one channel a...

Page 29: ...M DIGITAL ANALOG DIGITAL ANALOG DIGITAL ANALOG OUTPUT jack OUTPUT jacks OUTPUT jack OUTPUT jacks OUTPUT jack OUTPUT jacks Dolby Digital Bitstream 48 kHz 16 bit Bitstream 48 kHz 16 bit 48 kHz 16 bit 48...

Page 30: ...ON OFF button during playback The current subtitle setting is displayed for about three seconds Subtitle ENG On 1 Good morning Appears for about 3 seconds Subtitles The subtitles are displayed at the...

Page 31: ...rent chapter Current sound channel setting Current subtitle setting Current angle setting See page 39 for a list of abbreviations of the languages Bit Rate Mbit sec Amount of picture sound and subtitl...

Page 32: ...next page for an overview of the available functions Here is what the icons stand for Language related settings Picture related settings Audio output settings Settings related to the on screen menu f...

Page 33: ...ange of the audio data i e to reduce the difference between loud and soft sounds Karaoke Vocal Allows you to switch on or mute the vocal track of a DVD Karaoke disc Extended Audio Features Allows you...

Page 34: ...LANGUAGE Disc Menu Language PA Audio Language ENG French German Spanish Italian Others Subtitle Language On Screen Language ENG English Code P A e Press the ENTER button Note Some DVD video discs may...

Page 35: ...Light Brighter than in Normal 7 5 IRE PAL Auto DVD PAL Choose this option when you wish to watch DVD video discs in the PAL video format This requires that you connect the DVD Changer to a PAL televi...

Page 36: ...2 channel PCM so that you lose the surround information See also the table on page 29 Dynamic Range Control DVD Dynamic Range Control allows you to compress the dynamic range of a DVD s sound track so...

Page 37: ...re displayed when you pause playback of a DVD video disc See also page 16 Auto For normal use The image quality should be sufficient for most applications Frame Still pictures are clearer thanks to a...

Page 38: ...n screen 3 Press the buttons to select the country whose standards were used to rate the DVD video disc See the information supplied with the DVD for details U S Canadian models Other area models Leve...

Page 39: ...elandic IW Hebrew JI Yiddish JW Javanese KA Georgian KK Kazakh KL Greenlandic KM Cambodian KN Kannada KS Kashmiri KU Kurdish KY Kirghiz LA Latin Abbreviation of the Language Language LN Lingala LO Lao...

Page 40: ...yed back Power supply fluctuations or other abnormalities such as static electricity may interrupt correct operation The remote controller is not pointed at the remote sensor of the DVD Changer The re...

Page 41: ...button 14 STANDBY ON button 14 STANDBY ON indicator 14 DISC1 5 buttons 14 15 CD PLAY button 25 STOP button 16 PLAY button 15 20 22 26 OPEN CLOSE button 14 DISC SKIP button 14 24 DIMMER button 42 DISP...

Page 42: ...elapsed time DVD Display VIDEO CD When closing the disc tray Example Total number of tracks Total playing time of the disc During playback Example Playing track 6 Elapsed time of the current title So...

Page 43: ...N CLOSE button 14 PAUSE STEP button 16 SLOW button 17 SETUP button 32 POWER button 14 FR button 16 FF button 16 PLAY button 15 20 22 26 DOWN button 19 STOP button 16 17 38 UP button 19 MENU button 15...

Page 44: ...put 1 0 V p p 75 negative sync pin jack X 1 S video output Y 1 0 V p p 75 negative sync Mini DIN 4 pin X 1 C 0 286 V p p 75 Component Video output Y 1 0 V p p 75 negative sync pin jack X 1 PB PR 0 7 V...

Reviews: