background image

57

3


Taking a test

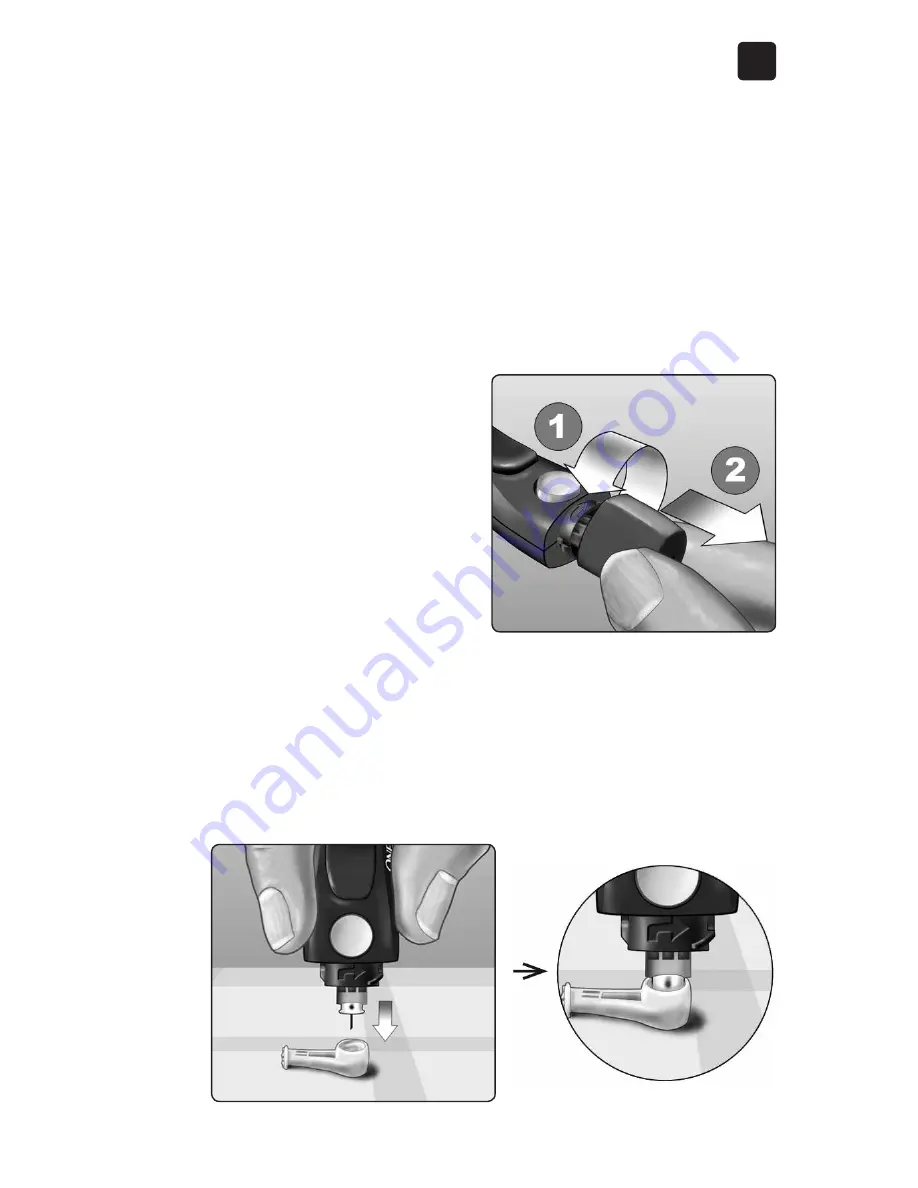
Removing the used lancet

NOTE: 

This lancing device has an ejection feature, so you 

do not have to pull out the used lancet.

1. Remove the lancing device cap 

Remove the cap by turning 
it counterclockwise and then 
pulling it straight off of the 
device. 

2. Cover the exposed lancet tip 

Before removing the lancet, place the lancet protective 
cover on a hard surface then push the lancet tip into the 
cupped side of the cover. 

Summary of Contents for VerioFlex

Page 1: ...Blood Glucose Monitoring System Instructions for Use Owner s Booklet...

Page 2: ......

Page 3: ...1 Owner s Booklet Blood Glucose Monitoring System VerioFlex...

Page 4: ...Meter results are sent to the compatible devices either through BLUETOOTH Smart wireless or USB cable connection Every OneTouch Meter is designed to help you test your blood glucose and manage your d...

Page 5: ...On History Mode Past results Apply Sample Range Indicator Arrow Setting Mode Compatible Wireless Devices Visit www OneTouch com for information on which wireless devices are compatible with your OneTo...

Page 6: ...ith your system for safety related information Direct current Before you begin Before using this product to test your blood glucose carefully read this Owner s Booklet and the inserts that come with t...

Page 7: ...ious diseases even after you have performed cleaning and disinfection For more information see FDA Public Health Notification Use of Fingerstick Devices on More than One Person Poses Risk for Transmit...

Page 8: ...ting outside the body in vitro diagnostic use by people with diabetes at home as an aid to monitor effectiveness of diabetes control Limitations The OneTouch Verio Flex Blood Glucose Monitoring System...

Page 9: ...lex Meter BLUETOOTH Smart wireless technology BLUETOOTH Smart wireless technology is used by some smartphones and many other devices Your OneTouch Verio Flex Meter uses BLUETOOTH Smart wireless techno...

Page 10: ...modifications not expressly approved by the party responsible for compliance could void the user s authority to operate the equipment This device complies with Part 15 of the FCC Rules Operation is su...

Page 11: ...radio communications However there is no guarantee that interference will not occur in a particular installation If this equipment does cause harmful interference to radio or television reception whic...

Page 12: ...meter will not affect the operation of other nearby electronic devices Additionally other electronic devices should not affect the use of your meter WARNING The BLUETOOTH Smart feature on your meter...

Page 13: ...irplanes you should turn the BLUETOOTH Smart feature off See page 29 for more information BLUETOOTH Smart trademark The BLUETOOTH word mark and logos are owned by the Bluetooth SIG Inc and any use of...

Page 14: ...system 14 2 Setting up your system 24 Setting up your meter 24 Connecting to a compatible wireless device 29 Turning the meter off 35 3 Taking a test 36 Testing your blood glucose 36 Testing with cont...

Page 15: ...ting Your Settings 76 Editing time and date 76 Editing your range limits 77 6 Caring for your system 80 7 Battery 86 8 Troubleshooting your system 90 9 Detailed information about your system 100 10 In...

Page 16: ...1 Getting to know your system Your OneTouch Verio Flex Blood Glucose Monitoring System Included with your kit OneTouch Verio Flex Meter CR2032 lithium coin cell battery included Lancing device Lancet...

Page 17: ...mer Service As your partner in diabetes care we welcome you to contact us available 7 days a week 8 a m 10 p m Eastern Time at 1 888 567 3003 English 1 888 567 3010 Spanish or www OneTouch com NOTE If...

Page 18: ...are required but may not be included in your kit They are sold separately Refer to your meter carton for a list of included items OneTouch Verio Level 3 Control Solution vial with blue cap OneTouch V...

Page 19: ...lthcare professional You can use either OneTouch Verio Level 3 Control Solution or OneTouch Verio Level 4 Control Solution with your OneTouch Verio Flex Meter WARNING Keep the meter and testing suppli...

Page 20: ...18 1 Getting to know your system Meter Getting to know your OneTouch Verio Flex Blood Glucose Monitoring System...

Page 21: ...19 1 Getting to know your system...

Page 22: ...20 1 Getting to know your system Test strip Getting to know your OneTouch Verio Test Strip...

Page 23: ...you know if your current result is below above or within your range limits It does this by displaying your current result with a Range Indicator Arrow pointing to a corresponding Range Indicator Colo...

Page 24: ...The pre set low range limit is 70 mg dL and the pre set high range limit is 180 mg dL You can change these limits as needed to meet your needs See page 77 for details on the pre set range limits and o...

Page 25: ...23 1 Getting to know your system This page left blank intentionally...

Page 26: ...there may be a problem with the meter Contact Customer Service Contact us at 1 888 567 3003 NOTE If you turned the meter on for the first time by inserting a test strip instead of pressing you will no...

Page 27: ...SET icon will appear on the screen to indicate that the meter has entered setup mode Setting the time Hour will flash If the hour displayed is correct press to confirm If the hour displayed is not co...

Page 28: ...date setup Year will flash If the year displayed is correct press to confirm If the year displayed is not correct press or to change the year and press to confirm AM PM will flash If the AM PM display...

Page 29: ...d is correct press to confirm If the month displayed is not correct press or to change the month and press to confirm Day will flash If the day displayed is correct press to confirm If the day display...

Page 30: ...l appear in place of the three dashes along with the date and time the test was taken Adjusting the time and date settings after first time setup You can adjust the meter s time and date settings afte...

Page 31: ...ned on The symbol will appear on the meter screen when the BLUETOOTH Smart feature is on When the symbol is not present on the screen the BLUETOOTH Smart feature is off To turn the BLUETOOTH Smart fea...

Page 32: ...ble wireless device Multiple OneTouch Verio Flex Meters can be paired with your compatible wireless device For example your compatible wireless device can be paired with a meter at home and another at...

Page 33: ...r on using the button 2 The BLUETOOTH Smart feature is turned on by pressing and together The symbol will appear to indicate that the BLUETOOTH Smart feature is on 3 Open the OneTouch Reveal Mobile Ap...

Page 34: ...32 2 Setting up your system 4 Look for OneTouch and the last 4 characters of the meter serial number on the compatible wireless device display to correctly identify your meter...

Page 35: ...Example of PIN number display on meter CAUTION Make sure the PIN you enter on your compatible wireless device matches the PIN on your meter display If a PIN number unexpectedly appears on your meter...

Page 36: ...as indicated by If needed press and at the same time to turn the BLUETOOTH Smart feature on The Sync symbol flashes on the meter display Syncing Data will appear on the app to notify you that the met...

Page 37: ...f Press and hold for several seconds until the meter turns off Remove the test strip Your meter will turn off by itself if left alone for two minutes NOTE Following a glucose test the meter will still...

Page 38: ...Verio Flex Meter OneTouch Verio Test Strips Lancing device Sterile lancets 3 Taking a test NOTE Use only OneTouch Verio Test Strips Unlike some blood glucose meters no separate step to code your OneT...

Page 39: ...fter use to avoid contamination and damage Store unused test strips only in their original vial Do Not return the used test strip to the vial after performing a test Do Not re use a test strip that ha...

Page 40: ...eceiving a D xylose absorption test as it may cause inaccurately high results Do Not use the OneTouch Verio Family of Meters when PAM Pralidoxime is known or suspected to be in the whole blood sample...

Page 41: ...ould delay treatment decisions and lead to a serious medical condition The test strip vial contains drying agents that are harmful if inhaled or swallowed and may cause skin or eye irritation Do Not u...

Page 42: ...40 3 Taking a test Getting to know your OneTouch Delica Lancing Device...

Page 43: ...Touch Verio Flex Blood Glucose Monitoring System has not been evaluated for Alternate Site Testing AST Use only fingertips when testing with the system The OneTouch Delica Lancing System does not incl...

Page 44: ...r lancing device with anyone Always use a new sterile lancet each time you test Always keep your meter and lancing device clean See page 80 The meter and lancing device are for single patient use only...

Page 45: ...43 3 Taking a test Preparing the lancing device 1 Remove the lancing device cap Remove the cap by turning it counterclockwise and then pulling it straight off of the device...

Page 46: ...wn here so that the lancet fits into the lancet holder Push the lancet into the device until it snaps into place and is fully seated in the holder Twist the protective cover one full turn until it sep...

Page 47: ...45 3 Taking a test 3 Replace the lancing device cap Place the cap back onto the device turn clockwise to secure the cap Do Not overtighten...

Page 48: ...st adults Deeper punctures work well for people with thick or callused skin Turn the depth wheel to choose the setting NOTE A shallower fingertip puncture may be less painful Try a shallower setting f...

Page 49: ...on Insert a test strip into the test strip port with the gold side of the test strip and the two silver prongs facing you NOTE No separate step to code the meter is required The flashing blood drop ic...

Page 50: ...Repeated punctures in the same spot may cause soreness and calluses Before testing wash your hands thoroughly with warm soapy water Rinse and dry completely 1 Puncture your finger Hold the lancing de...

Page 51: ...op of blood Gently squeeze and or massage your fingertip until a round drop of blood forms on your fingertip NOTE If the blood smears or runs Do Not use that sample Dry the area and gently squeeze ano...

Page 52: ...pply the sample to the test strip You can apply blood to either side of the test strip Apply your sample to the opening of the channel Be sure to apply your sample immediately after you get a drop of...

Page 53: ...el 2 Wait for the channel to fill completely The blood drop will be drawn into the narrow channel The channel should fill completely The channel turns red and the meter will count down from 5 to 1 Blo...

Page 54: ...ite or the channel may be blocked from filling properly Do Not apply more blood to the test strip after you have moved the drop of blood away Do Not move the test strip in the meter during a test or y...

Page 55: ...ppropriate Range Indicator Color Bar on the meter as a visual reminder Example Below Range Result Example In Range Result Example Above Range Result CAUTION Do Not make immediate treatment decisions b...

Page 56: ...s may require immediate treatment according to your healthcare professional s recommendations Although this result could be due to a test error it is safer to treat first then do another test NOTE Whe...

Page 57: ...HI is displayed when your result is over 600 mg dL You may have severe hyperglycemia very high blood glucose Re test your blood glucose level If the result is HI again this indicates a severe problem...

Page 58: ...ults and you have followed all instructions in this Owner s Booklet call your healthcare professional Never ignore symptoms or make significant changes to your diabetes management program without spea...

Page 59: ...ll out the used lancet 1 Remove the lancing device cap Remove the cap by turning it counterclockwise and then pulling it straight off of the device 2 Cover the exposed lancet tip Before removing the l...

Page 60: ...ction control forward until the lancet comes out of the lancing device Return the ejection control to its back position If the lancet fails to eject properly cock the device again and then slide the e...

Page 61: ...ace the cap back onto the device turn clockwise to secure the cap Do Not overtighten It is important to use a new lancet each time you obtain a blood sample Do Not leave a lancet in the lancing device...

Page 62: ...cap Testing with control solution Control solution testing precautions OneTouch Verio Control Solution is used to check that the meter and test strips are working together properly and that the test...

Page 63: ...ge 36 for more information on testing CAUTION Do Not swallow or ingest control solution Do Not apply control solution to the skin eyes ears or nose as it may cause irritation Do Not use control soluti...

Page 64: ...vial of test strips If you suspect that the meter or test strips are not working properly If you have had repeated unexpected blood glucose readings If you drop or damage the meter Preparing your met...

Page 65: ...e the vial gently 2 Remove the vial cap and place it on a flat surface with the top of the cap pointing up 3 Squeeze the vial to discard the first drop 2 Wait for the flashing blood drop icon to appea...

Page 66: ...test 4 Wipe both the tip of the control solution vial and the top of the cap with a clean damp tissue or cloth 5 Squeeze a drop into the small well on the top of the cap or onto another clean non abso...

Page 67: ...ol solution 1 Hold the meter so that the side edge of the test strip is at a slight angle to the drop of control solution 3 Wait for the channel to fill completely 2 Touch the channel on the side of t...

Page 68: ...it of measure and for control solution and stored in the meter Control solution results can be seen when reviewing past results on the meter CAUTION Make sure you press or until the control solution i...

Page 69: ...printed on its label Compare the result displayed on the meter to either the OneTouch Verio Level 3 Control Solution or OneTouch Verio Level 4 Control Solution range printed on the test strip vial de...

Page 70: ...past its discard date Meter test strips and or control solution were not all at the same temperature when the control solution test was performed A problem with the meter Dirt or contamination in the...

Page 71: ...69 3 Taking a test Cleaning the control solution cap Clean the top of the control solution cap with a clean damp tissue or cloth...

Page 72: ...ood glucose and control solution test results and displays them in the order the tests were taken The symbol will appear on your screen when in History Mode 1 When the meter is off press and hold to t...

Page 73: ...ompatible wireless device must have the app running and have already been paired to the meter before sending a result NOTE The compatible wireless device must have the app open and have already been p...

Page 74: ...urned on and the app is running The meter is correctly paired with your compatible wireless device The BLUETOOTH Smart feature on both devices is running indicated by and the devices are within 26 fee...

Page 75: ...results to the compatible wireless device please call Customer Service Contact us at 1 888 567 3003 NOTE Inserting a test strip during the transmission will cancel the transfer of all results The sym...

Page 76: ...in diabetes care we welcome you to contact us available 7 days a week 8 a m 10 p m Eastern Time at 1 888 567 3003 English 1 888 567 3010 Spanish or www OneTouch com Connect only to a computer certifi...

Page 77: ...to the meter the meter display will show the flashing Sync symbol indicating that the meter is in communication mode Do Not insert a test strip while the meter is connected to a computer If you are un...

Page 78: ...s mode and your last glucose result screen will appear The adjusted time and date will be displayed once a new glucose test has been completed and the result appears on the screen NOTE You will not be...

Page 79: ...ent low range limit displayed and the number and range indicator arrow will flash NOTE The low and high range limits you set apply to all glucose test results This includes tests taken before or after...

Page 80: ...mit press or to change the value between 60 mg dL 110 mg dL and then press 2 Review the pre set high range limit displayed To accept the pre set high range limit press To edit the pre set high range l...

Page 81: ...its Changing your range limits does not affect how past results are displayed NOTE You will not be able to perform a glucose test until you finish editing the range limits NOTE You can use the OneTouc...

Page 82: ...ecting After use and exposure to blood all parts of this kit may transmit infectious diseases Disinfection is the only way to reduce your exposure to disease For cleaning information see page 82 and f...

Page 83: ...ormation on purchase options visit www onetouch com disinfection or contact Customer Service Contact us at 1 888 567 3003 Other products such as Clorox Disinfecting Wipes have not been tested and shou...

Page 84: ...ip port pointed down Be sure to squeeze out any excess liquid before you wipe the meter Wipe the outside of the lancing device cap Cleaning your meter lancing device and cap The meter lancing device a...

Page 85: ...ting 1 First clean your meter lancing device and cap prior to disinfecting Follow step 1 of page 82 2 Use a new Clorox Germicidal Wipe to wipe the outside of the meter lancing device and cap until the...

Page 86: ...quids dirt dust blood or control solution to enter the test strip port or the data port Do Not squeeze the germicidal wipe into test strip port Do Not spray cleaning solution on the meter and lancing...

Page 87: ...you see evidence of such damage If you have questions about cleaning or disinfecting or if you see evidence of physical damage contact Customer Service As your partner in diabetes care we welcome you...

Page 88: ...pe may result in your meter providing fewer tests than normal If the meter does not turn on you may need to replace the battery See below for instructions WARNING Certain batteries may cause leaking w...

Page 89: ...old battery Start with the meter turned off Remove the battery cover by sliding it downward Pull up on the battery ribbon to lift the battery out of the compartment Do Not remove the battery while th...

Page 90: ...ert one CR2032 lithium coin cell battery on top of the battery ribbon with the plus side up If the meter does not power on after you have replaced the meter battery check that the battery is correctly...

Page 91: ...ttery Dispose of the battery according to your local environmental regulations 4 Check your meter settings Removing the meter battery will not affect your stored results However you will need to check...

Page 92: ...is on but does not operate locks up contact Customer Service Contact us at 1 888 567 3003 What it means You may have a very low blood glucose level severe hypoglycemia below 20 mg dL NOTE When your gl...

Page 93: ...hyperglycemia over 600 mg dL NOTE When your glucose result is above 600 mg dL both the HI and the Range Indicator Arrow will flash on the meter screen What to do Re test your blood glucose level If t...

Page 94: ...o Move the meter and test strips to a cooler area Insert a new test strip when the meter and test strips are within the operating range 50 104 F If you do not get another HI t message you can proceed...

Page 95: ...o Move the meter and test strips to a warmer area Insert a new test strip when the meter and test strips are within the operating range 50 104 F If you do not get another LO t message you can proceed...

Page 96: ...ix possible error screens that may appear Along with an error number there is also an error code in the upper left corner of your meter screen If you cannot resolve the error with your meter contact C...

Page 97: ...sed either by a used test strip or a problem with the meter or test strip What to do Do Not use the meter Contact Customer Service Contact us at 1 888 567 3003 What to do Repeat the test with a new te...

Page 98: ...lied before the meter was ready What to do Repeat the test with a new test strip Apply a blood or control solution sample only after the flashing symbol appears on the display If this message continue...

Page 99: ...s added after the meter began to count down The test strip may have been damaged or moved during testing The sample was improperly applied There may be a problem with the meter What to do Repeat the t...

Page 100: ...will continue to appear until the battery is replaced What to do Replace the meter battery soon What it means The meter has detected a problem with the test strip Possible cause is test strip damage...

Page 101: ...o result in memory such as the first time use or when you have chosen to delete all the results after downloading to a computer What to do Contact Customer Service to report this occurrence unless thi...

Page 102: ...ted in plasma equivalent units However your meter result may differ from your lab result due to normal variation A result from your OneTouch Verio Flex Meter is considered accurate when it is within 1...

Page 103: ...You have eaten recently This can cause a result from fingertip testing to be up to 70 mg dL higher than a lab test using blood drawn from a vein 1 Your hematocrit is above 60 or below 20 You are sever...

Page 104: ...meter is working properly Do Not eat for at least 8 hours before you test your blood Take your meter and testing supplies with you to the lab Testing with your OneTouch Verio Flex Meter at the lab Tes...

Page 105: ...lts to those taken from another meter Comparing your blood glucose test results taken with this meter to your results taken from a different meter is not recommended Results may differ between meters...

Page 106: ...tings 3 0 V d c CR2032 lithium coin cell battery Battery type One replaceable 3 0 Volt CR2032 lithium coin cell battery or equivalent BLUETOOTH Smart Technology Frequency range 2 4 2 4835 GHz Operatin...

Page 107: ...e 50 104 F Relative humidity non condensing 10 90 Altitude up to 10 000 feet Hematocrit 20 60 Reported result range 20 600 mg dL Sample Fresh capillary whole blood Sample volume 0 4 L Size 2 05 W x 3...

Page 108: ...stem 9 Lay User Accuracy User Accuracy of the system was assessed at 3 clinical sites 172 patients tested their blood using the OneTouch Verio Flex System where results were compared to the YSI 2300 G...

Page 109: ...esults that match the laboratory test Within 5 mg dL Within 10 mg dL Within 15 mg dL 76 2 16 21 95 2 20 21 95 2 20 21 Fingertip Results for Glucose Concentrations 75 mg dL Percent and number of meter...

Page 110: ...ted on each of three test strip lots Results indicate that the OneTouch Verio Flex System compares well with a laboratory method of Subjects of Tests Slope Intercept mg dL 172 172 0 99 2 98 95 CI Slop...

Page 111: ...se mg dL Mean Glucose mg dL Standard Deviation mg dL Coefficient of Variation 40 36 5 0 83 2 26 90 88 5 1 72 1 95 130 127 9 2 50 1 95 200 199 3 3 94 1 98 350 344 6 6 18 1 79 Results show that the grea...

Page 112: ...olution Tests per Glucose Level Data generated using the OneTouch Verio Flex Meter Glucose Level Ranges mg dL Mean Glucose mg dL Standard Deviation mg dL Coefficient of Variation Level 2 25 49 37 14 0...

Page 113: ...Only Emissions of the energy used are low and not likely to cause interference in nearby electronic equipment The meter has been tested for immunity to electrostatic discharge as specified in IEC 613...

Page 114: ...g meter results to laboratory results 100 Compatible wireless devices 3 Control solution 62 Control solution discard and expiration dates 60 61 Control solution testing 60 66 68 Data port 18 Date sett...

Page 115: ...e 111 Hyperglycemia 55 91 Hypoglycemia 54 90 Icons 3 4 Infection reduce the chance 42 Intended use 6 Kit components 14 Lancing device 14 40 43 Limitations 6 mg dL 18 105 Pairing 30 31 PIN 33 Plasma ca...

Page 116: ...68 80 92 93 105 Test principle 7 Test strip 20 47 62 Test strip applying drop of blood 50 Test strip discard and expiration dates 37 Test strip silver prongs 20 Time setting 25 28 Turning meter off 3...

Page 117: ...115 Notes...

Page 118: ...116 Notes...

Page 119: ......

Page 120: ...7 045 046 7 498 132 7 846 312 8 449 740 8 529 751 and 8 398 664 Use of the monitoring device included herein is protected under one or more of the following U S patents 6 413 410 6 890 421 8 163 162 7...

Reviews: