background image

24

Overview

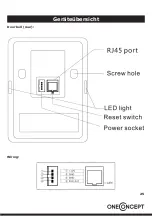
Door bell (front):

Summary of Contents for 10029293

Page 1: ...Doorguard 10029293 ...

Page 2: ...sen Sie keine Gegenstände aus Metall in dieses Gerät fallen Stellen Sie keine schweren Gegenstände auf dieses Gerät Reinigen Sie das Gerät nur mit einem trockenen Tuch Blockieren Sie keine Belüftungsöffnungen Verwenden Sie ausschließlich vom Hersteller oder vom qualifizierten Fachhandel empfoh lenes Zubehör Die Gewährleistung verfällt bei Fremdeingriffen in das Gerät Es wird keine Haftung für Schä...

Page 3: ...sischen sensori schen oder geistigen Fähigkeiten oder mangels Erfahrung und oder mangels Wissen benutzt zu werden es sei denn sie werden durch eine für ihre Sicherheit zuständige Person beaufsichtigt oder erhielten von ihr Anweisungen wie das Gerät zu benutzen ist Kinder sollten beaufsichtigt werden um sicherzustellen dass sie nicht mit dem Gerät spielen Technische Daten Artikelnummer 10029293 Str...

Page 4: ...4 Geräteübersicht Außen Gerät Front ...

Page 5: ...5 Geräteübersicht Außen Gerät Rückseite Verkabelungsdiagramm ...

Page 6: ...6 Geräteübersicht Klingel Rückseite Legen Sie drei AAA Batterien ein und schalten Sie die Klingel mit dem Schalter ein ...

Page 7: ...Kabel nach dem Diagramm auf S 5 Schrauben Sie die Rückseite an die gewünschte Stelle an einer Wand Montieren Sie die Gehäu sefront dann wieder an der Geäuse Rückwand Montieren Sie den Regen schutz mit den mitgelieferten Schrauben Software Download Laden Sie die für Ihr Smartphone kompatible App herunter Nutzen Sie das entsprechende QR Code hier ...

Page 8: ...ten auf das 2 Geben Sie die ID der Klingen ein auf der Rückseite des Geräts 3 Ist nur eine Person der Adminis trator ist das Passwort Feld leer Nach der Konfiguration können Sie dies ändern und Benutzerna men sowie Passwörter vergeben Tippen Sie auf NO Die Klingel wurde hinzugefügt ...

Page 9: ...n Stift und dann auf WiFi um die W Lan Verbindung zu nutzen Verbinden Sie falls dies noch nicht geschehen ist die Klingel mit dem Netzstrom und tippen Sie auf Weiter Pfeil Drücken Sie die Türklingel für 5 Sekunden Android Geräte verbinden Fol gen Sie den Instruktionen Wählen Sie das WLan das Sie konfigurieren möcheten Android ...

Page 10: ...Folgen Sie den Instruktio nen IOS Verbinden Sie mit TOP 0012 Das Standard Passwort ist 123456789 Wir empfehlen dies baldmöglichst zu ändern IOS Tippen Sie auf Einstellungen Zahnrad IOS Wählen Sie WIFI Settings Ändern Sie das Passwort Tippen Sie auf FINISH Das Gerät startet neu ...

Page 11: ...11 Bedienung der App Account bearbeiten Tippen Sie auf Einstellungen und dann auf USER Editieren Sie den Namen der Klin gel Editieren Sie die Nutzer Informa tionen ...

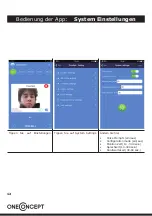
Page 12: ...pp System Einstellungen Tippen Sie auf Einstellungen Tippen Sie auf System Settings Ändern Sie hier Voice Prompts ein aus Configuration mode ein aus Monitor Zeit 10 300 sek Sprechzeit 10 300 sek Anrufwartezeit 30 90 sek ...

Page 13: ... welchen Telefonen über Ihr WLAN auf das Intercom zugegriffen werden kann Tippen Sie auf add oben rechts Geben Sie Nutzernamen und Passwörter für bis zu 7 Nutzer ein die Sie der White List hinzufügen möchten Nur der Administrator kann das Admin Passwort än dern Danach ist ein Neustart notwendig ...

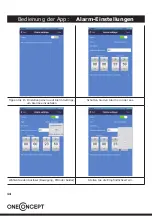
Page 14: ... App Alarm Einstellungen Tippen Sie im Einstellungsmenü auf Alarm Settings um Alarme einzustellen Schalten Sie den Alarm ein oder aus Wählen Sie den Auslöser Bewegung PIR oder beides Stellen Sie die Empfindlichkeit ein ...

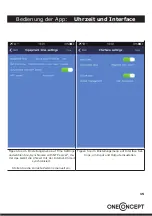
Page 15: ...smenü auf Time Settings und wählen Sie Synchronize with NTP server da mit das Gerät die Uhrzeit mit der Internet Uhrzeit synchronisiert Stellen Sie die korrekte Zeitzone manuell ein Tippen Sie im Einstellungsmenü auf Interface Set tings um Input und Output einzustellen ...

Page 16: ...16 Bedienung der App Firmware Update Tippen Sie auf CHECK THE UP DATE Tippen Sie auf YES zum Up graden Die neue Firmware wird herunter geladen ...

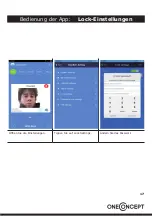
Page 17: ...17 Bedienung der App Lock Einstellungen Öffnen Sie die Einstellungen Tippen Sie auf Lock Settings Ändern Sie das Passwort ...

Page 18: ...ng der App Proaktives Monitoring Tippen Sie im Hauptfenster auf die Türklingel um direkt und proaktiv die Vorgänge vor Ihrer Haustür zu beobachten Antworten Sie mit Druck auf TALK Beenden Sie das Gespräch mit END ...

Page 19: ...e die App wie einen Türspion Tippen Sie auf die Türklingel und dann auf den grünen Hörer um ein Gespräch mit dem Gast vor der Tür zu be ginnen Drücken Sie den roten Hörer zum Auflegen Antworten Sie mit Druck auf TALK Beenden Sie das Gespräch mit END ...

Page 20: ...eitig alarmiert Tippen Sie auf den grünen Hörer um die Vorgänge vor Ihrer Haustür zu beobachten oder hängen Sie mit Click auf den roten Hörer auf Erscheint bei Beschädigung der Klingel System Reset Halten Sie den Klingelknopf 15 Sekunden lang gedrückt um das System in den Systemzustand zu versetzen ...

Page 21: ...r und elektro nischer Gerätschaften Richten Sie sich nach den örtlichen Regelungen und entsorgen Sie Altgeräte nicht über den Hausmüll Durch die regelkonforme Ent sorgung der Altgeräte werden Umwelt und die Gesundheit ihrer Mitmenschen vor möglichen negativen Konsequenzen geschützt Materialrecycling hilft den Verbrauch von Rohstoffen zu verringern Konformitätserklärung Hersteller CHAL TEC GmbH Wal...

Page 22: ...oduct may not be opened or changed The components cannot be serviced by the user The manufacturer is not responsible for any radio or TV interference caused by unauthorized modifications The appliance is not a toy Do not let children play with it Never let children insert foreign objects into the appliance Never clean the surface of the device with solvents paint thinners cleansers or other chemic...

Page 23: ... supply Outdoor Power adaptor 220V AC 12V DC Indoor 3 x Battery AAA Power consumption Max 3 8W Standby 1 5W Camera 1 4 F2 4 110 Resolution 640x480 Illumination 2 Lux Accessories Device Rain cover Bell Screws Cable Adaptor Instruction manual ...

Page 24: ...24 Overview Door bell front ...

Page 25: ...25 Geräteübersicht Door bell rear Wiring ...

Page 26: ...26 Overview Indoor Bell rear Insert three batteries AAA turn on with the switch ...

Page 27: ...ck of the housing off Connect the cables accor ding to the wiring diagram on p 25 Attach the back of the housing to a suitable area of your house wall Mount the housing front to the back again Mount the supplied rain cover with the two supplied screws to the door bell housing Software download ...

Page 28: ...k ADD Enter the doorbell ID on back of product Add user to be the primary administrator After successful configurazion of the network if the other cell phone users login please enter correct user name and password Choose NO Doorbell successfully added ...

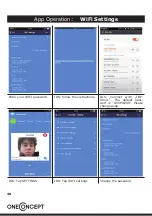
Page 29: ...AN cable If you use the wireless con nection click EDIT then choose the network Connect the doorbell to a mains outlet and press NEXT Press and hold your doorbell button for 5 seconds Android devices will automa tically connect Choose the WIFI you need to configure ...

Page 30: ...ration WiFi Settings Enter your WIFI password IOS follow the instructions IOS Connect with TOP 0012 The default pass wort is 123456789 Please change asap IOS Tap SETTINGS IOS Tap WIFI settings Change the password ...

Page 31: ...31 App Operation Edit Account Open the settings menu and tap on USER Edit the doorbell name Edit user information ...

Page 32: ...2 App Operation System Settings Open the settings menu Tap System settings Edit Voice Prompts on off Configuration mode on off Monitor time 10 300 secs Talk time 10 300 secs Call waiting time 30 90 secs ...

Page 33: ...m settings menu tap White List Settings to add Tap on ADD upper right corner Enter user names and pass words for up to 7 users you want to add to your white list The admin can edit the admin password Af ter that the device has to be restarted ...

Page 34: ...34 App Operation Alarm Settings In system settings menu tap alarm settings Set alarm on off Choose what triggers the alarm motion detec tion PIR both Set the detector sensitivity ...

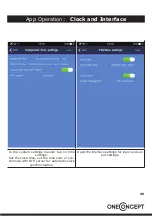
Page 35: ...nd Interface In the system settings menum tap on time settings Set the clock time set the time zone or syn chronize with NTP server for automatic clock synchronization Open the interface settings for input and out put settings ...

Page 36: ...36 App Operation Firmware Update Tap on CHECK THE UPDATE Choose YES Wait for the firmware update to download completely ...

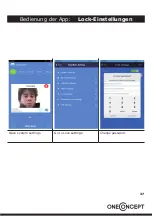
Page 37: ...37 Bedienung der App Lock Einstellungen Open system settings Go to Lock settings Change password ...

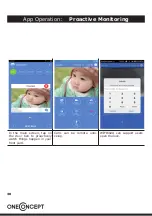
Page 38: ...8 App Operation Proactive Monitoring In the main screen tap on the door bell to proactively watch things happen in your front yard Calls can be remote unlo cking WIFI602A can support users open the lock ...

Page 39: ...p After answering a cell phone to any other phone will au tomatically hang up In the course of conversation you can remotely lock Press and hold the voice icon to send words to the doorbell Delay button you can extend this talk time Press END to hang up WIFI602A can support users open the lock ...

Page 40: ...all connected cell phones will be notified Tap the green phone to watch the events out side or tap red to hang up This will be shown when the device gets da maged System Reset Press and hold the door bell button for 15 seconds to re set to factory default ...

Page 41: ...s product is disposed of correctly you will hep prevent potential negative consequen ces for the environment and human health which could otherwise be caused by inappropriate waste handling of this product For more detailled informa tion about recycling of this product please contact your local council or your household waste disposial service Declaration of Conformity Manufacturer CHAL TEC GmbH W...

Reviews: