background image

PREVIOUS   |   CONTENTS   |   NEXT

One Talk—

T49G IP desk phone guide

User guide

5

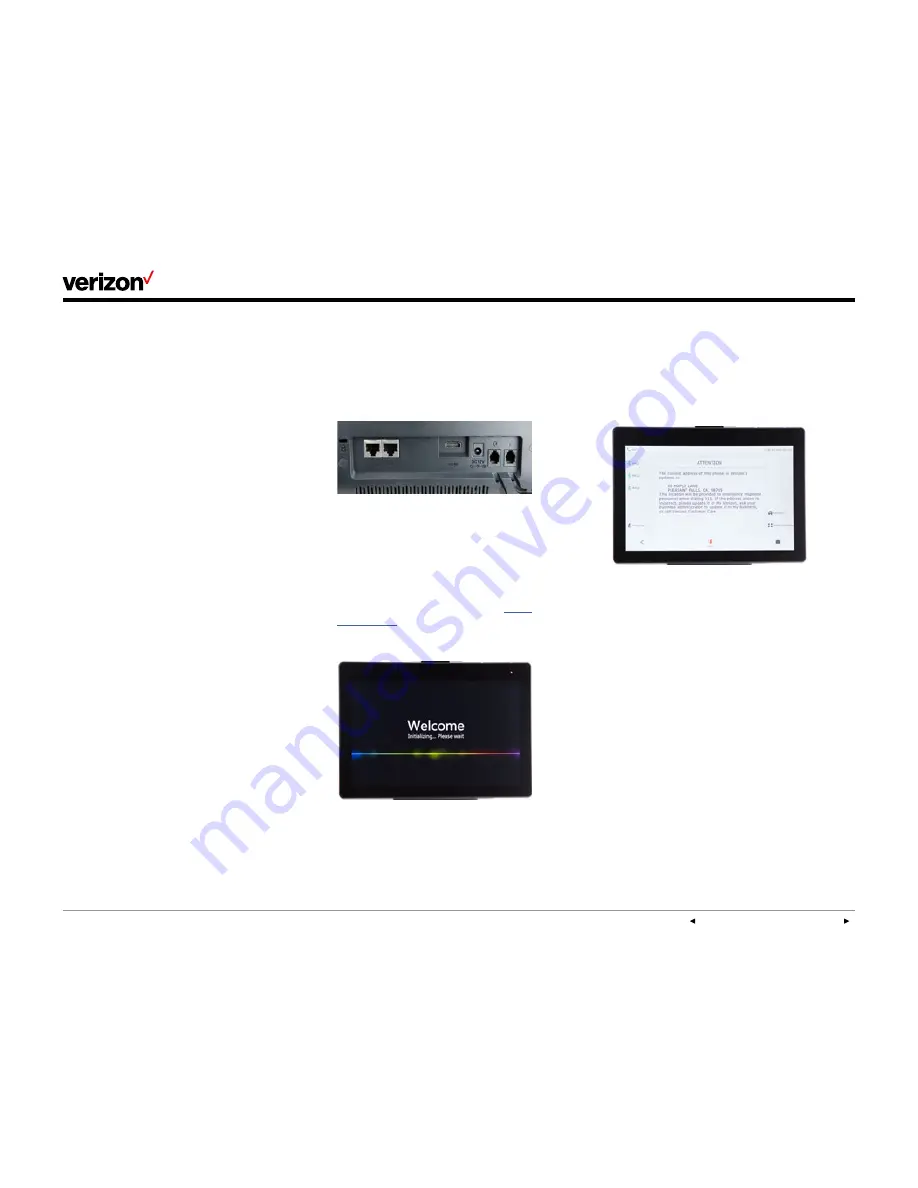
View E911 address.

Emergency 911 (E911) is a location technology 

that enables emergency responders to know the 

geographical location of a caller when dialing 911.
To view 911 address, tap the 

911 Address

 line key 

on the right side of your touch screen. 

Welcome

The T49G IP desk phone is an elegant solution 

for managers and teleworkers who need all the 

business features of One Talk

SM

 from Verizon 

combined with integrated HD video and audio 

communications. Its intuitive design enables video 

calling at the touch of a button, while the large, 

high-resolution touch screen and advanced data 

transmission capabilities will make you feel like 

you’re meeting face to face.
The T49G features integrated 802.11 a/b/g/n 

Wi-Fi and Bluetooth® 4.0 connectivity, 24 

programmable line keys, a centralized notification 

hub, and an advanced control center for fast 

access to your most popular features.
Most importantly, the T49G with One Talk 

seamlessly complements your mobile devices. 

So, wherever you are—at your desk or on the 

move—you never have to miss a call.

Initial setup

If your T49G desk phone is not already 

connected and set up for using the One Talk 

service, please verify the following with your 

system administrator before proceeding:

1.  You have a One Talk number.

2.  Your user information has been updated in the  

One Talk Admin Portal with your 911 address 

and email address.

3.  Your phone number has been included in any 

business group features.

4.  The preferred options for broadband and 

power connections.

Connect to broadband and power.

Connect the AC power as shown below.

Note: Your T49G desk phone should be used with 

the original Yealink power adaptor (12V/sA) only. 

The use of a third-party power adaptor may 

cause damage to the phone.


Wired Ethernet connection 

Attach Ethernet cable to the internet port on the 

back of the phone (see photo above).

Wireless Ethernet connection

As an alternative, you may connect to the network 

using your local Wi-Fi broadband connection. For 

setup instructions, please refer to 

Wi-Fi 

connectivity

 in the “Basic settings” section of this 

user guide. 

Summary of Contents for Verizon T49G

Page 1: ...One Talk T49G IP desk phone user guide www onetalk com T49G IP desk phone user guide...

Page 2: ...reen 7 Gestures 8 Control and notification center 8 LED light status 8 Indicators and notifications on touch screen 8 Customize your desk phone 9 Basic settings 9 Language preferences 9 Time and date...

Page 3: ...ge multiple lines 16 Ignore a call 16 End a call 16 Hold a call 16 Mute unmute 16 Redial 16 Advanced call features 17 One Talk feature access codes 17 Block a call 17 Bridge Line 18 Busy Lamp Field 18...

Page 4: ...ry settings 28 Specifications 29 Features 29 Accessibility features 30 Compatible accessories 31 Important customer information 31 WEEE warning 32 Customer feedback 32 GNU GPL information 32 Copyright...

Page 5: ...the T49G with One Talk seamlessly complements your mobile devices So wherever you are at your desk or on the move you never have to miss a call Initial setup If your T49G desk phone is not already con...

Page 6: ...Camera 2 Power indicator LED 3 Touch screen 4 Message key 5 Headset key 6 Mute key 7 Video key 8 Transfer key 9 Volume key 10 Speakerphone key 11 Redial key 12 Hold key 13 Keypad 14 Speaker 15 Shutte...

Page 7: ...y All calls Missed calls Placed calls Received calls Forwarded calls Feature settings Call Forward Anonymous Call Rejection Forward to Voicemail Device logs Navigating the touch screen The Idle screen...

Page 8: ...djust screen brightness 3 Notification center View missed or forwarded calls and access Voice Mail Tap or swipe from the bottom to hide this screen LED light status Power indicator LED LED status What...

Page 9: ...e and key tone sound settings Bluetooth headset setup Wi Fi connectivity Camera settings HDMI connection to external monitor Drag and scroll to view all To access Basic settings 1 Tap Menu to open the...

Page 10: ...From Basic settings tap Time Date then tap Time Date Format 2 Tap the Date Format field and select your preferred format in the pop up dialog box 3 Tap the Time Format field select 12 or 24 hour forma...

Page 11: ...hing to low light mode You can also turn off the backlight completely when inactive Configure backlight settings 1 From Display settings tap Backlight 2 Drag the Active Backlight Intensity slider to y...

Page 12: ...und settings is where you can configure ringtones and key tones keypad tones Selecting a different ringtone than those of your neighbors can help distinguish your phone from other incoming calls Key t...

Page 13: ...be connected at a time Pair your Bluetooth headset 1 From the Basic settings screen tap Bluetooth 2 Tap the On radio button Note You can also swipe down from the top of the screen to enter the contro...

Page 14: ...You can also set your preferences for whether you want incoming calls to be conducted as video or audio calls Tap Menu Basic Video Settings to make any of the following changes to your video settings...

Page 15: ...ialed numbers To view all lines press More Line Keys on the idle screen to toggle to 18 additional line keys Configure line keys for speed dial 1 Press and hold an unused line key for about five secon...

Page 16: ...ring a call Add video during a voice call Tap the Start Sharing icon at any time during an active voice call A two way video call will be established once the other party accepts the invitation to add...

Page 17: ...oming calls that restrict the display of their outgoing caller ID information Blacklist allows you to specify contact names and Call History numbers from which you do not wish to receive calls Enable...

Page 18: ...numbers will ring on your desk phone and you can use those other numbers to place calls directly from your own desk phone Configure another phone number to your desk phone Your organization s One Tal...

Page 19: ...ion of the parked call To configure Call Forwarding 1 Tap the Features soft key on the left side of the home screen 2 Tap Call Forward if it is not already selected and tap your preferred forwarding o...

Page 20: ...67 prior to dialing This will prevent your phone number or any other Caller ID information from appearing on the recipient s display Conference Calling One Talk 6 way Conferencing enables you to have...

Page 21: ...up Intercom line key 1 From the home screen press and hold an empty line key button 2 From the type field press Intercom 3 Enter the appropriate information then press Save Label Value extension numb...

Page 22: ...were missed placed received and forwarded You can view and delete call records place a call blacklist a contact or add a contact to your Local Directory from the Call History screen Call History can...

Page 23: ...ntact blacklist a number move contacts between groups or dial a contact number directly from the Local Directory The Local Directory can be accessed from the Idle screen Menu screen or the keypad scre...

Page 24: ...s section to learn how to remove a contact from your blacklist Edit contact information 1 Tap Directory 2 Tap the Info icon to the right of the desired contact name to view the Contact Details screen...

Page 25: ...firm or Cancel to keep the group Groups Groups are a great way to organize large lists of contacts You can even assign each group its own distinctive ringtone You can create and delete groups edit gro...

Page 26: ...your PIN followed by the key 3 After you listen to your message you can Press 7 to erase Press 8 to reply Press 9 to save 4 After all your messages have been played you can Press 1 to replay messages...

Page 27: ...all This will place the call on hold 2 Press 55 then enter the 10 digit phone number or extension you want to transfer to 3 Press the Direct soft key to complete the transfer System status troubleshoo...

Page 28: ...y reassigned These are advanced settings for administrators only and require an admin password Navigate to the Advanced Settings screen 1 Tap Menu 2 Tap Advanced 3 Enter your password using the onscre...

Page 29: ...nitor USB ports 2 0 compliant for media and storage applications Up to 16 SIP accounts Two way video conferencing Five way audio video mixed conferencing Features Accessibility 6 way Conference Callin...

Page 30: ...standard handset of the phone Teletypewriter TTY support Yealink phones support commercial TTY devices for example Ultratec Superprint Visual Message Waiting Indicator MWI An indicator light on the ph...

Page 31: ...roduct Use of another AC adaptor may cause a fire or explosion This product relies on short circuit overcurrent protection installed in your home or office Ensure that a fuse or circuit breaker no lar...

Page 32: ...ed in this file only for private use but not for redistribution No parts of this publication may be subject to alteration modification or commercial use Yealink Network Technology CO LTD will not be l...

Page 33: ...or relocate the receiving antenna 2 Increase the separation between the equipment and receiver 3 Connect the equipment into an outlet on a circuit different from that to which the receiver is connect...

Page 34: ...ete Local Directory Name Work Number Mobile Number Other Number Account Ring Photo Back Home New Contact Group Name Work Number Mobile Number Other Number Account Ring Photo Back Save Home History Set...

Page 35: ...ack Enter 802 1x Mode Disable EAP MDS EAP TLS EAP PEAP MSCHAP EAP TTL EAP MSCHAPv2 EAP EAP GTC Identify WAN Port IPv4 6 Mode IPv4 IPv6 LLDP Status ON OFF Packet Interval CDP Status ON OFF Packet Inter...

Reviews: