background image

 COMPLIANCE WITH THE FCC RULES AND     
 REGULATIONS

This equipment has been tested and found to comply with the
limits for a class B digital device, pursuant to part 15 of the FCC
Rules.  These limits are designed to provide reasonable
protection against harmful interference in a residential installation.
This equipment generates, uses and radiates radio frequency
energy and if not installed and used in accordance with the
instructions, may cause harmful interference to radio
communications.  However, there is no guarantee that
interference will not occur in a particular installation.  If this
equipment does cause harmful interference to radio or television
reception, which can be determined by turning the equipment off
and on, the user is encouraged to try and correct the interference
by one or more of the following measures:

*

Reorient or relocate the receiver antenna

*

Increase the separation between the equipment
and the receiver

*

Connect the equipment into an outlet that is different from
that to which the receiver is connected

*

Consult the dealer or an experienced radio/television
technician for help

The user is cautioned that changes and modifications made to the
equipment without the approval of the manufacturer could void
the user’s authority to operate  his equipment.

FCC Authorization Label
This device complies with part 15 of the FCC Rules.  Operation is
subject to the following two conditions:

(1)

This device may not cause harmful interference and

(2)

This device must accept any interference received,
including interference that may cause undesired operation.

FCC ID #:
Home Producer 8: MG3N868629
Command Center: MG3-15-1925R

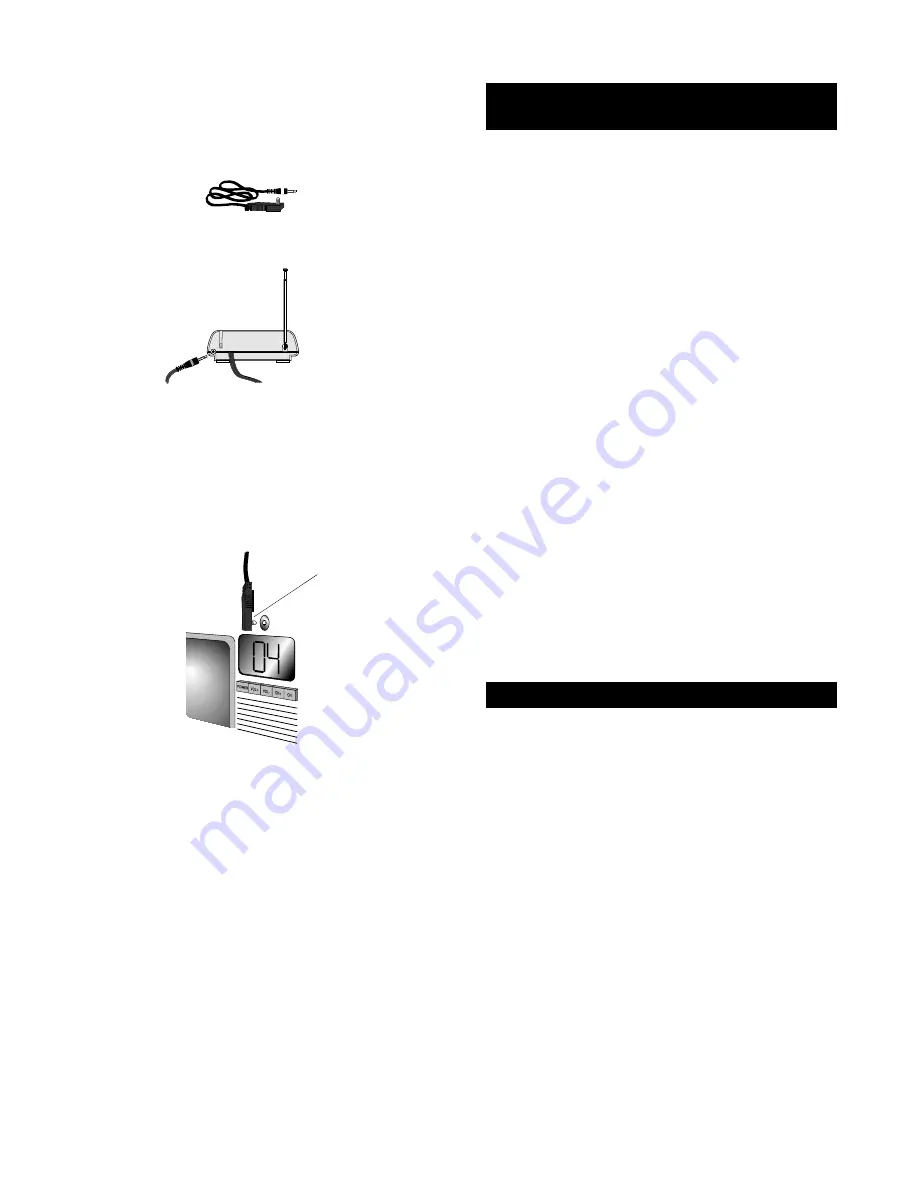
The Command Center also includes an additional IR
signal extension cord for use with a component that
is not in direct line-of-sight of the Command Center.
If you have a component that is not in the line-of-
sight of the Command Center:

1

Plug the 4 ft. IR signal extension cord into
the back of the Command Center.

2

 Run the IR signal extension cord to the
component that is not in the line-of-sight of
the Command Center.

3

Using the supplied double-sided tape, attach
the IR signal extension cord so that the LED
is over or next to the IR sensor of your home
theater component.

4

Test the 

Home Producer 8.  The Command

Center will convert the RF signal from the
Home Producer 8 into and IR signal and
transmit that signal to your component
through the IR signal extension cord.

NOTE:  If the IR signal extension cord does not
control the component that is not in the line-of-sight
of the Command Center, reposition the LED until the
component is able to be controlled, then re-attach
the LED.

LED

 SPECIFICATIONS

Remote Power ..................................................... 4 AAA Batteries

RF Command Console Power .................................  120 Volts AC

Remote to RF Command Console Range ....    100 Feet (30.48m)

RF Command Console to Device Range .... 25 Feet (7.62m) 

±

30˚

Remote Dimensions (HWD) ........................

9 3/8 x 2 7/8 x 1 3/8

RF Command Console

Dimensions (HWD) ............................ 1 9/16 x 5 1//16 x 4 inches

Remote Weight (without Batteries) ............................ 8 oz. (220g)

RF Command Console Weight ............................... 10.4 oz (300g)

Specifications are typical:  individual units might vary.
Specifications are subject to change and improvement without
notice.

Summary of Contents for URC 8090

Page 1: ...es If you do not upon entering your fresh batteries the LCD screen may say MEM FAULT If MEM FAULT does appear on the LCD screen press and hold MAGIC until the display screen changes from TV and the TIME to TIMED SEQ Press the MENU key one time The display screen will change to CODE SET UP Press SELECT The display will change to DEV SET UP Press SELECT and the display screen will change to TV Enter...

Page 2: ... last key press and re activates with the press of a key To de activate the backlight press the LITE key again The POWER key controls power ON and OFF The VOL Volume Up VOL Volume Down and MUTE keys control the volume the same as the Volume Up and Down and Mute keys on your original remote ESC LITE MAGIC TV VCR CBL SAT AMP TUN CD AUX1 HOME THEATER POWER VOL VOL MUTE VOL VOL CH CH POW ER MUTE SLEEP...

Page 3: ...key twice the display will change to CONFIGURE Press SELECT the display will change to THEATR SEL 3 Press MENU one time the display will change to TIME SETUP Press SELECT again 4 The display will change to TIME and the first digit in the time will blink Enter either a 0 or a 1 then the next digit in the time will begin to blink continue entering the time until all four digits of the time have been...

Page 4: ...65 Orion 236 463 180 179 Panasonic 250 051 055 054 Penney 047 051 060 019 018 030 156 021 027 178 003 135 039 002 032 149 Philco 054 096 030 019 187 020 028 Philips 054 096 030 019 187 020 028 Pilot 019 030 039 Pioneer 166 038 Portland 092 019 039 Prism 051 055 Proscan 047 Proton 003 052 178 Pulsar 092 017 019 Quasar 250 051 055 165 RadioShack 019 030 032 039 047 056 154 165 178 180 409 RCA 047 01...

Page 5: ...030 056 165 019 021 027 020 178 179 080 174 028 029 Zenith 017 092 016 Zonda 003 SELECT or POWER PL To Set Up Your VCR or TV VCR Combinations 1 Turn on your VCR and insert a tape 2 Press and release the VCR key 3 Press and hold MAGIC until the display screen changes from VCR and theTIME to TIMED SEQ 4 Press the MENU key one time The display screen will change to CODE SET UP Press SELECT The displa...

Page 6: ...N key press CH or one of the digit keys on the Home Producer 8 to turn your Cable Box on For a detailed explanation of what function each key will perform in the Cable mode please refer to page 48 in the index Set Up Codes For VCRs Cont Motorola 035 048 MTC 000 240 Multitech 000 072 NAD 104 NEC 038 040 041 067 104 008 Nikko 037 Nikon 034 Noblex 240 Olympus 035 Optimus 037 048 104 162 454 Optonica ...

Page 7: ...ontec 019 Eastern 002 Everquest 015 040 Focus 400 Garrard 153 GC Electronics 207 GE 232 233 Gemini 015 057 242 General Instrument 476 276 003 014 011 Goldstar 040 144 Hamlin 009 020 034 259 273 Hitachi 011 Hytex 007 Infinity 770 Jasco 153 315 Jerrold 003 014 476 012 011 015 024 276 Macom 033 Magnavox 027 334 Memorex 000 Movie Time 063 156 Novaplex 618 Novavision 008 017 477 NSC 063 156 Oak 007 019...

Page 8: ... Goldstar 030 417 525 Gradiente 558 Harman Kardon 108 426 Hitachi 032 139 155 1 Turn on your Laser Disc Player and insert a disc 2 Press and release the AUX 1 key 3 Press and hold MAGIC until the display screen changes from LDP and theTIME to TIMED SEQ 4 Press the MENU key one time The display screen will change to CODE SET UP Press SELECT The display will change to DEV SET UP 5 Press SELECT and t...

Page 9: ...Cont Inkel 065 JVC 072 655 658 Kenwood 028 037 048 190 337 338 339 340 523 Kodak 287 Koss 734 Krell 157 Kyocera 018 Luxman 093 149 327 LXI 305 Magnavox 038 129 157 526 Marantz 005 029 038 157 180 435 McIntosh 287 MCS 029 043 345 454 MGA 083 Mission 157 Mitsubishi 083 098 MTC 420 NAD 019 299 Nakamichi 147 NEC 043 130 234 Nikko 164 169 170 174 525 NSM 157 Onkyo 101 102 138 381 Optimus 000 032 037 08...

Page 10: ...SELECT to lock in your code 1 Turn on your amplifier 2 Press and release the AMP key 3 Press and hold MAGIC until the display screen changes from AMP and theTIME to TIMED SEQ 4 Press the MENU key one time The display screen will change to CODE SET UP Press SELECT The display will change to DEV SET UP 5 Press SELECT and the display screen will change to AMP 6 Enter the first Amplifier code listed f...

Page 11: ...xample to set up a DVD Player on the AUX1 key 1 Turn on your DVD Player and insert a disc 2 Press and release the AUX1 key 3 Press and hold MAGIC until the display screen changes from LDP and the TIME to TIMED SEQ 4 Press the MENU key one time The display screen will change to CODE SET UP Press SELECT The display will change to DEV SET UP 5 Press SELECT and the display screen will change to LDP Fi...

Page 12: ...nge to SOURCE POWER or MAGIC MENU SELECT MENU Device Key PL ESC x 2 x 3 4 Press the device key you would like to move for DVD Players it would be AUX1 or for a second TV it would be the TV key The display screen will change to COPY TO Now press the unused device key you would like to replace The display will change to DEVICE2 and the TIME Now proceed with programming the re assigned device key wit...

Page 13: ...will control your Volume in the Home Theater Mode Use the device keys AMP TUNER TV CABLE SAT or AUX1 to choose your AUDIO selection Once you choose the AUDIO source press SELECT For ex ample if your Tuner will control your volume in the Home Theater Mode press TUN SELECT The display will change to CHANNEL This will allow you to choose the device that will control your channel changing continued on...

Page 14: ... the Home Theater Mode key you can then set up a macro sequence on the POWER key in the Home Theater Mode This POWER key macro will then be able to activate all of the devices in the Home Theater Mode Power Key Macro Powering ON Your Home Theater Components with One Key 1 Press and release the HOME THEATER Mode key then press and hold MAGIC until the display screen changes from THEATER and the TIM...

Page 15: ... the se quence to begin Use MENU to toggle through the days of the week until the proper day is on the display screen Press SELECT The display will change to SELECT SEQ SETTING UP TIMED SEQUENCES RECORDING WHEN YOU ARE NOT HOME SELECT SELECT MAGIC For example enter a sequence that will start your VCR recording your DSS Satellite channel SAT POWER SAT 2 7 5 VCR POWER VCR RECORD This sequence will t...

Page 16: ...s of key strokes at any time with the press of one key Each sequence can have up to a maximum of 15 keystrokes For example to set up a sequence that will turn on your devices and turn the devices to the proper inputs 1 Press and hold MAGIC until the display screen changes from DEVICE and the TIME to TIMED SEQ Press MENU twice until the display reads CONFIGURE then press SELECT The display will the...

Page 17: ...lay will return to DEVICE and the TIME Now whenever you press SLEEP SHIFT MUTE the Home Producer 8 will use its own built in sleep timer MAGIC MENU SELECT MENU SELECT MENU SELECT MAGIC MENU VOLUME LOCK With the Home Producer 8 you can choose which home entertainment component controls your volume When you originally set up the Home Producer 8 each individual component operates its own volume provi...

Page 18: ...would press TV The display will show the device key that was just pressed 4 Press the key for the feature you want to move For the example above press VOL The display will change to TO Press the device key TV VCR CBL etc where you would like to place the feature For the example above you would press VCR The display will show the device key that was just pressed 2 Press the MENU key twice the displ...

Page 19: ... SELECT once more and the display will return to DEVICE and theTIME Your Home Producer 8 is now reset VOL VOL MAGIC MENU SELECT MENU SELECT SELECT x 2 x 2 Telescoping Atenna SETTING UP AND USING THE IR RF COMMAND CENTER The Home Producer 8 comes with an IR RF Command Center which receives Radio Frequency RF signals from your Home Producer 8 anywhere in your home up to 100 feet away The Command Cen...

Page 20: ...d 2 This device must accept any interference received including interference that may cause undesired operation FCC ID Home Producer 8 MG3N868629 Command Center MG3 15 1925R The Command Center also includes an additional IR signal extension cord for use with a component that is not in direct line of sight of the Command Center If you have a component that is not in the line of sight of the Command...

Page 21: ...ce If you make a mistake when saving a macro erase the incorrect macro by re saving a new macro on the same key TROUBLESHOOTING Problem Solution LCD screen begins to fade does not appear or the red light blinks five times when you press a key MEM FAULT appears on the LCD screen Replace the batteries with four 4 new AAA alkaline batteries Immediately before removing the batteries please refer to pa...

Page 22: ...and A V Producer are trademarks of Universal Electronics Inc URC 8090 Home Producer 2 98 WARRANTY One For All PRODUCTS Limited Warranty Universal Electronics Inc UEI warrants to the original purchaser only that this product will be free from defects in materials and workmanship under normal use for ninety 90 days from the date of original purchase This warranty does not cover damage or failures ca...

Reviews: