background image

10

Ⅺ. OPERATION STEPS

1. Add water to the humidification bottle: Take out 
the humidification bottle, unscrew the lid, pour 
distilled water or cold boiled water into the cup, 
between the maximum and minimum. Then tighten 
the lid, and put it back to its original position.
2 Take out the humidification tube (see the figure  
for details), then connect the oxygen outlet of the 
device and the oxygen inlet of the humidification 
bottle.
3. Turn on the power: Insert the power cord connector into device power jack; Plug the other end of 
the power cord into the indoor power socket, then turn on the power switch, press the ON/OFF 
button to start oxygen production.
4. Adjust the flow adjustment knob as needed.
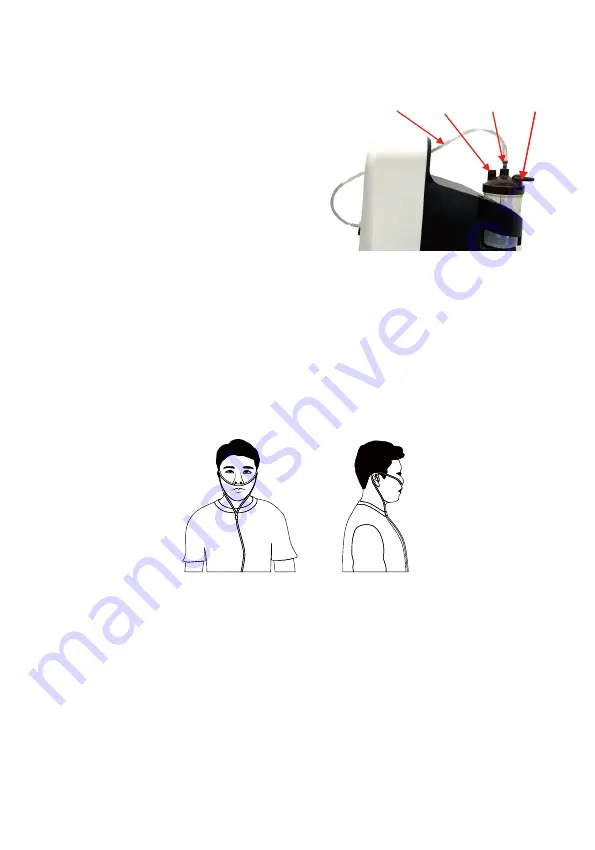
5. Insert the inlet end of the nasal oxygen cannula into the outlet of the humidification bottle, and 
then put the nasal oxygen cannula on the user's ears, inserting the nasal congestion in the user's 
nose (as shown in the figures below). Please follow the doctor's advice for the time and flow of 
oxygen inhalation.

6. When the oxygen therapy is finished, press the “ON/OFF” button on the display, and then turn off 
the power switch. If don't use the device for a long time, please unplug the power cord.
7. If you need to inhale oxygen and use time function, please refer to "1. Operation panel: button" in 
"Know Your Device"P7 for details.
8. Oxygen purity prompt function:
The oxygen purity will reach a steady state after 30 minutes of starting up.
a) When 50%≤oxygen purity<82%, the yellow light is on.
b) Oxygen purity <50%, the fault red light is on, and three voice instructions are issued, the fault 
code "E4" and the running time are displayed alternately.

Schematic figures of nasal oxygen cannula wearing

Humidification 

tube

Pressure 

relief valve

Oxygen 

inlet 

Oxygen 

outlet

9. If a sudden power failure occurs during the operation of the device with an alarm sound, please 
check whether the power connection part or the external power supply is in good condition.
10. Nebulization function description:
1) Unscrew the plug of the nebulization outlet and connect it to the disposable kit for nebulization to 
start nebulization. When the user needs to use the nebulization function, please refer to the 
"Schematic diagram of the disposable kit for nebulization" to install a disposable nebulization kit.
2) When the nebulization function is used, the oxygen purity will be reduced and the device may 
alarm, and the alarm will be automatically released when the oxygen flow is reduced. It is not a 
malfunction.
3) Operation steps:
a. Add an appropriate amount of liquid medicine into the nebulization cup.
b. Unscrew the plug of the nebulization outlet in counterclockwise direction.
c. Connect the two ports of the connecting pipe to the nebulization cup and the nebulization outlet 
of the main unit respectively.
d. Turn on the power switch of the main unit and press ON/OFF button to start nebulization therapy.
e. After therapy, screw the nebulization plug clockwise into the nebulization outlet of the main unit 
and tighten it. 

Summary of Contents for Y-506W

Page 1: ...manual Thank you for purchasing the OMRON oxygen concentrator In order to use the device safely please read the complete manual carefully before using it for the rst time Keep this instruction manual...

Page 2: ......

Page 3: ...scope of application of the product Product features Know your device Operation steps Maintenance instructions XIII Schematic diagram of gas circuit and electric circuit XIV Troubleshooting XV Compone...

Page 4: ...customer shall not disassemble and repair it privately If abnormal phenomena such as the alarm is found please contact the customer support for consultation see the back cover SAFETY INSTRUCTIONS 1 Op...

Page 5: ...ou begin to feel ill or are experiencing discomfort while using the oxygen concentrator please go to the doctor immediately 16 When the user is a child or a person with limited mobility the device nee...

Page 6: ...e stored in an environment like this No strong sunlight no corrosive odor well ventilated and clean Avoid violent vibration inverted or horizontal placement during transportation THE SCOPE OF APPLICAT...

Page 7: ...tor oxygen purity better and understand the use condition of patients oxygen purity 82 only the green light of the operation indicator is on 50 oxygen purity 82 yellow light is on oxygen purity 50 the...

Page 8: ...ce should not be used with ammable anesthetic gas mixed with air or ammable anesthetic gas mixed with oxygen or nitrous oxide 5 years except fragile parts and consumables Maximum outlet pressure Compr...

Page 9: ...omizer Primary ltration 06 Rear view of the whole device Side view of the whole device Power switch Including fuse Nebulization outlet Secondary lter Humidi cation bottle Device power jack Primary lte...

Page 10: ...he device will stop oxygen producing and enter the standby state after the timing is completed Set the timing for 8 hours and press the Timing button again to enter the continu ous oxygen therapy mode...

Page 11: ...oxygen outlet of the humidi cation bottle was blocked the pressure relief valve of the humidi cation bottle will operate by itself At this time oxygen will be ejected from the pressure relief valve bu...

Page 12: ...the network power socket and the power cord connector is inserted into the device power jack Then the device can get power supply 9 Primary lter Contains lter sponge for air ltration 10 Secondary lte...

Page 13: ...cation bottle and then put the nasal oxygen cannula on the user s ears inserting the nasal congestion in the user s nose as shown in the gures below Please follow the doctor s advice for the time and...

Page 14: ...zation kit 2 When the nebulization function is used the oxygen purity will be reduced and the device may alarm and the alarm will be automatically released when the oxygen ow is reduced It is not a ma...

Page 15: ...the device and the display screen Most cleaners must be diluted before use 2 Filters The cleaning and the replacement of the lters protect the compressor and molecular sieve and Symbol State Status In...

Page 16: ...sulting about lter please contact customer support see the back cover 3 Humidi cation bottle The oxygen concentrator is equipped with a humidi cation bottle and it is recommended to clean it each time...

Page 17: ...new fuse Figure 3 reinstall the fuse holder Figure 4 Figure 4 Figure 3 Figure 2 Figure 1 Air Filter Compressor Oxygen and nitrogen separation Adsorption tower Humidi cation bottle Oxygen outlet Oxyge...

Page 18: ...ss the ON OFF button of the operation panel as required 3 Turn on the power switch and restart the device 4 Replace the fuse Firstly cut o the power supply and carry out by professional maintenance pe...

Page 19: ...3 If the phenomenon continues please contact the customer support for consultation see the back cover 7 The inside of the nasal oxygen cannula has a lot of fog or water droplets the method of removing...

Page 20: ...it has been deformed during cleaning and disinfection 2 Replace the disposable kit 3 The cup mouth of the nebulization cup is blocked 3 Clean or replace the nebulization cup 4 Excessive addition of li...

Page 21: ...with the corresponding national laws and regulations It is recommended to consult the environmental protection department or the Omron customer support when dealing with the corresponding waste and r...

Page 22: ...n the manual 2 Portable and mobile radio frequency communication equipment may a ect the normal operation of this product 3 The maximum length of the power cord of this product is 2m 4 In addition to...

Page 23: ...le for use in all establishments including domestic establishments and those directly connected to the public low voltage network that supplies buildings used for domestic purposes Harmonic Emissions...

Page 24: ...the test voltage is applied Floors should be wood concrete or ceramic tile If oors are covered with synthetic material the relative humidity should be at least 30 Mains power quality should be that o...

Page 25: ...he eld strengths should be less than 3V m Where P is the maximum output power rating of the transmitter in watts W according to the transmitter manufacturer and d is the recommended separation distanc...

Page 26: ...e by maintaining a minimum distance between portable and mobile RF communications equipment trans mitters and this concentrator as recommended below according to the maximum output power of the commun...

Page 27: ......

Page 28: ...he customer support for consultation 5 When performing warranty service if necessary we can request quali ed technicians identi ed by us to provide product circuit diagrams and repairable component da...

Reviews: