Product Specifications
AC 100V - AC 240V (Stand-by: Min 4.8W, Operation: Max 19W)
DC +12.8V
Call Signal (Electronic Tone Sound)
User can monitor situations of front door camera using "Front Door" button on monitor.
By pressing "Guard/Lobby" button for about 5 seconds, users can monitor lobby situations
(This function is available only in lobby phones adopting TEN-KEY [KLP-100 series] mode).
When pressing call button on outdoor camera, call signal rings.
Explanation for melody type of front door camera :
- Camera 1 : ‘Ding-Dong~’ 2times
- Camera 2 : ‘Ddiriri~’ 8times
Hands-free System (DSP)
In calling from front door camera, image maintains for about 30 seconds.
While communicating, image maintains for about 3 minutes.
Front Door Camera: 4-wire Polarity IV 0.65mm or more
Main line: VOICE1/VOICE2/DATA(3-line) Polarity IV 0.8mm or more
Power (+/GND) (2-line) Polarity IV 1.2mm or more
For video line, coaxial cable is used - COAXIAL 5C-2V
237(W) X 199(H) X 39(D) mm
Front Door Camera: When 0.65mm cable is used, 30m
Main Line Communication Line: When IV 0.8
Ф
is used, 300m
Monitor: 0.C ~ 50.C
Power Source
Voltage of Operating Power
Lobby / Guardroom / In-house Call Signal
Monitoring of Front Door Camera
Lobby Phone's Lobby
Monitoring Function
Call Method
Communication Method
Image Maintenance Time
Number of Wiring
Dimensions
Communication Distance
Guaranteed Operation Temperature
��
KC-C60, KC-MC35 Front Door Camera
��
KIV-212 Monitor / KIV-D212 Monitor
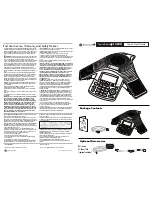
Component
Monitor Accessories
●
Camera
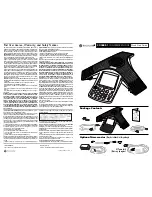
Monitor Components
①
A Wall Hanger Frame
②
Wall Hanger
Fixing Screws
③
Wiring Lines of Camera 1 & 2
Blue (Power)
Yellow (GND)
Red (Voice)
White (Video)
Gray (+17V)
Violet (GND)
Blue (Voice)
Green (Voice)
Yellow (Video Input)
Orange (Data)
Red (In-house Line)
Brown (Data in-house line)
Black (Video Output)
④
Wiring Lines of Multi-home Main Line
Front Door Camera Components
①
Camera Main Frame Supporter
●
Monitor
②
Screws for fixing camera
to main frame supporter
③
Screws for fixing cabinet
body on the wall
④
Upward adjusting supporter
for lens angle
Power Source
Ambient temperature
Angle of picture
Min. Illumination
Lens
Dimension
DC12V
±
1V(Power from monitor)
-10
℃
~ 50
℃
Diagonal 120
。
0.1Lux(LED ON)
F:2.0, f=3.0mm
95(W) X 127(H) X 34(D)mm
CAMERA
(KC-C60)
Metal Pinhole Camera
(KC-MC35)
Diagonal 90
。
F:3.5, f=3.8mm
95(W) X 127(H) X 33(D)mm
10
11
Summary of Contents for KIV-212
Page 2: ...2 3 ...
Page 3: ...4 5 ...