6
•
DE
4
Bedienelemente und Anschlüsse
18
19
20
25
16
2
1
3
5
7
8
26
28
31
29
30
27
32
9
10
11
12
13
14
15
21
22
23
17
24
33
34
35
Page 1: ......
Page 2: ......
Page 3: ...ch für eines unserer Produkte entschieden haben Diese Bedienungsanleitung zeigt Ihnen wie Sie den Mixer in Betrieb nehmen und nutzen Damit Sie sich und andere keinen Gefahren aussetzen beachten Sie bitte unbedingt alle Sicherheitshinweise in dieser Anleitung und alle auf dem Gerät angebrachten Sicherheitshinweise Diese Bedienungsanleitung gilt für die Artikelnummer 10006874 Bitte bewahren Sie dies...
Page 4: ...urch Zug belastet werden Es muss stets eine ausreichende Kabellänge zum Gerät hin vorhanden sein Andernfalls kann das Kabel beschädigt werden was zu tödlichen Stromschlägen führen kann Achten Sie darauf dass die Netzleitung nicht gequetscht oder durch scharfe Kanten beschädigt werden kann Überprüfen Sie das Gerät und die Netzleitung in regelmäßigen Abständen auf Beschädigungen Werden Verlängerungs...
Page 5: ...es Gerät darf nur in einer Höhenlage zwischen 20 und 2000 m über NN betrieben werden Verwenden Sie das Gerät nicht bei Gewitter Überspannung könnte das Gerät zerstören Das Gerät bei Gewitter allpolig vom Netz trennen Netzstecker ziehen Das Gerät darf nicht in einer Umgebung eingesetzt oder gelagert werden in der mit Spritzwasser Regen Feuchtigkeit oder Nebel zu rechnen ist Feuchtigkeit oder sehr h...
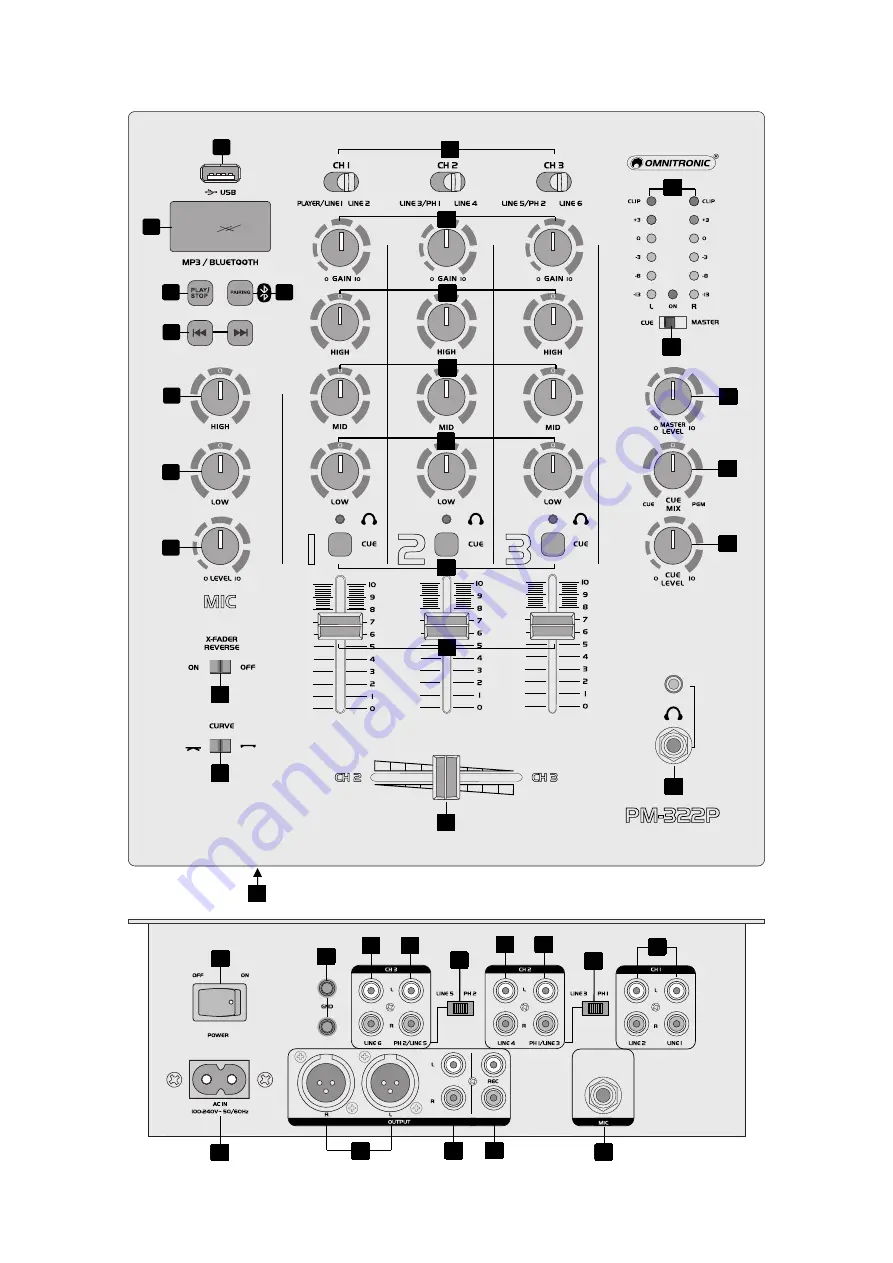
Page 6: ...6 DE 4 Bedienelemente und Anschlüsse 18 19 20 25 16 2 1 3 4 5 6 7 8 26 28 31 29 30 27 32 9 10 11 12 13 14 15 21 22 23 17 24 33 34 35 29 30 29 31 ...
Page 7: ...tärkeregler CUE LEVEL für den Kopfhörer 21 Umschalter X FADER REVERSE zum Vertauschen von Kanal 2 und 3 für den Crossfader 22 Umschalter für die Überblendcharakteristik des Crossfaders Verwenden Sie die linke Position für hartes Überblenden und die rechte Position für weiches Überblenden 23 Crossfader zum Überblenden zwischen Kanal 2 und 3 In der Mittelstellung werden beide Kanäle mit gleicher Lau...
Page 8: ...LR männl Rot 2 Schwarz 3 Schirm 1 Rot 2 Schirm 1 3 XLR weibl Rot 2 Schwarz 3 Schirm 1 Rot 2 Schirm 1 3 6 3 mm Klinke stereo Rot Spitze Schwarz Ring Schirm Schaft Rot Spitze Schirm Schaft Ring 6 3 mm Klinke mono Rot Spitze Schwarz Ring Schirm unverb Rot Spitze Schirm Schaft Cinch Rot Spitze Schwarz Schaft Schirm unverb Rot Spitze Schirm Schaft Einschalten Zum Schutz Ihrer Geräte insbesondere der La...
Page 9: ...len Sie den Crossfader in die Mittelposition 2 Soll dem Musikprogramm das Signal von Kanal 1 beigemischt werden ziehen Sie den entsprechenden Fader auf 3 Mit dem Umschalter CURVE kann die Überblendcharkateristik des Crossfaders eingestellt werden Die linke Position eignet sich für hartes Überblenden z B für Scratchen und Cutten und die rechte Position für weiches Überblenden z B für langlaufende M...
Page 10: ...SB Anschluss ein Das Gerät wird als Abspielmedium angewählt und eingelesen Das Display blendet verschiedene Informationen ein Sollte ein Datenträger nicht auf Anhieb erkannt werden entfernen Sie ihn bitte nochmals und setzen ihn erneut ein Steuern Sie die Wiedergabe mit den Tasten PLAY STOP und 7 Reinigung und Wartung Das Gerät sollte regelmäßig von Verunreinigungen wie Staub usw gereinigt werden ...
Page 11: ...gung Bitte übergeben Sie das Gerät bzw die Geräte am Ende der Nutzungsdauer zur umweltgerechten Entsorgung einem örtlichen Recyclingbetrieb Geräte die mit diesem Symbol gekennzeichnet sind dürfen nicht im Hausmüll entsorgt werden Für weitere Informationen wenden Sie sich bitte an Ihren Händler oder die zuständige örtliche Behörde Entnehmen Sie evtl eingelegte Batterien und entsorgen Sie diese getr...
Page 12: ......
Page 13: ...s 1 Introduction Welcome to Omnitronic Thank you for choosing one of our products This user manual will show you how to install and operate the mixer Users of this product are recommended to carefully read all warnings in this manual and on the unit in order to protect yourself and others from damage Please save this document for future needs and pass it on to further owners This user manual is va...
Page 14: ... damages fire or mortal electrical shock The cable insert or the female part in the device must never be strained There must always be sufficient cable to the device Otherwise the cable may be damaged which may lead to mortal damage Make sure that the power cord is never crimped or damaged by sharp edges Check the device and the power cord from time to time If extension cords are used make sure th...
Page 15: ...ce must only be operated in an altitude between 20 and 2000 m over NN Never use the device during thunderstorms Over voltage could destroy the device Always disconnect the device during thunderstorms This device must never be operated or stockpiled in surroundings where splash water rain moisture or fog may harm the device Moisture or very high humidity can reduce the insulation and lead to mortal...
Page 16: ...16 EN 4 Operating Elements and Connections 18 19 20 25 16 2 1 3 4 5 6 7 8 26 28 31 29 30 27 32 9 10 11 12 13 14 15 21 22 23 17 24 33 34 35 29 30 29 31 ...
Page 17: ...red ahead of the master output control 20 Volume control CUE LEVEL for the headphones 21 Selector switch X FADER REVERSE to reverse channel 2 and 3 for the crossfader 22 Selector switch for adjusting the crossfader curve Use the left position for sharp crossfading and the right position for smooth crossfading 23 For crossfading between channel 2 and 3 In mid position both channels can be heard at ...
Page 18: ...ion XLR male red 2 black 3 shield 1 red 2 shield 1 3 XLR female red 2 black 3 shield 1 red 2 shield 1 3 6 3mm jack stereo red tip black ring shield sleeve red tip shield sleeve ring 6 3 mm jack mono red tip black ring shield n c red tip shield sleeve RCA red tip black sleeve shield n c red tip shield sleeve Powering up To protect your audio equipment specifically your speakers follow this power up...
Page 19: ... crossfader to mid position 2 For mixing the signal of input channel 1 to the music program advance the corresponding fader accordingly 3 The selector switch CURVE allows for adjustment of the crossfading characteristic Use the left position for sharp crossfading e g for scratching and cutting and the right position for smooth crossfading e g for long mixes Do not use this switch while a signal is...
Page 20: ...tion insert a USB drive into the USB port After loading a device it is selected as the playback medium and read in The display shows various information If a data carrier is not recognized at the first try remove it and insert it again Now use the PLAY STOP and buttons for playback control 7 Cleaning and Maintenance Disconnect from mains before starting maintenance operation We recommend a frequen...
Page 21: ...the Environment Disposal of old equipment When to be definitively put out of operation take the product to a local recycling plant for a disposal which is not harmful to the environment Devices marked with this symbol must not be disposed of as household waste Contact your retailer or local authorities for more information Remove any inserted batteries and dispose of them separately from the produ...
Page 22: ......
Page 23: ......
Page 24: ... OMNITRONIC 2019 D00124863 Version 1 0 Omnitronic is a brand of Steinigke Showtechnic GmbH Andreas Bauer Str 5 97297 Waldbüttelbrunn Germany ...