background image

1-14

CT PC Box Parts

Numeric Keypad

1-, 2-, 3-Cell Color Touch Installation and Service Guide

/67-2014 Rev G

© 2011 Omnicell, Inc.

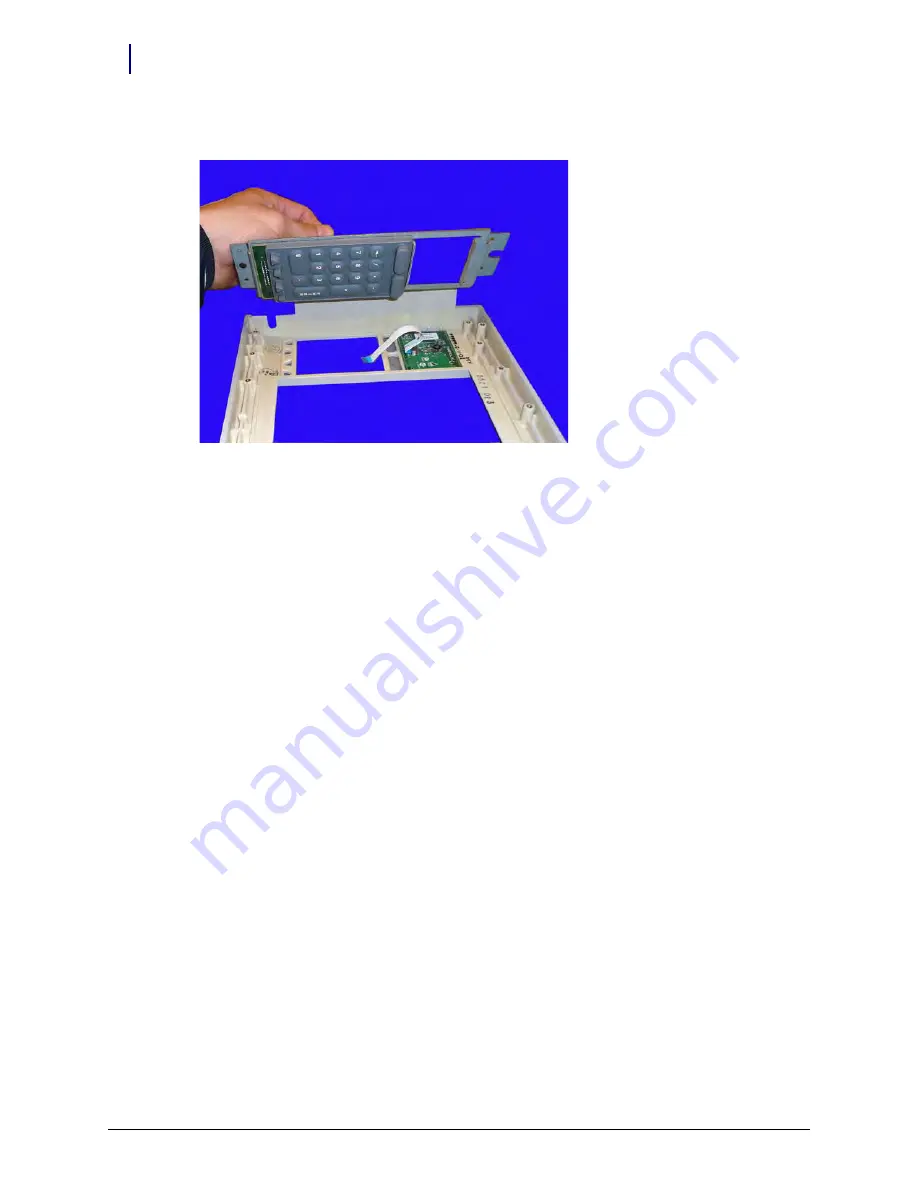
6. Remove the numeric keyboard.

Figure 1-21.

Remove the keypad

Replacement Procedure

1. Place the numeric keypad face down in the rectangular cutout of the LCD bezel. Ensure that 

the keypad is oriented correctly on the bezel before continuing.

2. Place the keyboard bracket on top of the keyboard and touch pad.

3. Align the beads of the numeric keypad in the holes on the bracket and firmly pull on the four 

corner beads to ensure that the keypad is securely fastened to the bracket.

4. Connect the flex cable to the numeric keyboard.

5. Replace the four 4-40 x 1/4 SCH screws that secure the numeric keyboard bracket to the LCD 

display bezel.

6. Replace the 4-40 x 1/4 flathead screw.

7. Replace the five 4-40 x 1/4 SHC screws from the rear of the assembly to secure the LCD 

bracket to the LCD bezel assembly.

8. Replace the LCD bezel.

Summary of Contents for 1-Cell CTPC

Page 1: ...1 2 3 Cell CTPC Console Installation and Service Guide 67 2014 Rev G Includes G4 Upgrade Install and Service Guides ...

Page 2: ...rleston Road Mountain View CA 94043 650 251 6100 www omnicell com Omnicell and the Omnicell design mark OmniBuyer OmniCenter OmniRx OmniSupplier Pandora PandoraVIA SafetyMed SafetyStock and Sure Med are registered trademarks Anesthesia TT Anesthesia Workstation Anywhere RN Executive Advisor FlexBin Medication Surveillance OmniDispenser OmniLinkRx OmniScanner OmniTrack Omni TT Open Touch OptiFlex O...

Page 3: ...LCD Bezel Assembly 1 6 Removal Procedure 1 6 Replacement Procedure 1 9 LCD Data Cable 1 9 Removal Procedure 1 9 Replacement Procedure 1 9 LCD Display and Touch Screen Glass 1 10 Removal Procedure 1 10 Replacement Procedure 1 12 Numeric Keypad 1 12 Removal Procedure 1 12 Replacement Procedure 1 14 Touch Pad 1 15 Removal Procedure 1 15 Replacement Procedure 1 15 Color Touch PC Box 1 16 PowerCom2 CT ...

Page 4: ...dure 3 3 Pull out Shelf 3 5 Switchpanels 4 1 Introduction 4 1 Tools List 4 1 Removal Procedure 4 2 From a Shelf 4 2 From a Supply Drawer 4 3 From a Pull out Shelf 4 4 From a Suture Rack 4 5 From a Catheter Rack 4 7 Doors 5 1 Introduction 5 1 Tools list 5 2 Removal Procedure 5 2 Installation Procedure 5 3 Locks and Latches 6 1 Introduction 6 1 Tools list 6 1 Removal Procedure 6 2 Wireway 6 2 Manual...

Page 5: ...tion 8 1 Tools List 8 1 Removal Procedure 8 1 Manual Override 9 1 Introduction 9 1 Tools List 9 1 Removal Procedure 9 1 Catheter Rack 10 1 Introduction 10 1 Tools List 10 1 Installation Procedure 10 1 Configuration 10 2 Removal Procedure 10 2 Service Procedures 10 3 LED Panel 10 3 Front Plate 10 4 Switchpanel and Cable 10 5 LED Cable 10 6 Hooks 10 8 Rail Slide 10 8 SPC Board 10 8 SPC Cables 10 8 S...

Page 6: ...from the CT PC Console 13 1 Install the E Box onto the Console 13 5 Prepare PC Box Console with E Box 13 8 Add Knock out Safety Plate 13 8 Add the Flex Lock or External Return Bin Optional 13 10 Remove and Replace the LCD Touch Screen 13 13 LCD Touch Screen Removal 13 13 LCD Touch Screen Replacement 13 17 Remove and Replace the Keyboard and Printer Panel 13 18 Keyboard and Printer Panel Removal 13...

Page 7: ...he Power Supply 14 12 Remove the Power Supply 14 12 Replace the Power Supply 14 15 Remove the wireless card 14 17 Replace the wireless card 14 18 Remove Replace the Power Entry Module 14 19 Remove the Power Entry Module 14 19 Replace the Power Entry Module 14 20 Appendix A Part List A 1 Index Index 1 Feedback Form Feedback 1 ...

Page 8: ...1 2 3 Cell Color Touch Installation and Service Guide 67 2014 Rev G 2011 Omnicell Inc viii Table of Contents ...

Page 9: ...he Color Touch PC Box or CT PC Box with the PowerCom3 board Figure 1 1 CT PC Box with a PowerCom3 board Tools List The following tools are required to install the CT PC Box T8 Torx Driver T10 Torx Driver T15 Torx Driver 9 64 Allen wrench Caution The CT PC Box is heavy Trying to lift or remove the box alone could result in injury Use a second person to help lift and remove the CT PC Box from the Om...

Page 10: ...HC screws from the keyboard cable cover Figure 1 2 Remove the screws from the keyboard cable cover 5 Lift up the keyboard cable cover and remove it 6 Remove the four 4 40 x 3 8 buttonhead screws that secure the rear keyboard door Figure 1 3 Remove the four screws securing the rear keyboard door Note The cover is held to the back of the keyboard door enclosure by two tabs that slide into slots in t...

Page 11: ...nter cable the 5 pin cable and speaker cable to the door bezel 3 Pull the rear keyboard door off the latch and line up the rear door with the keyboard door bezel 4 Replace the four 4 40 x 3 8 buttonhead screws 5 Replace the two 4 40 x 3 8 SHC screws 6 Close the keyboard door Important Once the four screws are removed the door bezel is only connected to the CT PC Box by a few cables Be sure to hold...

Page 12: ...e 1 Perform a graceful shutdown of the cabinet 2 Remove the keyboard Door Bezel See Removal Procedure on page 1 2 3 Remove the six screws from the keyboard bracket using a Torx T10 screwdriver Figure 1 5 Remove the six screws that secure the keyboard bracket 4 Remove the bracket Figure 1 6 Remove the keyboard bracket 5 Remove the keyboard p ...

Page 13: ...Door Bezel See Removal Procedure on page 1 2 3 Remove the four flat nuts and remove the speaker Figure 1 7 Remove the four flat nuts Replacement Procedure 1 Perform a graceful shutdown of the CT PC Box 2 Remove the keyboard door bezel See Removal Procedure on page 1 2 3 If the speaker is still attached remove the four flat nuts and remove the speaker 4 Place the new speaker on the plastic pegs and...

Page 14: ...ing the keyboard door and using the T15 Torx driver 6 32x1 4 BH screws Supply cabinet PC box screws are accessed under the box at the front corners using a T 10 Torx driver 8 32x3 8 SHC screws 4 Pull the CT PC Box forward about halfway out of the cabinet 5 Use the 2036 key to unlock the top cover of the CT PC Box Figure 1 8 Use the 2036 key to unlock the CT PC Box cover 6 Remove the cover 7 Discon...

Page 15: ...llation and Service Guide 67 2014 Rev G CT PC Box Parts 1 7 LCD Bezel Assembly Figure 1 9 Disconnect the LCD data cable and inverter cable Figure 1 10 Disconnect the 24 pin keyboard harness assembly Figure 1 11 Disconnect the touch screen data cable ...

Page 16: ... Box frame using a T10 Torx driver 9 Remove the three 4 40 x 3 16 screws using a 9 64 Allen wrench then remove the LCD bezel assembly Figure 1 12 Remove the three screws securing the bezel to the CT PC Box frame 10 Slide the LCD bezel assembly to the left remove the standoffs from the keyholes and pull the LCD bezel away from the frame Figure 1 13 Remove the LCD bezel assembly from the CT PC Box ...

Page 17: ...for LCD The 24 pin keyboard harness assembly from bottom connector on the numeric pad bracket LCD data cable Touch screen data cable from the touch screen LCD Data Cable Removal Procedure 1 Perform a graceful shutdown of the CT PC Box 2 Unplug the power cord and all data cables from the rear of the box 3 Remove the LCD bezel assembly See Removal Procedure on page 1 6 4 Remove the LCD data cable fr...

Page 18: ... PC Box 2 Unplug the power cord and all data cables from the rear of the box 3 Remove the LCD Bezel Assembly See Removal Procedure on page 1 6 4 Remove the five 4 40 x 3 16 SHC screws from the rear of the assembly to remove the LCD bracket from the LCD bezel assembly Figure 1 15 Remove the five SHC screws 5 Remove the 4 40 x 1 4 flathead screw in the lower right corner Figure 1 16 Remove the flath...

Page 19: ...17 Remove the four screws from the front of the bezel assembly 7 Disconnect the LCD data cable from the board on the assembly bezel Figure 1 18 Disconnect the LCD screen cable 8 Remove the LCD display 9 Remove the touch screen glass and set it aside Important Do not touch the inner surface of the touch screen glass as this could prevent the touch screen from working properly when re installed Care...

Page 20: ...overing on the front of the display 6 Replace the five 4 40 x 1 4 SCH screws that secure the LCD bracket assembly to the bezel 7 Replace the 4 40 x 1 4 flathead screw Numeric Keypad Removal Procedure 1 Perform a graceful shutdown of the CT PC Box 2 Remove the LCD Bezel Assembly See Removal Procedure on page 1 6 3 Remove the LCD display and touch screen glass See Removal Procedure on page 1 10 Impo...

Page 21: ... 67 2014 Rev G CT PC Box Parts 1 13 Numeric Keypad 4 Disconnect the flex cable from the connector on the numeric keypad Figure 1 19 Remove the flex cable 5 Remove the four 4 40 x 1 4 SHC screws to remove the keyboard bracket from the bezel Figure 1 20 Remove the four screws ...

Page 22: ...he keyboard bracket on top of the keyboard and touch pad 3 Align the beads of the numeric keypad in the holes on the bracket and firmly pull on the four corner beads to ensure that the keypad is securely fastened to the bracket 4 Connect the flex cable to the numeric keyboard 5 Replace the four 4 40 x 1 4 SCH screws that secure the numeric keyboard bracket to the LCD display bezel 6 Replace the 4 ...

Page 23: ... cable 6 Disconnect the flex cable from the touch pad if necessary Replacement Procedure 1 Connect the flex cable to the touch pad and place the assembly into the bezel Ensure that the touch pad goes into the bezel with the flex cable closer to the keyboard 2 Connect the other end of the flex cable to the keyboard 3 Replace the Numeric Keypad See Replacement Procedure on page 1 14 4 Replace the to...

Page 24: ...pen the keyboard door to access the screws fastening the CT PC Box to the frame b Remove the buttonhead 8 32 x 7 8 and 8 32 x 3 8 screws c Slowly pull the CT PC Box from the frame until the side mounted slides lock and stop d Unlock the CT PC Box cover with the cam lock key 2036 e Remove the cover by lifting the front end and pulling away from the cabinet f Disconnect the SPC cables from the Power...

Page 25: ...of PowerCom2 CT PC Box b Replace and lock the top cover c Once the PowerCom3 CT PC Box has been removed from the shipping box and installed in the cabinet place the PowerCom2 CT PC Box in the shipping box and secure it for return Installation Preparation The PowerCom3 CT PC box is lighter than the PowerCom2 box and does not require two people for installation and or removal 1 Unlock the PowerCom3 ...

Page 26: ...to access the screws fastening the CT PC Box to the frame 6 Replace the buttonhead 8 32 x 7 8 and buttonhead 8 32 x 3 8 screws Auto Power Reset When a power outage occurs the power switch on the back of the PC box must be pushed to turn the unit back on In a hospital with multiple auxiliary cabinets this is an unmanageable situation To solve the problem change the dip switch setting on the interna...

Page 27: ...1 19 Auto Power Reset 4 Apply label 65 8035 near the power switch to indicate that the unit has been modified The label warns to turn the unit off the power cord needs to be unplugged from the wall AC outlet Note If power problems continue to occur these cabinets should be placed on an external UPS unit ...

Page 28: ...1 20 CT PC Box Parts Auto Power Reset 1 2 3 Cell Color Touch Installation and Service Guide 67 2014 Rev G 2011 Omnicell Inc ...

Page 29: ...ade to removing specific modules such as the 9 drawer carrier and the OmniDispenser These portions of the procedure are not intended to show how to completely remove a particular module but to show the least amount of work that is required to get the wireway free from the cabinet frame This chapter provides removal procedures Installation can be done by performing the appropriate removal procedure...

Page 30: ...ws are accessed by opening the keyboard door and using the T15 Torx driver 6 32x1 4 BH screws Figure 2 1 Pharmacy cabinet Supply cabinets PC box screws are accessed under the box at the front corners using a T 10 Torx driver 8 32x3 8 SHC screws Figure 2 2 Supply cabinet a Slowly pull the CT PC Box from the frame until the side mounted slides lock and stop ...

Page 31: ...s and Wireways 2 3 Wireway Removal b Unlock the CT PC Box cover with the cam lock key 2036 Figure 2 3 Unlock the CTPC Box Cover c Remove the cover by lifting the front end and pulling away from the cabinet d Disconnect the SPC cables from the PowerCom board Figure 2 4 Disconnect the SPC Cables ...

Page 32: ...transport handle on the side of the OmniSupplier frame g Release the CT PC Box from the slides carefully remove it from the cabinet and set it on a flat surface Caution The CT PC Box is heavy Trying to lift or remove the box alone could result in injury Get help from a second person to lift and remove the CT PC Box from the cabinet Important The following sections cover optional equipment that may...

Page 33: ...ier manual override cover then remove the cover Figure 2 6 Unlock and Remove the Manual Override Cover 2 Pull the pharmacy drawer in position two second drawer from the top forward to expose the pharmacy drawer controller cable cover 3 Remove the two screws securing each controller cable cover using a T10 Torx screwdriver Figure 2 7 Remove the screws securing the controller cable cover ...

Page 34: ...eleases on each drawer slide 6 Repeat steps 3 5 for drawers in positions seven eight and nine 7 Remove the two screws securing the large manual override lever using a T15 Torx screwdriver Figure 2 9 Remove the screws securing the manual override lever 8 Remove the lever 9 Remove the two screwssecuring each of the four slide support brackets using a Torx T15 screwdriver 10 Remove the slide support ...

Page 35: ...he manual override cover then remove the cover from the OmniDispenser Figure 2 10 Unlock and Remove the Manual Override Cover 2 Pull the manual override lever and open the restock door Rail Frame 1 Pull the rail frame out until it is fully extended 2 Remove the two screws securing the rail cable bracket Figure 2 11 Remove the two screws securing the rail cable bracket ...

Page 36: ...ll Inc 3 Loosen the screw securing the rail cable bracket to the rail frame Figure 2 12 Loosen the screw securing the rail cable bracket to the rail frame 4 Remove the rail cable bracket 5 Disconnect the rail cable from P1 on the rail controller board Figure 2 13 Disconnect the cable from P1 on the rail controller board ...

Page 37: ...d Wireways 2 9 Wireway Removal 6 Remove the rail frame from the OmniDispenser Figure 2 14 Remove the rail frame from the OmniDispenser Ribbon Cable 1 Remove the four screws two on each side that secure the top tray to the frame Figure 2 15 Remove the four screws securing the top tray to the frame ...

Page 38: ... Omnicell Inc 2 Pull the top tray out far enough to reach the ribbon cable Figure 2 16 Pull out the top tray 3 Disconnect the ribbon cable from the reach board and pull the ribbon cable through the opening on the right side of the tray Figure 2 17 Remove the ribbon cable from the slot on the right side of the tray ...

Page 39: ... bayonet 5 Remove the four screws that secure the top bayonet Figure 2 19 Remove the four screws that secure the top bayonet 6 Move the top bayonet slightly and disconnect the ribbon cable from the wireway 7 Place one screw back in the top bayonet to secure the bayonet to the frame Note Do not attempt to remove the top bayonet from the frame The manual override cables are attached to the bayonet a...

Page 40: ... Omnicell Inc 8 Remove the two screws that secure the second bayonet to the frame Figure 2 20 Remove the two screws securing the second bayonet from the top to the frame 9 Remove the second bayonet from the frame and disconnect the ribbon cable Figure 2 21 Remove the second bayonet and disconnect the ribbon cable ...

Page 41: ...way Removal Restock Door 1 Remove the two Phillips head screws securing the trunnion bars to the module frame Figure 2 22 Remove the screws securing the trunnion bars to the module frame 2 Remove the three screws securing the fix inhibitor bracket Figure 2 23 Remove the three screws securing the fix inhibitor bracket ...

Page 42: ...ev G 2011 Omnicell Inc 3 Remove the two screws securing each side of the bottom bracket to the frame Figure 2 24 Remove the screws securing the bottom bracket 4 Remove the door Bottom Bayonet 1 Remove the four screws that secure the bottom bayonet to the frame Figure 2 25 Remove the bottom bayonet screws ...

Page 43: ... 2 15 Wireway Removal 2 Remove the bottom bayonet Figure 2 26 Remove the bottom bayonet from the frame 3 Disconnect the ribbon cables from the wireway Figure 2 27 Disconnect the ribbon cables from the wireway 3 drawer Carrier The removal procedure for the 3 drawer carrier is similar to the 9 drawer carrier ...

Page 44: ...rews two screws on the top of the wireway and the two screws asymmetrically placed near the center of the wireway using a T15 Torx screwdriver Figure 2 28 Remove the Screws Securing the Wireway 2 Pull the wireway slightly forward and disconnect the overhead communications cable Figure 2 29 Disconnect the Overhead Communications Cable 3 Remove the wireway ...

Page 45: ...G Shelves 3 1 Removal Procedure Shelves Removal Procedure 1 Lift the shelf clips on either side of the switchpanel and open the clips o Figure 3 1 Lift the Shelf Clips 2 Disconnect the switchpanel from the SPC board in the wireway Figure 3 2 Disconnect the Switchpanel from the SPC Board ...

Page 46: ...sh the shelf up and remove 5 Remove the shelf clip if a new shelf will not be re installed in the same location 6 Remove the dividers from the clips Note In certain cases the shelf clip may be secured with a single screw that provides extra support Remove the screw using a Torx T15 screwdriver If a new shelf will not be re installed in the location be sure to cover the opening in the frame with a ...

Page 47: ...s on the shelf Figure 3 5 Remove the clip from the shelf 8 Remove the clips from the shelf Installation Procedure 1 Remove the switchpanel connector covers one on each side where the shelf will be installed 2 Insert a shelf clip into the hole on the frame 3 Slide the switchpanel into its holder Figure 3 6 Slide the switchpanel into its holder 4 Lift up the tabs on the shelf clips ...

Page 48: ...C board in the wireway Figure 3 7 Connect the Switchpanel to the SPC Board 6 Insert the switchpanel and the holder into the shelf clips and close the clips 7 Slide the shelf into the mounting slots at the back of the frame 8 Lower the shelf into the shelf supports and ensure they are locked into place 9 Place the clips on the shelf at the required position ...

Page 49: ...a product option that must be purchased separately and does not come as a standard feature A pull out shelf should never be installed in the top 1 3 of a cell 1 Perform a graceful shutdown of the CT PC box 2 Open the door in the zone where the pull out shelf will be located 3 If a standard shelf already exists in the location planned for the pull out shelf remove the standard shelf first 4 Insert ...

Page 50: ...3 6 Shelves Pull out Shelf 1 2 3 Cell Color Touch Installation and Service Guide 67 2014 Rev G 2011 Omnicell Inc ...

Page 51: ...location of the product The switchpanels can be removed and relocated with the corresponding shelf drawer or rack and can be re used from one shelf to another similar shelf or from one drawer to another drawer However a switchpanel cannot be moved from a shelf to a catheter rack or from a drawer to a shelf Each switchpanel is designed to work with one storage type only This chapter provides the re...

Page 52: ...dure From a Shelf 1 Lift the shelf clips on either side of the switchpanel and open the clips o Figure 4 1 Lift the Shelf Clips 2 Disconnect the switchpanel from the SPC board in the wireway 3 Remove the switchpanel and its holder from the clips 4 Slide the switchpanel from its holder Figure 4 2 Remove the switchpanel from its holder ...

Page 53: ...e the screws securing the drawer to the mounting bracket 3 Remove the supply drawer and its casing from the dispenser unit Caution If pliers are used to remove the drawer ribbon cable ensure that the connection is removed slowly and that the pliers are pulling both the cable and the connection If the connector on the end of the ribbon cable comes free from the ribbon cable it might cause a short d...

Page 54: ...om the Drawer From a Pull out Shelf 1 Slide the shelf partially out of the dispenser unit 2 Remove the four Allen Screws from the top of the switchpanel using a 5 64 Allen wrench 3 Pull the left side of the switchpanel away from the shelf to expose the two screws securing the switchpanel to the right side of the frame 4 Remove the two screws using a small Phillips head screwdriver 5 Remove the swi...

Page 55: ...uture rack s right most rack forward then disconnect the SPC board cable Figure 4 6 Remove the SPC board cable 2 Remove the two screws securing the rack to the housing using a 3 32 Allen wrench Figure 4 7 Remove the screws securing the suture rack to the housing 3 Remove the suture rack from the L brackets 4 Open the suture rack and locate the LED cable ...

Page 56: ... Disconnect the LED cable from the wireway connector Figure 4 8 Disconnect the LED cable 6 Remove the LED cable from the plastic routing clip Figure 4 9 Remove the LED cable from the plastic routing clip 7 Remove the cable plate from the rear of the housing Figure 4 10 Disconnect the cable plate from the suture rack drawer ...

Page 57: ...e from the switchpanel Figure 4 11 Disconnect the Switchpanel Cable 9 Remove the switchpanel by sliding it out of the housing 10 Disconnect the LED cable from the switchpanel by pressing the tab on the connector From a Catheter Rack 1 Pull the cath rack rail forward until it is fully extended Figure 4 12 Extend the cath rack rail until it locks into place ...

Page 58: ...tion and Service Guide 67 2014 Rev G 2011 Omnicell Inc 2 Remove the two nuts on either side of the front panel using a 5 16 nut driver Figure 4 13 Remove the nuts securing the LED panel 3 Disconnect the LED cable from the LED panel Figure 4 14 Disconnect the LED cable ...

Page 59: ...tallation and Service Guide 67 2014 Rev G Switchpanels 4 9 Removal Procedure 4 Remove the two screws on the front plate handle Figure 4 15 Remove the two screws on the front plate handle 5 Remove the front plate Figure 4 16 Remove the front plate ...

Page 60: ...rews on the back of the cath rack arm using a Torx T8 screwdriver Figure 4 17 Remove the two screws securing the LED cable to the cath rack arm 7 Slide the switchpanel toward the back of the unit Stop when the switchpanel is about halfway out 8 Disconnect the switchpanel cable from the switchpanel Figure 4 18 Disconnect the switchpanel cable ...

Page 61: ... 3 Cell Color Touch Installation and Service Guide 67 2014 Rev G Switchpanels 4 11 Removal Procedure 9 Slide the switchpanel forward and remove it from the rail Figure 4 19 Remove the switchpanel from the Catheter rack rail ...

Page 62: ...4 12 Switchpanels Removal Procedure 1 2 3 Cell Color Touch Installation and Service Guide 67 2014 Rev G 2011 Omnicell Inc ...

Page 63: ...ors Introduction Omnicell 1 2 and 3 cell cabinets and half cell units have doors that are similar but can be different sizes The standard sizes for a door on a 1 2 or 3 cell cabinet are A full height 2 3 height next page B 1 3 height and C CT PC Door Figure 5 1 A Full height door B 1 3 door and C CT PC door A B C ...

Page 64: ...rator user name and password into the CT PC Box 2 Access the diagnostics screen and unlock the doors 3 Open the door If the cabinet is not powered up 1 Unlock the cabinet using the 2036 key Start with the right most cell and unlock each cell until the desired cell is unlocked 2 Open the door 1 Remove the two screws securing the top bracket of the door using a Torx T20 screwdriver Note Hold onto th...

Page 65: ...uring the Top Bracket 2 Lift the door off the lower door bracket Installation Procedure 1 Place the door bottom first onto the bottom bracket Ensure that the door is securely placed in the bracket 2 Place the top bracket onto the door and line up the top of the door with the screw holes on the cabinet frame 3 Attach the two screws securing the top bracket ...

Page 66: ...5 4 Doors Installation Procedure 1 2 3 Cell Color Touch Installation and Service Guide 67 2014 Rev G 2011 Omnicell Inc ...

Page 67: ... or CT PC Box lids The cam locks are mounted with pawl latches and are designed to be oriented only one way The following diagram shows the proper orientation of locks on a 1 2 or 3 cell cabinet This chapter provides the removal procedure Installation can be done by performing the removal procedure in reverse order Tools list The following tools are required to install the CT PC Box Torx T8 driver...

Page 68: ... 2 Remove the two screws securing the cam lock assembly to the wireway using a Torx T15 screwdriver Figure 6 1 Remove the Two Screws Securing the Lock Assembly 3 Remove the lock from the wireway Manual Override Cover Manual override covers are equipped with locks to help prevent unauthorized access to pharmacy drawers and dispensers 1 Unlock and remove the manual override cover Figure 6 2 Unlock a...

Page 69: ... 67 2014 Rev G Locks and Latches 6 3 Removal Procedure 2 Remove the nut that secures the lock to the cover Figure 6 3 Three Drawer Manual Override Cover and Locks 3 Remove the pawl latch 4 Loosen and remove the larger nut that secures the lock to the cover 5 Remove the lock ...

Page 70: ...6 4 Locks and Latches Removal Procedure 1 2 3 Cell Color Touch Installation and Service Guide 67 2014 Rev G 2011 Omnicell Inc ...

Page 71: ...The lit matrix drawers are configurable up to a maximum of 24 bins and the unlit matrix drawer is configurable up to a maximum of 96 bins The drawers are separated into four equal quadrants In the unlit drawers each quadrant can contain a maximum of 24 bins In the lit matrix drawer each quadrant can contain a maximum of six bins The Omnicell Sensing Lid OSL models have sensing lids As each lid is ...

Page 72: ...he layout of each drawer has been approved by the customer before installing the dividers 2 Break the divider tabs according to the customer design and trim away excess plastic to ensure a snug fit in the drawer 3 Add the dividers to the bin liner The dividers should snap into the bottom of the drawer and the sides of each bin liner quadrant 4 Use the gray circular labels provided with the kit to ...

Page 73: ... fit in the drawer 3 Add the dividers to the bin liner The dividers should snap into the bottom of the drawer and the sides of each bin liner quadrant 4 Use the gray circular labels provided with the kit to cover any un used divider slots in the bin liner 5 Insert the light pipes into each notch provided in the dividers The light pipe is installed on the rear side of the bin divider and snaps into...

Page 74: ... 4 These numbers are used to identify bin locations for the drawer The drawer will be numbered by using the lowest number in a specific bin In the following example the bin in the lower right corner of the drawer would be Bin 7 the bin in the upper left corner would be Bin 49 and the bin in the upper right corner would be Bin 85 Figure 7 3 Matrix Drawer labeling System Once a bin has been configur...

Page 75: ...on Double Deep Drawer Installing a Double Deep 4 Bin Matrix drawer OMD4 is the same as installing any other double deep drawer in a 1 2 or 3 Cell cabinet The OMD4 would replace an existing double deep drawer or it would replace two single deep drawers 1 Perform a graceful shutdown of the CT PC box and remove the existing double deep drawer two existing drawers two false door fronts or a combinatio...

Page 76: ...ill be used later in the procedure Figure 7 4 Remove the screws securing the false drawer front 4 Remove the slide support bracket Figure 7 5 Remove the slide support bracket 5 Connect the drawer cable to the drawer connect board 6 Attach one side of the double sided tape to the cable clamp and the other to the drawer cable 7 Line up the tape to the edges of the clamp and secure the clamp to the c...

Page 77: ...lacing the pharmacy drawer 13 Place the drawer onto the rails and push it all the way into the cabinet 14 Pull the drawer back out until as far as it will go 15 Place the drawer controller cable onto the drawer and connect the cable to the drawer 16 Replace the pharmacy drawer controller cable clamp and the drawer controller cable to the pharmacy drawer with the two screws provided with a Torx T10...

Page 78: ...ssary A Nine Drawer Pharmacy Module cannot be retrofitted with a Three Drawer Pharmacy Module as the entire frame must be replaced to install a Three Drawer Module A Three Drawer Pharmacy Module can only be installed in the supply zones of full frame cabinet 1 Perform a graceful shutdown of the CT PC box 2 If a door exists in the zone where the three drawer module exists remove the door a Open the...

Page 79: ...the zone in which the Three Drawer Pharmacy Module needs to be installed Use diagonal cutters to cut the rivets Figure 7 7 Cut the rivets on the inside of the frame 7 Slide the plastic cover panel between the metal flange and the acrylic panel on the inner side of the frame aligning all rivet holes Secure the panel to the frame with rivets using a rivet installer Figure 7 8 Slide the plastic cover...

Page 80: ...the rear and right carrier wall into the frame so that the three tabs on the rear carrier wall anchor into the slots on the back of the frame Figure 7 9 Insert the right and rear carrier walls 9 Secure the right carrier bracket to the frame with two screws with a Torx T15 screwdriver Figure 7 10 Secure the carrier wall to the frame ...

Page 81: ...n Procedures 10 Insert the spacer bracket between the left carrier bracket and the frame Figure 7 11 Insert the hinge bracket between the left carrier wall and the frame 11 Secure the left carrier wall to the frame with two screws using a Torx T15 screwdriver Figure 7 12 Secure the left carrier wall to the frame ...

Page 82: ...top and bottom slides to the holes on the left carrier wall securing each with two screws with a Torx T15 screwdriver Figure 7 13 Install the drawer slides 13 Install the front Facia bracket connecting it with two screws to both the left and right walls of the carrier with a Torx T10 screwdriver Figure 7 14 Install the front facia bracket ...

Page 83: ...Connect one end of the SPC to carrier control board 10 pin ribbon cable to the carrier control board and the other end to the SPC board on the frame Figure 7 15 Connect the SPC to carrier cable 15 Insert the tabs on the slide support brackets into the slots on the rear carrier wall Figure 7 16 Insert the slide support brackets ...

Page 84: ...ce the pharmacy drawer controller cable clamp and the drawer controller cable to the pharmacy drawer with the two screws provided with a Torx T10 screwdriver 22 Close the drawer 23 Repeat the steps for the other two drawers 24 Replace the pharmacy manual override cover Configuration 1 Power up the cabinet 2 Program the drawer at the OmniSupplier in OmniConfigurations 3 Log on by entering a valid u...

Page 85: ...ould be Inactive Removal Procedure Pharmacy Drawer 1 Perform a graceful shutdown of the CT PC box 2 Remove the manual override cover on the pharmacy drawers Figure 7 18 Remove the manual override cover 3 Pull the manual override lever flag and open the desired pharmacy drawer Note When replacing a drawer reset the drawer address before performing the replacement See Resetting Drawer Addresses on p...

Page 86: ...e 67 2014 Rev G 2011 Omnicell Inc 4 Remove the two screws securing the drawer controller cable cover to the cable clamps with a Torx T10 screwdriver Figure 7 19 Remove the controller cable cover 5 Remove the cable clamp and disconnect the cable Figure 7 20 Remove the controller cable ...

Page 87: ...ure 7 21 Push the release levers to release the drawer 7 Remove the pharmacy drawer from the module Resetting Drawer Addresses Drawers are programmed during manufacturing and must be reprogrammed if there are any changes to the drawer locations To check the current programming or to reprogram the drawers 1 Log on to the cabinet as omnitech 2 Select Omni Config Program Pharmacy Drawers 3 Select the...

Page 88: ... G 2011 Omnicell Inc Starting at the top of the cabinet the system lights the first drawer 4 Press the lit button to program the drawer A message indicates when the drawer is successfully programmed 5 Press Next Drawer and continue programming each drawer and zone until complete 6 When finished press Done ...

Page 89: ...ect board also protects the pharmacy drawers from electrical shorts and overloads This chapter provides the removal procedure Installation can be done by performing the removal procedure in reverse order Tools List The following tools are required to install the CT PC Box Torx T15 screwdriver 1 16 Allen wrench Removal Procedure 1 Perform a graceful shutdown of the CT PC Box 2 Remove the manual ove...

Page 90: ...2014 Rev G 2011 Omnicell Inc 4 Remove any false drawer fronts Figure 8 2 Remove the Screws Securing the False Drawer Front 5 Remove the two screws securing the manual override lever then remove the bar Figure 8 3 Remove the Manual Override Bar 6 Remove the two screws securing the slide support bracket ...

Page 91: ...v G Drawer Connect Board 8 3 Removal Procedure 7 Remove all slide support brackets Figure 8 4 Remove the Slide Support Brackets 8 Remove the two screws on either side of each cable mounting bracket using a Torx T15 screwdriver Figure 8 5 Remove the Screws on the Cable Mounting Bracket ...

Page 92: ...d Service Guide 67 2014 Rev G 2011 Omnicell Inc 9 Disconnect the drawer cables from the drawer connect board Figure 8 6 Disconnect the Drawer Cable from the Drawer Connect Board 10 Remove the SPC to drawer connect board cables Figure 8 7 Remove the SPC to Drawer Connect Board Cables ...

Page 93: ...ide 67 2014 Rev G Drawer Connect Board 8 5 Removal Procedure 11 Remove the eight screws securing the drawer connect board to the wall using the 1 16 Allen wrench Figure 8 8 Remove the Screws Securing the Drawer Connect Board to the Wall 12 Remove the drawer connect board ...

Page 94: ...8 6 Drawer Connect Board Removal Procedure 1 2 3 Cell Color Touch Installation and Service Guide 67 2014 Rev G 2011 Omnicell Inc ...

Page 95: ...Manual records must be kept when using the manual override system as no power is being supplied to the Omnicell cabinet This chapter provides the removal procedure Installation can be done by performing the removal procedure in reverse order Tools List The following tools are required to install or remove a manual override Torx T15 screwdriver Torx T20 screwdriver Removal Procedure 1 Perform a gra...

Page 96: ...Omnicell Inc 4 Remove any false drawer fronts Figure 9 2 Remove the Screws Securing the False Drawer Front 5 Remove the two screws securing the manual override lever then remove the bar Figure 9 3 Remove the Manual Override Bar 6 Remove the two screws securing the slide support bracket and slide support bracket ...

Page 97: ...ual Override 9 3 Removal Procedure 7 Remove all slide support brackets Figure 9 4 Remove the Slide Support Brackets 8 Remove the screws securing the top cover to the frame one on each side of the carrier Figure 9 5 Remove the screws securing the top cover to the frame 9 Remove the top cover ...

Page 98: ...the left carrier wall to the back of the frame Figure 9 6 Remove the Two Screws Securing the Left Carrier Wall to the Back of the Frame 11 Remove the buttonhead screw securing the left carrier wall to the left side of the frame Figure 9 7 Remove the buttonhead screw securing the left carrier wall to the left side of the frame 12 Remove the left carrier wall ...

Page 99: ... Rev G Manual Override 9 5 Removal Procedure 13 Remove the four screws securing the right carrier wall to the right side of the frame Figure 9 8 Remove the four screws securing the right carrier wall to the right side of the frame 14 Remove the right and rear carrier walls together ...

Page 100: ...ide of the rear carrier wall Figure 9 9 Remove the nut securing the manual override to the back side of the rear carrier wall 16 Remove the buttonhead screw securing the manual override to the carrier wall Figure 9 10 Remove the buttonhead screw securing the manual override to the carrier wall 17 Slide the manual override away from the rear of the frame and remove the manual override ...

Page 101: ...ectors up 4 Remove the three screws securing the cable cover to the frame of the unit using a 3 32 Allen wrench 5 Remove any switchpanel connector covers from the wireway holes on the frame 6 Slide the cath rack into the frame Make sure that the rear tabs slide into the slots at the back of the frame 7 Insert two Allen wrenches into the screw holes on the right and left sides of the frame to tempo...

Page 102: ...s an example if the first wireway cable is attached to the fifth wireway connection the value would be 5 Removal Procedure 1 Perform a graceful shutdown of the CT PC Box 2 Unlock the cabinet where the catheter rack is located 3 Remove the cable cover using a 3 32 Allen wrench to remove the three screws 4 Disconnect the eight cable connectors from the wireway 5 Remove the screw from the left screw ...

Page 103: ...ures 1 Perform a graceful shutdown of the CT PC Box 2 Unlock the cabinet where the catheter rack is located LED Panel 1 Pull the cath rack rail forward until it is fully extended Figure 10 1 Extend the cath rack housing until it locks into place 2 Remove the front LED panel by removing the two nuts on either side of the panel using a 5 16 nut driver Figure 10 2 Remove the nuts securing the LED pan...

Page 104: ...v G 2011 Omnicell Inc 3 Disconnect the LED cable from the front LED panel then remove the panel Figure 10 3 Disconnect the LED cable Front Plate 1 Perform the procedures described in LED Panel on page 10 3 2 Remove the two screws on the plate handle Figure 10 4 Remove the two screws on the plate handle ...

Page 105: ...and Cable 1 Perform the procedures described in LED Panel on page 10 3 2 Perform the procedures described in Front Plate on page 10 4 3 Remove the two screws on the back of the cath rack housing using a Torx T8 screwdriver Figure 10 6 Remove the two screws securing the LED cable to the cath rack 4 Slide the switchpanel toward the back of the unit and stop when the switchpanel is about halfway out ...

Page 106: ...gure 10 7 Disconnect the switchpanel cable 6 Slide the switchpanel forward and remove it from the rail LED Cable 1 Pull the cath rack rail forward until it is fully extended 2 Remove the front LED panel by removing the two nuts on either side of the panel using a 5 16 nut driver 3 Remove the front plate from the cath rack arm by removing the two screws using a Torx T15 screwdriver ...

Page 107: ...14 Rev G Catheter Rack 10 7 Service Procedures 4 Remove the two screws securing the plate on the back of the cath rack arm using a Torx T8 screwdriver 5 Remove the plate 6 Slide the switchpanel toward the back of the cabinet 7 Disconnect the switchpanel cable from the switchpanel ...

Page 108: ...he switchpanel See Switchpanel and Cable on page 10 5 4 Remove the two screws that secure the rail to the side of the frame using an 11 32 nutdriver 5 Remove the two screws that secure the slide to the cath rack SPC Board 1 Remove the cath rack See Removal Procedure on page 10 2 2 Disconnect the six cables from the cath rack SPC board 3 Remove the four screws securing the board to the rack using a...

Page 109: ... 2011 Omnicell Inc 1 2 3 Cell Color Touch Installation and Service Guide 67 2014 Rev G Catheter Rack 10 9 Service Procedures 5 Remove the SPC cables from the housing and out through the three cable tags ...

Page 110: ...10 10 Catheter Rack Service Procedures 1 2 3 Cell Color Touch Installation and Service Guide 67 2014 Rev G 2011 Omnicell Inc ...

Page 111: ...ll or remove a suture rack 3 32 Allen wrench 5 32 Allen wrench Torx T8 screwdriver Torx T15 screwdriver Installation Procedure Cabinet Preparation 1 Perform a graceful shutdown of the CT PC Box 2 Open the door where the suture rack will be installed 3 Remove any existing shelves or drawers where the rack will be located Suture Rack Housing 1 Slide the two suture rack brackets into the slots presen...

Page 112: ...n On Off On Off On On Off 21 Off On Off On Off On On Off 22 On Off Off On Off On On Off 23 Off Off Off On Off On On Off 24 On On On Off Off On On Off 25 Off On On Off Off On On Off 26 On Off On Off Off On On Off 27 Off Off On Off Off On On Off 28 On On Off Off Off On On Off 29 Off On Off Off Off On On Off 30 On Off Off Off Off On On Off 31 Off Off Off Off Off On On Off 32 On On On On On Off On Off...

Page 113: ...f 56 On On On Off Off Off On Off 57 Off On On Off Off Off On Off 58 On Off On Off Off Off On Off 59 Off Off On Off Off Off On Off 60 On On Off Off Off Off On Off 61 Off On Off Off Off Off On Off 62 On Off Off Off Off Off On Off 63 Off Off Off Off Off Off On Off 64 On On On On On On Off Off 65 Off On On On On On Off Off 66 On Off On On On On Off Off 67 Off Off On On On On Off Off 68 On On Off On On...

Page 114: ...ff Off On Off Off 93 Off On Off Off Off On Off Off 94 On Off Off Off Off On Off Off 95 Off Off Off Off Off On Off Off 96 On On On On On Off Off Off 97 Off On On On On Off Off Off 98 On Off On On On Off Off Off 99 Off Off On On On Off Off Off 100 On On Off On On Off Off Off 101 Off On Off On On Off Off Off 102 On Off Off On On Off Off Off 103 Off Off Off On On Off Off Off 104 On On On Off On Off Of...

Page 115: ...s can be full height or half height A typical full height divider looks like this 114 On Off On On Off Off Off Off 115 Off Off On On Off Off Off Off 116 On On Off On Off Off Off Off 117 Off On Off On Off Off Off Off 118 On Off Off On Off Off Off Off 119 Off Off Off On Off Off Off Off 120 On On On Off Off Off Off Off 121 Off On On Off Off Off Off Off 122 On Off On Off Off Off Off Off 123 Off Off On...

Page 116: ... the divider so that the side with the notched edge is facing the shelf and the edge with two tabs is facing up 3 Angle the divider so that it fits into the rack 4 Insert the top two tabs into the top of the rack at the desired location 5 Insert the bottom tab into the slot align the slots and keep the divider straight in the rack Color Coding 1 Open the rack where the color coding will be install...

Page 117: ...from the frame 7 Remove the screws securing the suture rack brackets using a 3 32 allen wrench or a Torx T15 screwdriver LED plate 1 Pull the rack out far enough to see behind the front panel 2 Disconnect the LED cable on the inside of the front panel 3 Remove the two bolts securing the plate using the 5 32 nut driver 4 Remove the plate LED cable 1 Pull the rack out far enough to see behind the fr...

Page 118: ...and Cable 1 Pull the right most rack forward and disconnect the SPC cable Figure 11 1 Remove the SPC Board Cable 2 Remove the two screws securing the rack to the housing using a 3 32 Allen wrench or a T15 Torx screwdriver Figure 11 2 Remove the screws securing the suture rack to the housing 3 Remove the suture rack from the housing ...

Page 119: ...using a 3 32 Allen wrench Figure 11 4 Remove the Four Screws Securing the SPC Board 6 Remove the SPC board 7 Remove the suture rack from the cabinet 8 Disconnect the SPC cable from the SPC board on the back of the rack 9 Turn the suture rack on its side 10 Remove the four screws at the bottom of the rack using a 3 32 Allen wrench Torx T15 screwdriver 11 Remove the cable sliding it under the two at...

Page 120: ...11 10 Suture Rack Removal Procedure 1 2 3 Cell Color Touch Installation and Service Guide 67 2014 Rev G 2011 Omnicell Inc ...

Page 121: ...ver Phillips 1 screwdriver Standard Blade Screwdriver Cam Lock Key 2036 Cam Lock Key 2378 Remove the CT PC Box 1 Perform a graceful shutdown of the cabinet 2 Unplug the cabinet power cord from the outlet 3 Unplug the network cable from the back of the CT PC Box 4 Unlock the cabinet doors using the 2036 key 5 Remove the screws that secures the CT PC Box to the cabinet Pharmacy cabinets PC box screw...

Page 122: ...he front corners using a T 10 Torx driver 8 32x3 8 SHC screws Figure 12 2 Supply cabinet a Slowly pull the CT PC Box from the frame until the side mounted slides lock and stop b Unlock the CT PC Box cover with the cam lock key 2036 Figure 12 3 Unlock the CTPC Box Cover c Remove the cover by lifting the front end and pulling away from the cabinet d Disconnect the SPC cables from the PowerCom board ...

Page 123: ...fully remove it from the cabinet and set it on a flat surface g Remove the wireway clip and disconnect the SPC cables from the wireway Remove and discard the cables but keep the wireway clip Caution The CT PC Box is heavy Trying to lift or remove the box alone could result in injury Get help from a second person to lift and remove the CT PC Box from the cabinet Important The following sections cov...

Page 124: ...st screw on the door hinge above the CT PC Box area Use a Torx T20 driver Figure 12 6 Remove the innermost screw on the door hinge Important Do NOT remove the two outermost screws on the door hinge The hinge has an inner piece that will become dislodged and fall to the bottom of the wireway if the two screws are removed If this happens the door will not be able to be replaced until a new piece is ...

Page 125: ...tallation of the G4 Console 1 Place the smaller cover on the right side of the console enclosure and set it on the ridge Figure 12 7 Place the smaller cover in the enclosure 2 Ensure that the tab of the small cover is positioned below the rear and side flange of the frame Figure 12 8 Ensure the tab is below the rear and side flange ...

Page 126: ... Inc 3 Secure the cover to the frame by adding a 8 32 x 3 8 flathead torx screw to the front of the cover near the wireway opening Use a Torx T20 driver Figure 12 9 Secure the cover with the screw provided 4 Place the larger cover on the left side of the console enclosure and set it on the ridge Figure 12 10 Place the large cover into the frame opening ...

Page 127: ...5 Ensure that the tab of the large cover is positioned below the rear and side flange of the frame Figure 12 11 Ensure that the tab is below the rear and side flange on the frame 6 Attach the two sections of the cover by adding two screws to the top front portion of the cover Use a Torx T15 driver Figure 12 12 Add a screw to join the two portions of the cover ...

Page 128: ...llation and Service Guide 67 2014 Rev G 2011 Omnicell Inc 7 Secure the large section of the cover to the frame by attaching the screw that was previously removed from the door hinge There is also a spare screw in the upgrade kit Figure 12 13 Secure the large portion of the cover by replacing the screw ...

Page 129: ...2 9 Prepare for Installation of the G4 Console 8 Add three more screws as shown in Figure 12 14 on page 12 9 to complete the joining of the two cover pieces Use a Torx T15 driver Figure 12 14 Add three more screws to secure the lid pieces Note Do not tighten any of the screws until all of the screws are installed ...

Page 130: ...ion of the G4 Console 1 2 3 Cell Color Touch Installation and Service Guide 67 2014 Rev G 2011 Omnicell Inc Add the Ribbon Cable 1 Add the new ribbon cable plugging in both connectors to the wireway Figure 12 15 Place the ribbon cables into the wireway ...

Page 131: ...y using a cable clip Place the clip between the two cables and snap it into place Figure 12 16 Add the wireway clip Important If the clip is not installed the ribbon cable can very easily come unplugged and or damaged during use Important The cable clip secures the connectors not the cable itself Ensure that the cable is not caught underneath the clip when the clip is installed or the cable may be...

Page 132: ...l Inc 3 Move the wireway cable out of the opening and secure it so that it does not get in the way when installing the G4 console Figure 12 17 Move the wireway cable and secure it outside of the console opening Connect the E Box Battery 1 Remove the two screws that secure the lid on the E Box Figure 12 18 Remove the two screws that secure the E Box lid ...

Page 133: ...nstallation of the G4 Console 2 Remove the E Box lid 3 Check the velcro straps that secure the battery and ensure they are secure Tighten the straps if they are loose Figure 12 19 Tighten the velcro straps around the battery 4 Connect the battery cable to the PowerCom4 board Figure 12 20 Connect the battery to the PowerCom4 board ...

Page 134: ...rails 2 Pull the console back out until the rails stop 3 Connect the wireway cable to the E Box Important The G4 console is heavy and requires two people to lift it into place Trying to lift the console into the cabinet with just one person can result in injury or damage to the console Note If there is interference between the G4 console and the top of a previously installed supply drawer verify t...

Page 135: ...4 Rev G Installing a G4 Console 12 15 Install the G4 Console 4 Secure the connection with the screws provided Use a 1 Phillips screwdriver Figure 12 22 Connect the wireway cable to the E Box 5 Attach the network cable to the LAN port provided Figure 12 23 Attach the network cable ...

Page 136: ... Inc Close the G4 Console and Power on the Cabinet 1 Carefully slide the G4 console with E Box into the cabinet 2 Open the keyboard door 3 Remove the filter access panel Figure 12 24 Remove the filter access panel 4 If the filter is not in place install the filter Slide the filter behind the filter holders Figure 12 25 Add the filter ...

Page 137: ...he G4 Console 5 Add the M4x14 security screw to the top of the printer enclosure securing it to the console cover Figure 12 26 Add the M4x14 security screw 6 Lock the G4 console into place using the 2378 key Turn the key vertical to lock the console into place Figure 12 27 Power on the cabinet 7 Replace the filter access panel ...

Page 138: ...alling a G4 Console Install the G4 Console 1 2 3 Cell Color Touch Installation and Service Guide 67 2014 Rev G 2011 Omnicell Inc 8 Power on the cabinet 9 Close the keyboard door 10 Configure the cabinet as needed ...

Page 139: ...he PC box 3 Use key 2378 and unlock the PC box Figure 13 1 Unlock the PC console 4 Pull the PC box from the console Remove the Electronics Tray from the CT PC Console If two people are not present to lift the CT PC console with E Box into the frame remove the E Box from the console before lifting the console into the cabinet frame Otherwise proceed to the next section ...

Page 140: ...s on each side of the E Box that secure the E Box to the bottom of the CT PC console Figure 13 2 2 Remove the three power cables that are attached to the right side of the E Box Figure 13 3 Disconnect the power cables 3 Remove all the cables from the left hand side of the E Box frame including all USB sound video and network cables ...

Page 141: ...rvice 13 3 Figure 13 4 4 Loosen but do not remove the screw on the side of the console frame Figure 13 5 Loosen the screw Note Take note of the routing of all cables and which cable guide clips are used for which cables When replacing these cables they should be routed the same way they were removed ...

Page 142: ...Omnicell Inc 5 Slide the E Box away to the left then lift and remove it from the CT PC console Figure 13 6 Remove the E Box from the frame 6 Push down on the two side clips that secure the PC Box frame to the console and pull the frame from the console Figure 13 7 Remove the frame from the console ...

Page 143: ...ox Service 13 5 Install the E Box onto the Console 1 Pull the console as far out as it goes on the rails and slide the E Box in at an angle from the left side to install it on the console frame Figure 13 8 2 Straighten out the E Box and slide it into place on the CT PC console frame Figure 13 9 ...

Page 144: ... G4 PC Box Service 1 2 3 Cell Color Touch Installation and Service Guide 67 2014 Rev G 2011 Omnicell Inc 3 Replace and tighten the screws that secure the E Box to the console frame Figure 13 10 Figure 13 11 ...

Page 145: ...he right hand side of the E Box The location of the two bottom molex connectors is unimportant The connections are the same and supply identical power Figure 13 12 5 Reconnect the USB power sound and network cables on the left hand side of the E Box refer to Figure 13 13 to ensure that the cables are routed in the proper locations Figure 13 13 ...

Page 146: ...nc Prepare PC Box Console with E Box 1 Connect the ribbon cable to the E Box 2 Secure the connection with the screws provided Use a Torx T10 driver Figure 13 14 Add Knock out Safety Plate 1 If the safety plate on the back of the console has not been installed add it before completing the rest of the install ...

Page 147: ...e plate on the left rear of the console and secure it using the screws provided Use a Torx T 10 driver Figure 13 15 3 If the security plate on the right rear of the console is not attached place the plate onto the console and secure it with the screws provided Use a Torx T 10 driver Attach the network cable Figure 13 16 ...

Page 148: ...on and Service Guide 67 2014 Rev G 2011 Omnicell Inc Add the Flex Lock or External Return Bin Optional 1 Feed the extender cable up through the opening in the right rear of the CT PC console Figure 13 17 2 Connect the extender cable to the E Box Figure 13 18 ...

Page 149: ...d the Flex Lock or External Return Bin ERB cable through the punch out hole on the underside of the CT PC console 4 Attach a strain relief to the cable Place the strain relief six to nine inches from the connector Figure 13 19 5 Snap the strain relief into place and ensure that it is secure on the cable Figure 13 20 ...

Page 150: ...ce Guide 67 2014 Rev G 2011 Omnicell Inc 6 Snap the strain relief into the rounded punch out on the underside of the console tray Figure 13 21 7 Connect the Flex Lock or ERB cable to the extender Figure 13 22 8 Mount the Flex Lock or ERB according to the facility request ...

Page 151: ...een Remove and Replace the LCD Touch Screen LCD Touch Screen Removal 1 Open the keyboard printer door 2 Perform a graceful shutdown of the PC box 3 Remove the filter access door Figure 13 23 Removing the filter access door 4 Remove the screw from the top surface of the access area Figure 13 24 This screw must be removed before moving the CT PC box ...

Page 152: ...llation and Service Guide 67 2014 Rev G 2011 Omnicell Inc 5 Use key 2378 and unlock the CT PC box Figure 13 25 Unlocking the PC Box 6 Pull the system out enough to gain easy access to the rear of the LCD touch screen panel Figure 13 26 Pull the PC Box only far enough to gain sufficient access ...

Page 153: ...uch screen panel 8 Remove the two TORX screws from the left rear of the LCD panel to the right when viewed for the angle required to access Figure 13 28 Remove the screws that secure the LCD touch screen panel assembly Note There are two power cables one for the LCD display one for the touch screen These have unique pin patterns but care must still be taken not to damage the connectors by forcing ...

Page 154: ...mbly and slide it away from the keyboard assembly to the right when viewed for the angle required to access to disengage it from the keyhole fasteners on the right rear of the assembly Figure 13 29 Carefully disengage the panel from the keyhole fasteners Figure 13 30 Showing the male half of the keyhole fastener located on the rear of the LCD touch screen assembly shown after removal ...

Page 155: ...screen panel assembly is the reverse of removal Care must be taken to correctly align the keyhole fasteners or damage to the chassis and panel may occur The note below is more important during replacement Note There are two power cables one for the LCD display one for the touch screen These are unique but care must be taken not to damage the connectors by forcing them into the incorrect location N...

Page 156: ...Remove and Replace the Keyboard and Printer Panel Keyboard and Printer Panel Removal 1 Perform a graceful shutdown of the PC box 2 Unlatch the printer panel via the latch at the top of the panel and carefully rotate the panel forward It will rest safely in the lowered position Figure 13 32 Unlatch the keyboard panel Figure 13 33 and carefully lower it forward ...

Page 157: ...G G4 PC Box Service 13 19 Remove and Replace the Keyboard and Printer Panel 3 Remove the rear panels of both printers use a thumb to push the latch forward Figure 13 34 Removing rear printer panel Note position of thumb on latch Figure 13 35 Detail of latch to release rear printer panel ...

Page 158: ...e Guide 67 2014 Rev G 2011 Omnicell Inc 4 Remove the four TORX fasteners from the right printer to remove it Figure 13 36 Remove the four screws from the rear of the right printer 5 Rotate the right printer forward to gain access to the connections on the rear Figure 13 37 Gaining access to the right printer connections ...

Page 159: ...SB cable from the right printer 7 Remove the data cable from the right printer Figure 13 39 Carefully remove the data cable from the right printer 8 Remove the unit and carefully set aside 9 Remove the screws from the left printer They are in the same relative location on the left printer as the right printer 10 Rotate the panel forward to gain access to the connections in a similar fashion as jus...

Page 160: ... Guide 67 2014 Rev G 2011 Omnicell Inc 11 Remove the mini USB cable but from the chassis circuit board not the printer board Figure 13 40 Removing the Mini USB cable for the left printer 12 Remove the data cable from the chassis circuit board not the printer board Figure 13 41 Removing the data cable for the left printer ...

Page 161: ...board and Printer Panel 13 Remove the grounding cable from the keyboard chassis Figure 13 42 Be careful not to allow the fastener from the grounding strap to fall into the chassis after removal 14 Remove the main power cable from the keyboard chassis circuit board Figure 13 43 The main power lead is the largest cable of the cable bundle ...

Page 162: ...c 15 Remove the secondary power cable from the keyboard chassis This cable is considerably smaller and more fragile than the main power cable use care Figure 13 44 Use care removing the secondary power cable 16 Remove the mini USB cable from the keyboard chassis circuit board Figure 13 45 Removing the Mini USB lead from the main circuit board in the chassis ...

Page 163: ...rd and Printer Panel 17 Remove the speaker cable from the keyboard chassis circuit board The speaker connection is hidden under the sheet metal of the chassis Figure 13 46 The circle highlights the location of the speaker connection 18 Cut the cable tie securing the power data USB cable bundle Figure 13 47 Removing the strain relief zip tie ...

Page 164: ... 2014 Rev G 2011 Omnicell Inc 19 Remove the screws holding the keyboard chassis onto the hinge There is one screw on the left and right and one in the center The keyboard chassis should remain caught on the hinge pins but exercise caution Figure 13 48 Removing fastener on the right Figure 13 49 Removing the fastener in the center ...

Page 165: ...ove the chassis GENTLY pull the plastic sides of the chassis apart to help clear the hinge pins Figure 13 50 Removing the keyboard and printer chassis This concludes removal of the printer keyboard panel Keyboard and printer Panel Removal Replacement of the Keyboard and Printer Panel is the reverse of removal Close the CT PC Console and Power on the Cabinet 1 Carefully slide the CT PC console with...

Page 166: ...ide 67 2014 Rev G 2011 Omnicell Inc 2 Open the keyboard tray If the filter is not in place add the filter to the keyboard tray Slide the filter behind the filter holders Figure 13 51 3 Lock the CT PC console into place using the key provided Turn the key vertical to lock the E Box into place Figure 13 52 4 Power on the unit ...

Page 167: ... 2011 Omnicell Inc 1 2 3 Cell Color Touch Installation and Service Guide 67 2014 Rev G G4 PC Box Service 13 29 Remove and Replace the Keyboard and Printer Panel 5 Configure the unit as needed ...

Page 168: ...13 30 G4 PC Box Service Remove and Replace the Keyboard and Printer Panel 1 2 3 Cell Color Touch Installation and Service Guide 67 2014 Rev G 2011 Omnicell Inc ...

Page 169: ...edures required to remove a G4 E Box and replace any FRU parts within the E Box Tools Required Torx T10 driver Torx T15 driver Torx T20 driver Phillips 1 screwdriver Standard Blade Screwdriver Openthe E Box 1 Remove the three screws that secure the E Box lid Figure 14 1 Remove the screws that secure the E Box lid 2 Using the finger holds in the lid pull the lid forward and lift it to remove it fro...

Page 170: ...ox Service Guide Open the E Box 1 2 3 Cell Color Touch Installation and Service Guide 67 2014 Rev G 2011 Omnicell Inc 3 Set the lid and the three screws aside Figure 14 2 The CTPCconsoleE Boxwiththe lid removed ...

Page 171: ... and Service Guide 67 2014 Rev G E Box Service Guide 14 3 Remove Replace the Hard Drive Remove Replace the Hard Drive Removethe HardDrive 1 Remove the data and power cables from the hard drive Figure 14 3 Disconnect the dataand powercablesfromthe harddrive ...

Page 172: ... 67 2014 Rev G 2011 Omnicell Inc 2 Loosen but do not remove the screw that connects the hard drive plate to the E Box wall Figure 14 4 Loosen the screwthatsecuresthe harddriveto the E Boxwall 3 Lift the hard drive up pull it away from the drive all and remove it from the E Box Figure 14 5 Removethe harddrive ...

Page 173: ...ard Drive Replacethe HardDrive 1 Set the hard drive into place inside the E Box Make sure not to pinch any wires that may be present inside the E Box Figure 14 6 Replace the hard drive 2 Tighten the screw that connects the hard drive plate to the E Box wall Figure 14 7 Tighten the screw that secures the hard drive to the E Box wall ...

Page 174: ...emove Replace the Hard Drive 1 2 3 Cell Color Touch Installation and Service Guide 67 2014 Rev G 2011 Omnicell Inc 3 Replace the data and power cables to the hard drive Figure 14 8 Connect the dataand powercablesforthe harddrive ...

Page 175: ...lation and Service Guide 67 2014 Rev G E Box Service Guide 14 7 Remove Replace the Fans Remove Replacethe Fans Remove the Fans 1 Remove the four screws that secure each cooling fan to the E Box Figure 14 9 Remove the screwssecuringthefansto theE Box ...

Page 176: ...h Installation and Service Guide 67 2014 Rev G 2011 Omnicell Inc 2 Disconnect the fan cables from the PowerCom4 board Figure 14 10 Disconnect the fan cables from the PowerCom4 board 3 Remove the fans from the E Box Replacethe Fans 1 Hold each fan in place inside the E Box ...

Page 177: ... E Box Service Guide 14 9 Remove Replace the Fans 2 Replace the four screws that secure each cooling fan to the E Box Figure 14 11 Replace the screws securing the fans to the E Box 3 Connect the fan cables to the PowerCom4 board Figure 14 12 Connect the fan cables to the PowerCom4 board ...

Page 178: ...lacethe Battery 1 Remove the velcro straps that secure the battery to the E Box frame Figure 14 13 Remove the velcro straps that secure the battery to the E Box frame 2 Disconnect the cable that connects the battery to the PowerCom4 board Figure 14 14 Disconnect the cablethatconnectsthebatteryto the PowerCom4board 3 Remove the battery from the E Box ...

Page 179: ... battery into place inside the E Box Make sure not to pinch any wires coming from the power entry module 2 Replace the velcro straps that secure the battery to the E Box frame Figure 14 15 Set the battery on the straps and secure the straps 3 Connect the cable that connects the battery to the PowerCom4 board Figure 14 16 Connect the batterycableto the PowerCom4board ...

Page 180: ...or Touch Installation and Service Guide 67 2014 Rev G 2011 Omnicell Inc Remove Replace the Power Supply Removethe PowerSupply 1 Disconnect the cable that connects the power supply to the PowerCom4 board Figure 14 17 Disconnect the power supply cable from the PowerCom4 board ...

Page 181: ...x Service Guide 14 13 Remove Replace the Power Supply 2 Remove the screw that secures the power supply to the E Box base Figure 14 18 Remove the screwthatsecuresthepowersupplyto theE Box 3 Pull the power supply away from the E Box wall 4 Lift but do not remove the power supply from the E Box ...

Page 182: ...014 Rev G 2011 Omnicell Inc Figure 14 19 Figure1 19 Powersupplypowercable 5 Remove the power cable connected to the power supply Figure 14 20 Disconnect the power cable from the power supply 6 Remove the power supply from the E Box Caution Pulling the power supply too far from the E Box could damage the power supply ...

Page 183: ... Service Guide 67 2014 Rev G E Box Service Guide 14 15 Remove Replace the Power Supply ReplacethePowerSupply 1 Place the power supply into the opening in the E Box Figure 14 21 Place the power supply 2 Reconnect the power cable to the power supply Figure 14 22 ...

Page 184: ...4 Rev G 2011 Omnicell Inc 3 Slide the power supply into place underneath the two tabs on the E Box frame Figure 14 23 Tabsto securethepowersupply 4 Secure the power supply to the E Box by replacing the screw that secures the power supply to the E Box Figure 14 24 Replace the screwthatsecuresthe powersupplyto the E Box ...

Page 185: ...ve Replace the Power Supply 5 Connect the power supply power cable to the PowerCom4 board Figure 14 25 Connect the power supply power cable to the PowerCom4 board Removethewirelesscard 1 Remove the screw that secures the wireless card to the E Box frame Figure 14 26 Remove the screwsecuringthe wirelesscardto the E Box ...

Page 186: ...ervice Guide 67 2014 Rev G 2011 Omnicell Inc 2 Lift the wireless card from the E Box Figure 14 27 Remove the wireless card from the E Box Replacethe wirelesscard 1 Place the wireless card into the E Box ensuring that it fits snugly into the slot on the motherboard Figure 14 28 Replacethewirelesscard ...

Page 187: ... 2 Replace the screw that secures the wireless card to the E Box frame Figure 14 29 Replace the screw that secures the wireless card Remove Replace the Power Entry Module Removethe PowerEntryModule 1 Remove the battery Follow the steps in Remove the Battery on page 1 8 2 Remove the power supply Follow the steps in Remove the Power Supply on page 1 10 ...

Page 188: ... nut driver Figure 14 30 Remove the screwssecuringthepowerentrymoduleto the E Box 4 Pinch the tabs on the inside corners of the power entry module and push it out from the inside of the E Box 5 Remove the power entry module from the E Box Replacethe PowerEntryModule 1 Feed the cables through the back of the E Box into the box 2 Pinch the tabs on the corners of the power entry module and push the m...

Page 189: ...Power Entry Module 3 Replace the two nuts that secure the power entry module wires to the E Box frame Figure 14 31 Replace the screws that secure the ground wires to the E Box 4 Replace the power supply Follow the steps in Replace the Power Supply on page 1 13 5 Replace the battery Follow the steps in Replace the Battery on page 1 9 ...

Page 190: ...14 22 E Box Service Guide Remove Replace the Power Entry Module 1 2 3 Cell Color Touch Installation and Service Guide 67 2014 Rev G 2011 Omnicell Inc ...

Page 191: ...3109 shelf ASSY PULL OUT SHELF Three Drawer Pharmacy Module 13 7000 supply drawer MFG ASSY DRAWER CARRIER RX1 Supply Drawer 13 7002 9 drawer carrier MFG ASSY DRAWER CARRIER RX2 9 drawer Carrier 13 7003 3 drawer carrier MFG ASSY DRAWER CARRIER 3 DWR 3 drawer Carrier 14 1100 numeric keypad MFG ASSY KEYPADS Numeric Keypad 14 1284 PC box cover MFG ASSY COVER CT PC BOX LCD Bezel Assembly 14 2107 wirewa...

Page 192: ...d 15 7020 false door front MFG ASSY DRAWER FRONT DUMMY RX2 Double Deep Drawer 15 7035 manual override lever MFG ASSY PULL LEVER MANUAL OVERRIDE RX 9 drawer Carrier 15 7073 manual override cover MFG ASSY COVER MANUAL OVERRIDE PROFILE RX2 9 drawer Carrier OmniDispenser 15 7075 15 7076 dividers KIT DIVIDER 24 BIN LIT MATRIX KIT DIVIDER 4 96 BIN UNLIT MTR Bin Configuration 15 8016 top bayonet MFG ASSY...

Page 193: ...SPEAKER CT PC BOX Keyboard Door Bezel 42 1202 overhead communications cable CABLE ASSY SPC INTERCONNECT Wireway 42 1242 LCD data cable CABLE ASSY LVDS LCD DISPLAY LCD Bezel Assembly LCD Data Cable LCD Display and Touch Screen Glass 42 3113 42 3114 LED cable CABLE ASSY SWP TO LED 12 BUTTON CATH CABLE ASSY SWP TO LED SUTURE RACK From a Catheter Rack From a Suture Rack LED cable 42 7015 SPC cable CAB...

Page 194: ...UPPLIER Ribbon Cable 53 8105 bottom bracket BRACKET BOTTOM CROSS BAR OMNIDISPENSER Restock Door 53 8108 fix inhibitor bracket BRACKET FIX INHIBITOR OMNIDISPENSER Restock Door 53 8118 spacer bracket BRACKET SPACER 3 DRAWER CARRIER Three Drawer Pharmacy Module 53 8119 top bayonet plate BRACKET CABLE MOUNT TOP BAYONET ONNIDISPENSER Ribbon Cable 56 7016 cover panel COVER SIDE 3 DWR Three Drawer Pharma...

Page 195: ...Assembly CT PC Box Removal Locks and Latches 92 1001 92 1011 manual override cover lock KEY RING 48 O D CAM LOCK 2232 9 drawer Carrier OmniDispenser 94 6005 drawer nuts NUT HEX 4 40 SS From a Supply Drawer 94 6012 drawer screws SCREW SHCS 8 32 X 1 4 SS From a Supply Drawer 94 6039 4 40 x 1 4 buttonhead screw SCREW BHCS 4 40X1 4 SS LCD Display and Touch Screen Glass 94 6049 8 32 x 3 8 screw SCREW B...

Page 196: ...ail Frame Three Drawer Pharmacy Module 94 6165 manual override lever screws top bayonet screw second bayonet screw bottom bayonet screw SCREW BH TORX 8 32 X 3 8 SS 9 drawer Carrier Ribbon Cable Bottom Bayonet 94 6172 4 40 x 1 4 flathead screw SCREW FH TORX 4 40X1 4 SS LCD Display and Touch Screen Glass 94 6173 4 40 x 3 16 SHC screw SCREW SHCS 4 40X3 16 SS LCD Bezel Assembly LCD Display and Touch S...

Page 197: ...PC Box 1 1 CT PC box 1 1 1 16 2 1 D dip switch setting 1 18 dividers 3 2 doors 5 1 drawer connect board 8 1 F fix inhibitor 2 13 I installation double deep drawer 7 5 pharmacy drawer 7 6 supply drawer 7 5 three drawer pharmacy module 7 8 K keyboard 1 4 keyboard door bezel 1 2 L LCD bezel assembly 1 6 LCD data cable 1 9 LCD display 1 10 lock orientation 6 1 pawl latches 6 1 M manual override 9 1 ma...

Page 198: ...PC cable 11 9 switchpanel cables 11 9 suture rack installation cabinet preparation 11 1 dip switches 11 1 suture rack module 11 1 switchpanel 3 1 catheter rack 4 7 pull out shelf 4 4 shelves 4 2 supply drawer 4 3 suture rack 4 5 switchpanel control boards 2 1 T three drawer pharmacy module configuration 7 14 install kits 7 8 switchpanel positions 7 8 tools 1 1 2 1 4 1 5 2 6 1 7 1 8 1 9 1 10 1 11 1...

Page 199: ... your input so we can continue to improve our publications Please send us your feedback Did this document meet your needs If so please let us know what we re doing right If not please provide specific feedback E mail or fax your feedback as follows E mail Documentation Requests e mail group at documentationrequests omnicell com specify the document title or PN Fax send this page along with your fe...

Page 200: ...1 2 3 Cell Color Touch Installation and Service Guide 67 2014 Rev G 2011 Omnicell Inc ...

Reviews: