background image

4-3 Pt 100 ohm measurement

1)All the measuring procedures are same as the Type K

(section 4-1 ) except to select the Temp. Sensor type to
“Pt” by pressing the “Type Button” (3-5, Fig. 1)
once in sequence 
until the right down  LCD display shows “Pt” text as :

Pt

2)Insert a Pt 100 ohm probe to 

PT1 input socket (3-10, Fig. 1)
PT2 input socket (3-11, Fig. 1)

*  The Pt 100 ohm measurement only allow

max. two channels ( two probes ) input. 

4-4 T1-T2 measurement

When the meter has two installed probes :

Type K/J/T/E/R/S : T1, T2 input socket

Pt 100 ohm : PT1, PT2 input socket

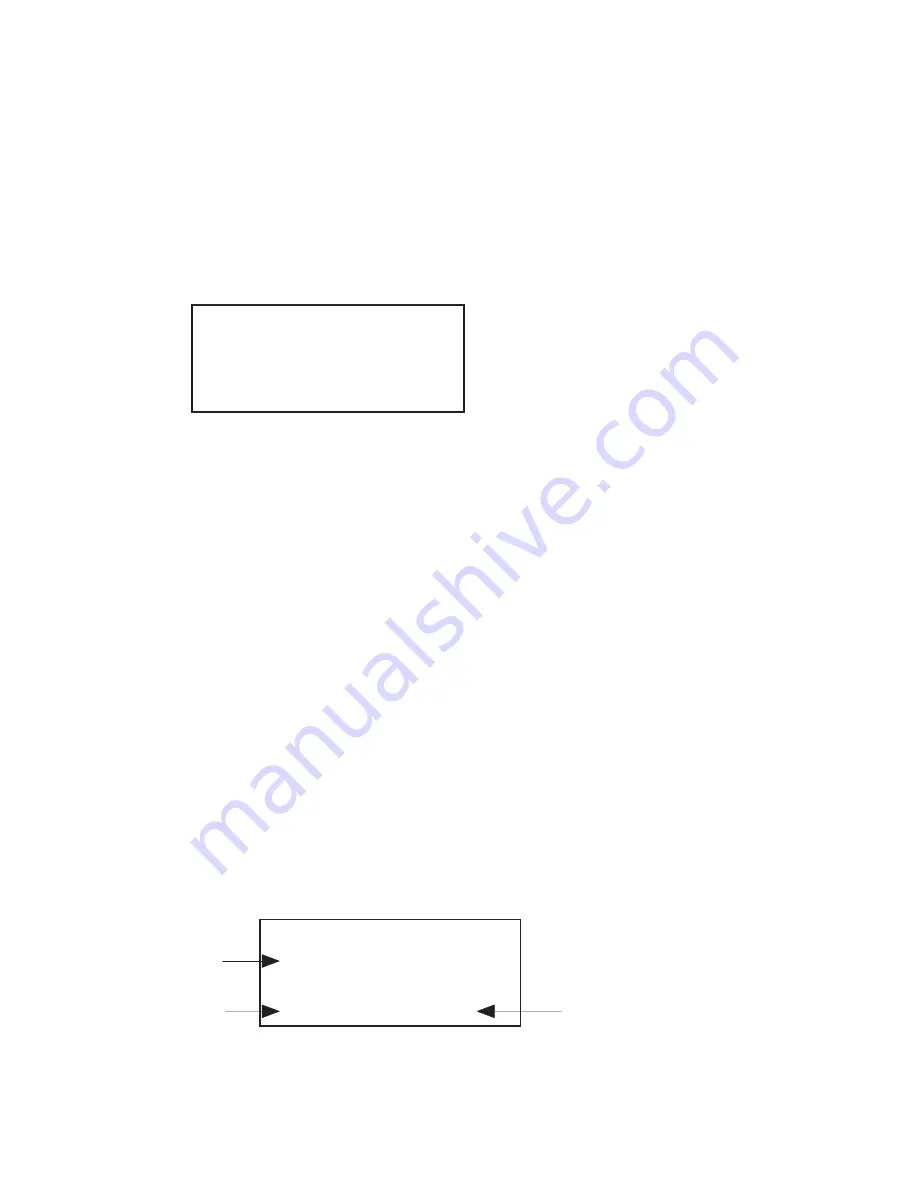
Pressing the “T1-T2 button” ( 3-6, Fig. 1 ), display will

show the difference temperature value between T1, T2 

( PT1, PT2 ) as :

T1 °C

°C

T1 

26.2

  1-2

T2 °C

°C

T2

26.6

 -0.4

T1-T2 value

8

Summary of Contents for RDXL4SD

Page 1: ...omega com e mail info omega com For latest product manuals omegamanual info User sGuide RDXL4SD 4 Channel Datalogger Thermometer Shop online at MADE IN TAIWAN Extended Warranty Program SM ...

Page 2: ... Managed by the United Kingdom Office Toll Free 0800 466 342 TEL 33 0 161 37 29 00 FAX 33 0 130 57 54 27 e mail sales omega fr Germany Austria Daimlerstrasse 26 D 75392 Deckenpfronn Germany Toll Free 0800 6397678 TEL 49 0 7056 9398 0 FAX 49 0 7056 9398 29 e mail info omega de United Kingdom OMEGA Engineering Ltd ISO 9001 Certified One Omega Drive River Bend Technology Centre Northbank Irlam Manche...

Page 3: ... Card Socket 6 4 Measuring Procedure 7 4 1 Type K Measurement 7 4 2 Type J T E R S Measurement 7 4 3 PT 100 Ω Measurement 8 4 4 T1 T2 Measurement 8 4 5 Data Hold 9 4 6 Data Record Max Min Reading 9 4 7 LCD Backlight ON OFF 10 5 Datalogger 10 5 1 Preparation Before Execute Datalogger Function 10 5 2 Auto Datalogger Set Sampling Time 1 Sec 11 5 3 Manual Datalogger Set Sampling Time 0 Sec 12 5 4 Auto...

Page 4: ...is available set the sampling time to 0 second during execute the manual datalogger function can be set at different positions location position 1 to position 99 Easy operation computer is not needed to setup with software After execute datalogger just take the SD card from the meter and plug in the SD card into a computer It will down load all the measured values with the time information year mo...

Page 5: ... 0 1 F 1 F Datalogger Auto 1 second to 3600 seconds Sampling Time Sampling time can set to 1 second Setting range but memory data may loss Manual Push the data logger button once will save data one time Set the sampling time to 0 second Manual mode can also select the 1 to 99 position Location no Memory Card SD memory card 1 GB to 16 GB Advanced Set clock time Year Month Date setting Hour Minute S...

Page 6: ...how Data Hold Freeze the display reading Memory Recall Maximum Minimum value Sampling Time Approx 1 second of Display Data Output RS 232 USB PC computer interface Connect the optional RS232 cable UPCB 02 will get the RS232 plug Connect the optional USB cable USB 01 will get the USB plug Power off Auto shut off saves battery life or manual off by push button Operating 0 to 50 C Temperature Operatin...

Page 7: ...x 1 9 inch Accessories Instruction Manual Included Optional Accessories USB cable USB 01 RS232 cable UPCB 02 Data Acquisition software SW U801 WIN AC to DC 9V adapter Hard carrying case CA 06 Soft carrying case CA 05A 2 2 Electrical Specifications 23 5 C PT 100 ohm Resolution Range Accuracy 0 1 199 9 to 850 0 C 0 4 1 C 0 1 327 0 to 999 9 F 0 4 1 8 F 1 1000 to 1562 F 0 4 2 F Pt 100 ohm probe TP 101...

Page 8: ...to 752 0 F 0 4 1 F Type E 0 1 C 50 1 to 100 0 C 0 4 1 C 50 0 to 900 0 C 0 4 0 5 C 0 1 F 58 1 to 148 0 F 0 4 1 8 F 58 0 to 999 9 F 0 4 1 F 1 F 1000 to 1652 F 0 4 2 F Type R 1 C 0 to 600 C 0 5 1 C 601 to 1700 C 0 5 1 C 1 F 32 to 1112 F 0 5 2 F 1113 to 3092 F 0 5 2 F Type S 1 C 0 to 600 C 0 5 1 C 601 to 1500 C 0 5 1 C 1 F 32 to 1112 F 0 5 2 F 1113 to 2732 F 0 5 2 F Remark a Accuracy value is specifie...

Page 9: ...ton Button R Button 3 7 SET Button Time check Button 3 8 Logger Button OFFSET Button Sampling time check Button 3 9 T1 T2 T3 T4 input socket Type K Type J 3 10 PT1 input socket Pt 100 ohm 3 11 PT2 input socket Pt 100 ohm 3 12 RS 232 output terminal 3 13 DC 9V adapter socket 3 14 Tripod Fix Nut 3 15 Battery Cover Screws 3 16 Battery compartment Cover 3 17 Stand 3 18 SD card socket 6 ...

Page 10: ... please refer to Chapter 7 5 page 18 3 Insert the Type K probes into the T1 T2 T3 T4 input socket 3 9 Fig 1 The LCD will show the 4 channels T1 T2 T3 T4 temperature value at the same time If the certain channels do not insert the temperature probes the relative channel display will show over range 4 2 Type J T E R S measurement All the measuring procedures are same as the Type K section 4 1 except...

Page 11: ...nsert a Pt 100 ohm probe to PT1 input socket 3 10 Fig 1 PT2 input socket 3 11 Fig 1 The Pt 100 ohm measurement only allow max two channels two probes input 4 4 T1 T2 measurement When the meter has two installed probes Type K J T E R S T1 T2 input socket Pt 100 ohm PT1 PT2 input socket Pressing the T1 T2 button 3 6 Fig 1 display will show the difference temperature value between T1 T2 PT1 PT2 as T1...

Page 12: ...s the REC Button 3 4 Fig 1 once the REC MAX symbol along with the maximum value will appear on the display If you wish to delete the maximum value just press the Hold Button 3 3 Fig 1 once the display will show the REC symbol only execute the memory function continuously b Press the REC Button 3 4 Fig 1 again the REC MIN symbol along with the minimum value will appear on the display If you wish to...

Page 13: ...e SD card should face against the down case b SD card Format If using the SD card for the first time it is recommended to make the SD card Format first Please refer to chapter 7 7 page 19 c Time setting If using the meter for the first time you should adjust the clock time exactly please refer chapter 7 1 page 16 d Decimal format setting The numerical data structure of the SD card is defaulted as ...

Page 14: ... the beeper sound refer to Chapter 7 4 page 18 b Pause the datalogger During execute the Datalogger function press the Logger Button 3 8 Fig 1 once will pause the Datalogger function stop to save the measuring data into the memory circuit temporally At the same time the text of REC will stop flashing Remark If you press the Logger Button 3 8 Fig 1 once again it will execute the Datalogger again th...

Page 15: ...ow the Position Location no P1 P2 P99 and the T4 measurement value alternately During execute the Manual Datalogger use the Button 3 5 Fig 1 or Button 3 6 Fig 1 to set the measuring position 1 to 99 for example room 1 to room 99 to identify the measurement location b Finish the Datalogger Press the REC Button 3 4 Fig 1 continuously at least two seconds the REC indication will be disappear and stop...

Page 16: ...first time to execute the Datalogger under the route TMA01 will generate a new file name TMA01001 XLS After this the Datalogger will save the data to the file TMA01001 XLS until the data column reaches 30 000 columns then it will generate a new file For example TMA01002 XLS 3 Under the folder TMA01 if the total files are greater than 99 files it will generate a new route such as TMA02 4 The file s...

Page 17: ...e SD card adapter then connect the SD card adapter into the computer 3 Power ON the computer and run the EXCEL software Down load the saving data file for example the file name TMA01001 XLS TMA01002 XLS from the SD card to the computer The saved data will be displayed onto the EXCEL software screen for example as the below EXCEL data screen The user can use EXCEL data to make further Data or Graph...

Page 18: ... Setting mode Pressing the Next Button 3 3 Fig 1 will in sequence select the seven main functions the lower display will show dAtE Set clock time Year Month Date Hour Minute Second dEC Set SD card Decimal character PoFF Auto power OFF management bEEP Set beeper sound ON OFF t CF Select the Temp unit to or SP t Set sampling time Hour Minute Second Sd F SD memory card Format 15 ...

Page 19: ...3 5 Fig 1 or Button 3 6 Fig 1 to adjust the value Setting start from Year value After the desired value is set press the Enter Button 3 4 Fig 1 once will go to the next value adjustment for example first setting value is Year then next to adjust Month Date Hour Minute Second value 2 After setting all the time value Year Month Date Hour Minute Second the screen will jump to SD card Decimal characte...

Page 20: ...oint with default Euro Use as the Decimal point with default 2 After selecting the upper text to bASI or Euro pressing the Enter Button 3 4 Fig 1 will save the setting function with default 7 3 Auto power OFF management When the lower display shows PoFF 1 Use the Button 3 5 Fig 1 or Button 3 6 Fig 1 to select the upper value to yES or no yES Auto Power Off management will enable no Auto Power Off ...

Page 21: ...ter selecting the upper text to yES or no press the Enter Button 3 4 Fig 1 will save the setting function with default 7 5 Select the Temp unit to C or F When the lower display shows t CF 1 Use the Button 3 5 Fig 1 or Button 3 6 Fig 1 to select the upper Display text to C or F C Temperature unit is C F Temperature unit is F 2 After Display unit is selected to C or F press the Enter Button 3 4 Fig ...

Page 22: ...r Button 3 4 Fig 1 will save the setting function with default 7 7 SD memory card Format When the lower display shows Sd F 1 Use the Button 3 5 Fig 1 or Button 3 6 Fig 1 to select the upper value to yES or no yES Intend to format the SD memory card no Not execute the SD memory card format 2 If selecting the upper to yES press the Enter Button 3 4 Fig 1 the display will show text yES Ent To confirm...

Page 23: ...tor appears before the instrument becomes inaccurate 2 Remove the battery cover screws 3 15 Fig 1 and remove the battery cover 3 16 Fig 1 from the instrument and remove the battery 3 Replace with DC 1 5 V battery 6 AA Alkaline heavy duty and replace the cover 4 Make sure the battery cover is secured after changing the batteries 10 RS232 PC SERIAL INTERFACE The instrument has RS232 PC serial interf...

Page 24: ... D1 D0 Each digit indicates the following status D15 Start Word D14 4 D13 When send the upper display data 1 When send the lower display data 2 D12 D11 Annunciator for Display 01 02 D10 Polarity 0 Positive 1 Negative D9 Decimal Point DP position from right to the left 0 No DP 1 1 DP 2 2 DP 3 3 DP D8 to D1 Display reading D1 LSD D8 MSD For example If the display reading is 1234 then D8 to D1 is 000...

Page 25: ...3 7 23 7 If no probe is inserted into T1 the meter will measuring adjust display Err value value Use the button 3 5 Fig 1 button 3 6 Fig 1 to adjust the desired value on right bottom display Pressing Enter button 3 4 Fig 1 once the adjustment value will be saved into memory then return to normal measuring screen to finish the offset adjustment procedures The above offset adjustment for Type K J T ...

Page 26: ... to PT2 input socket Press the R button 3 6 Fig 1 once the display will show example as following SEt oFS 23 7 23 7 If no probe is inserted into PT1 PT2 input measuring adjust socket the meter value value will show Err Use the button 3 5 Fig 1 button 3 6 Fig 1 to adjust the desired value on right bottom display Pressing Enter button 3 4 Fig 1 once the adjustment value will be saved into the memory...

Page 27: ...se shall not exceed the purchase price of the component upon which liability is based In no event shall OMEGA be liable for consequential incidental or special damages CONDITIONS Equipment sold by OMEGA is not intended to be used nor shall it be used 1 as a Basic Component under 10 CFR 21 NRC used in or with any nuclear installation or activity or 2 in medical applications or used on humans Should...

Page 28: ...ine Paddlewheel Systems 䡺 Totalizers Batch Controllers pH CONDUCTIVITY 䡺 pH Electrodes Testers Accessories 䡺 Benchtop Laboratory Meters 䡺 Controllers Calibrators Simulators Pumps 䡺 Industrial pH Conductivity Equipment DATA ACQUISITION 䡺 Data Acquisition Engineering Software 䡺 Communications Based Acquisition Systems 䡺 Plug in Cards for Apple IBM Compatibles 䡺 Data Logging Systems 䡺 Recorders Print...

Reviews: