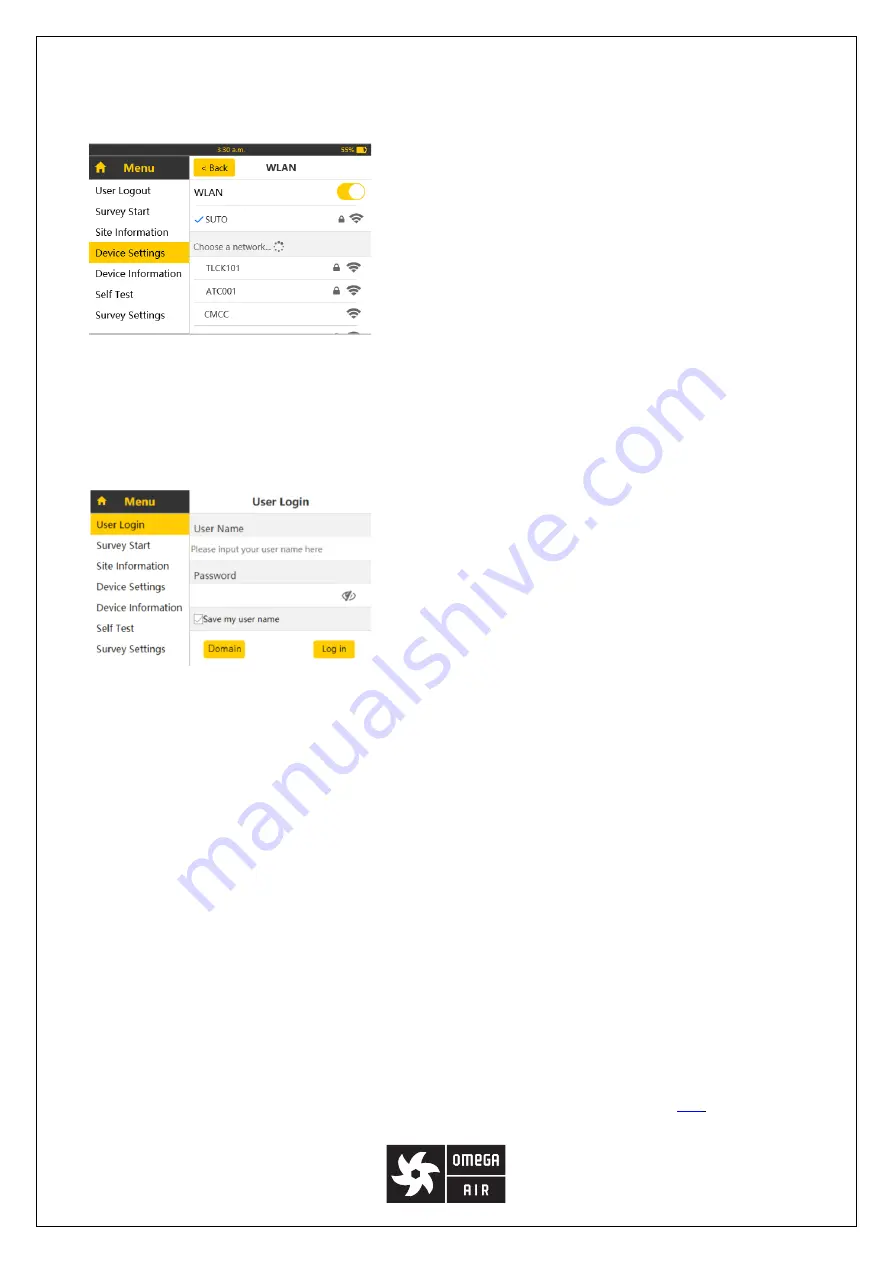
background image


17


authentication.


Steps:


1. Access 

Menu

 > 

Device Settings > WLAN

.


2. In the WLAN screen, switch on the 

WLAN

 toggle, and select a 

WLAN to join.


Note

: After the WLAN link is established, the OS 531 remembers the 

password. Next time when you enable WLAN, the OS 531 connects to 
this WLAN automatically without asking for the password.


Tips

:


You can make your mobile phone a hotspot for WLAN.


In some networks, only registered MAC addresses are 
permitted to connect to the WLAN. Ask your network 
administrator to add the MAC address of your OS 531 
(Displayed in the 

Device Information

 menu) to the permitted 

list.


3. Access 

Menu

 > 

User Login

.


4. Enter your email address in the 

User Name

 field, and then enter 

the password, which is sent to the email address when your account 
is created in the LMS.


Note

:


Only the user account of the technician role can log into the OS 531.


5. To have the user name shown the next time, click the 

Save my user name

 check box.


6. Click the 

Domain

 button and enter the the domain name or IP address and port number of the LMS server (

for 

example

, 192.244.11.204:8000). Then click <

Back

>.


Notes

:


Ask the LMS administrator or your IT technician for the URL of the LMS server.


To use the domain name and port number to access the LMS server, enter “http://” before the address.  


(

For example

, http://LMS.example.net:8080) .    


7. Click the 

Log in

 button.


If the user name and password are authenticated by the LMS server, the menu name is changed from 

User Login


to 

User Logout

.


 9.3.2 


Downloading the survey information from the LMS


After you successfully log into the LMS from your OS 531, choose the survey that you want to conduct and download 
its data to the OS 531. The survey data includes client information, site information, survey information, and master 
data.   


An OS 531 can work for only one survey at a time. If you download the information of a survey to the OS 531, only 
the leak records detected under this survey can be viewed and managed on the OS 531 screen. Leak records of the 
previous survey can be accessed only through a PC that is connected to the OS 531 (See section 

13.2

 for details).


To download a survey to the OS 531:


Summary of Contents for OS 531

Page 1: ...Installation and operating manual Document 3403235 Language Eng Rev 002 Date 7 4 2021 OS 531 Ultrasonic Leak Detector...

Page 2: ...e with this manual Should the device be tampered with in any manner other than a procedure that is described and specified in the manual the warranty is void and the manufacturer is exempt from liabil...

Page 3: ...Switching the OS 531 to the required mode 16 9 2 Non LMS mode only Creating a survey 16 9 3 LMS mode only Downloading a survey from the LMS 16 9 3 1 Remotely logging into the LMS via WLAN 16 9 3 2 Dow...

Page 4: ...4 16 2 Headset operations 31 16 3 Working as a wireless headset 31 16 4 Working as a wired headset 31 16 5 Pairing a new headset with the OS 531 32 16 6 Care and maintenance 32...

Page 5: ...injuries particularly on lens and retina or even blindness Never look directly at the laser Never point the laser at persons Never point the laser at smooth and reflective surfaces This can lead to a...

Page 6: ...n ultrasonic tone generator to generate sounds that can be detected by OS 531 To efficiently manage leak surveys leaks and related repair activities you can purchase the LMS Leak Management Software w...

Page 7: ...exchange Display 3 5 color LCD Laser pointer Wave length 640 660 nm Output power 1 0 mW WLAN 2 4 GHz band Camera 5 0 megapixels Headset Noise isolated and wireless Weight 3 65 kg full set 4 2 Electric...

Page 8: ...ip used for leak detection 1 Trumpet used to increase sensitivity and isolate from environmental noise 1 Battery charger 1 Type C USB stick 1 Transport case 1 Leak tags to mark found leaks 100 pieces...

Page 9: ...in leak detection 3 Laser button Press to turn laser on or off 4 Sensitivity wheel Turn the wheel to fine tune the sensitivity level 5 Touch screen for further functions 6 Sensor unit To detect the u...

Page 10: ...ssure and distance settings 7 Pressure Distance Setting Shows the latest settings for the pressure in the detected object and the distance between the OS 531 sensor and the leak point You can change t...

Page 11: ...and transfer data Headset jack At the bottom of the OS 531 handle reserved to connect the wireless headset through the supplied audio cable when the headset runs out of power 7 Before you start for t...

Page 12: ...ss Headset toggle B Power on the headset by pressing and holding the Power button for 3 seconds After wireless connection is built the message EDIFIER W860NB connected appears on the OS 531 screen Not...

Page 13: ...dset 9 To adjust the display brightness click Display Settings 10 To adjust the volume of pressing buttons click Beeper Settings Note By clicking the icon on the top left side you can return to the ho...

Page 14: ...14 Steps 1 2 3 4 and 5 6 8 2 Using the OS 531 in the LMS mode Steps performed on the OS 531 1 2 3 4 and 5...

Page 15: ...k surveys and part suppliers To maintain master data Technician To detect leaks using the OS 531 To download the survey from the LMS to the OS 531 To detect leaks using the OS 531 To upload the detect...

Page 16: ...window that appears check the input information and if correct click Yes Note Before you have completed checking and specifying the survey settings do not start the survey by clicking Start The reaso...

Page 17: ...and enter the the domain name or IP address and port number of the LMS server for example 192 244 11 204 8000 Then click Back Notes Ask the LMS administrator or your IT technician for the URL of the...

Page 18: ...nits of flow pressure and currency 1 Access Menu Survey Settings 2 Click Media Setting and configure the gas media to be detected Note In the non LMS mode the options of the Media Settings are fixed I...

Page 19: ...ey and specify the survey settings now you can start the survey to enable the leak detecting and recording functions on the OS 531 Steps 1 Access Menu Survey Start 2 On the Survey Start screen that ap...

Page 20: ...g the sensitivity wheel on the OS 531 handle 2 To turn on the laser press the Laser push button as shown on the left hand side Note To avoid laser injury the the laser function is enabled only when th...

Page 21: ...ak amount 11 Recording leaks After you detect the exact position of a leak point you can start to record the leak data ATTENTION The calculation of leak losses depends on many factors including pressu...

Page 22: ...ke a photo of the detected leak point 6 To highlight areas in the photo click Mark 7 Tap the red Square icon until it switches to the desired color and then click the Circle icon to add an circle in t...

Page 23: ...h the settings that you specified last time For the record item of Est Repair Time if you cannot find an appropriate time in the option list select 0 For other record items if the option list does not...

Page 24: ...needed delete the leak and record again The leak records provide input for leak repair and analysis If the OS 531 is in the non LMS mode you can download the leak records to a PC for further leak ana...

Page 25: ...the OS 531 is working in the LMS or Non LMS mode In the OS 531 leak records detected in different surveys are stored in the sub folders under the records folder by the survey IDs Steps 1 Access Menu...

Page 26: ...s voice recordings and the CSV formatted leak file are deleted from the OS 531 If you need the leak data in the CSV format before the upload action please perform to generate the leak data into a CSV...

Page 27: ...he leak data except the photo voice recording and CSV files will be deleted from the OS 531 To avoid losing the leak data before the update please upload the leak data to the LMS If you need the leak...

Page 28: ...nformation to view the current firmware version 2 Access Menu Device Setting Firmware Update 3 On the screen that appears click Device Firmware Update as needed Note To update the sensor firmware upda...

Page 29: ...tore the ex factory settings you can perform the system reset Access Menu Device Settings System Reset It takes about five seconds to complete the reset process Note All settings will be cleared but t...

Page 30: ...ultrasonic that is produced by the generator can flow through leaks and be detected by OS 531 15 Disposal or waste Electronic devices are recyclable material and do not belong in the household waste T...

Page 31: ...adset is paired with OS 531 device before delivery 1 Press and hold the power button for 3 seconds to power on the headset 2 Enable the wireless headset function in the OS 531 by below steps A Navigat...

Page 32: ...nance Keep the product away from humid places to avoid damaging the internal circuit Do not put the product in places exposed to sun or in high temperature High temperature will shorten service life o...

Page 33: ...OMEGA AIR d o o Ljubljana Cesta Dolomitskega odreda 10 SI 1000 Ljubljana Slovenia Tel 386 0 1 200 68 00 Fax 386 0 1 200 68 50 E mail info omega air si www omega air si...

Reviews: