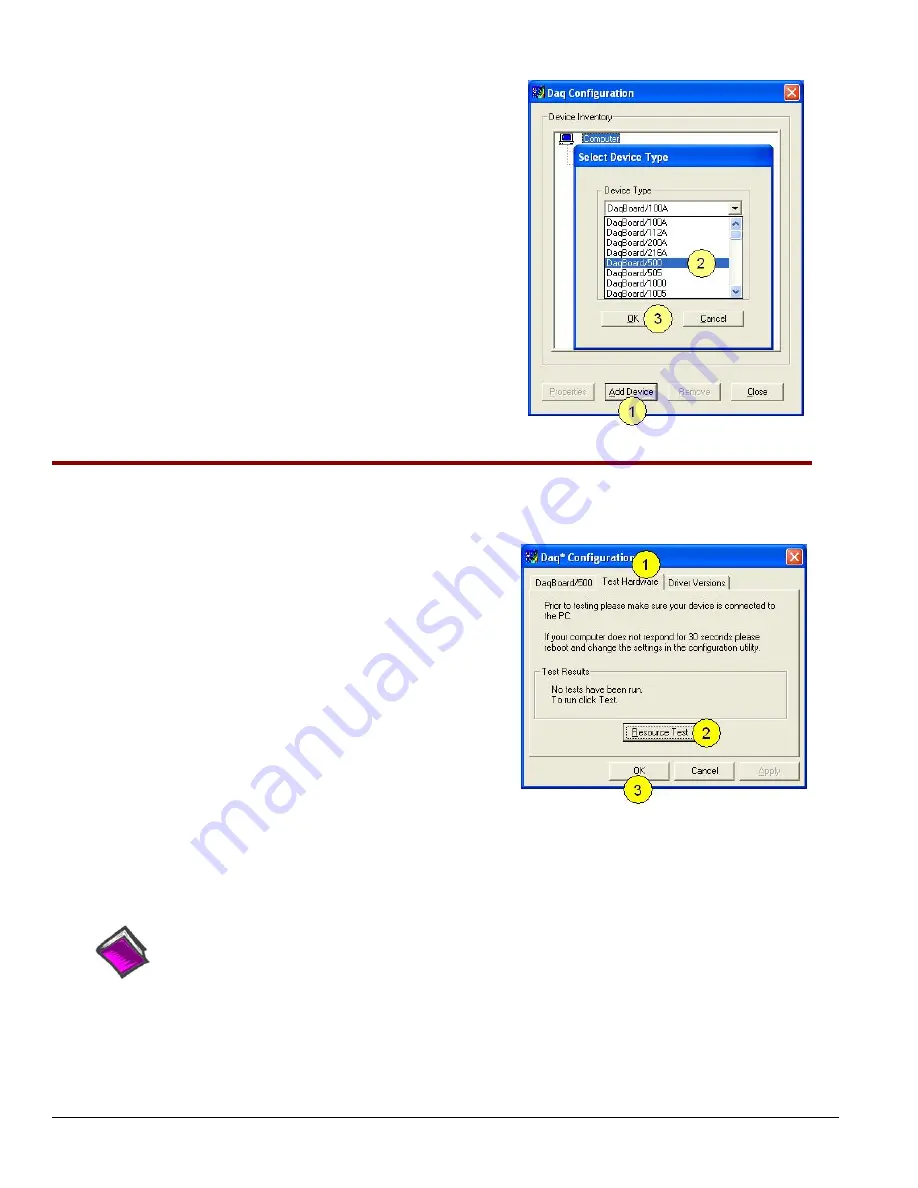
Using “Add Device”
This method is for users who have accessed the
Daq
Configuration
control panel applet, but have no DaqBoard/500
Series device icon.
1.
After accessing the Daq Configuration control panel applet,
click on the <
Add Device
> button (see figure, right). The
Select Device Type
window will appear.
2.
Using the
Device Type’s
pull-down list, select the
applicable board. In the example at the right
DaqBoard/500
is selected.
3.
Click the <
OK>
button. The board’s Properties tab will
appear. The tab applies to all boards in the series.
At this point, complete steps 6 through 8 on page IG-5.
Using “Add Device”
Step 4
– Test Hardware
Use the following steps to test the DaqBoard. Note that these steps are continued from those listed under the
previous section, “Configure Board.”
1.
Select the “
Test Hardware”
tab.
2.
Click the <
Resource Test
> button.
3.
After the test is complete, click <
OK>
.”
System capability is now tested for the DaqBoard and a list
of test results will appear.
Note:
If you experience difficulties, please consult your user
documentation (included on your CD) before calling
for technical support.
Test Hardware Tab
(Condensed Screen Image)
At this point we are ready to connect signals. For DaqBoard/500 Series boards, connection is typically made via
a terminal board, such as the optional TB-100.
Reference Notes
:
During software installation, Adobe
®
PDF versions of user manuals are automatically installed onto
your hard drive as a part of product support. The default location is in the
Programs
group, which can
be accessed from the Windows Desktop. A copy of the Adobe Acrobat Reader
®
is included on your
CD. The Reader provides a means of reading and printing the PDF documents. Note that hardcopy
versions of manuals can be ordered from the factory.
IG-
6 DaqBoard/500 Series Installation Guide
947994
1138-0940, rev 1.1


