Valet
Switch
Status
Light
Congratulations for choosing one of the most versatile, fully-featured vehicle
security and convenience systems available today, the Excalibur AL-1810-EDP by
Omega Research and Development. To enjoy the most from your new system,
please take a few moments to learn about the principal user components, and the
basic operation of the system. These subjects are found in next several pages,
followed by more detailed specifics of complete operations and features.
Page - 4
Introduction to the System
•
The Valet Switch can also be used, in conjunction with
the vehicle’s ignition key, to perform an emergency disarming of the security
system in the event the transmitter or transceiver is lost or becomes inoperable.
This is referred to as “performing an Emergency Override”.
•
The Valet Switch is used in the procedure of programming operational
features and also for encoding transmitters and transceivers to the system.
A complete description of the Valet Switch and its operations is on pages 17-19.
The multicolored Status Lights report the operational
status of the system at all times, and also serves as a visual
deterrent to break-ins and theft. Specific description of the
Status Light operation may be found on pages 20-21.
The Valet Switch has three main functions:
•
The Valet Switch can be used to turn off the security
functions, including any automatic arming or locking
features (if used), and/or remote engine starting
functions of the system. The former is “Alarm Valet
Mode”; the later is “Starting Valet Mode” .
The system can operated by two types of devices: the
2-Way Controller
and the
1-Way Transmitter
. Your system comes with one of each of these, pre-learned
to operate the system. The controller, in addition to operating your system, also
receives signals from the system, and displays a variety of system conditions on its
LCD screen. This is the patented Echo 2-way technology. The transmitter will fully
operate the system, but it can not receive signals nor report events from the vehicle.
Your system can be operated by as many as four controllers and/or transmitters.
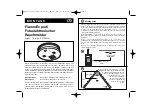
One of the components, typically mounted on the windshield, is the
Window Unit
module which contains the
Status Lights
and the
Valet Switch
. The window
unit also receives and transmits the Echo technology
communications for the system’s 2-way operation.
The controller and the transmitter both share the same four operational buttons, and
their use to operate the Excalibur system is the same. These buttons and a brief
description of what they do are:
this is done will the system accept a remote start command, and the vehicle must
remain undisturbed until that point. The complete instructions for remote starting,
including Stick Shift Remote Starting, starts on page 40.
This feature should only be programmed by the installer, and the operation of
this feature depends on the correct connection of the safety wire to the vehicle’s
parking brake. Please refer to the Installation Instructions manual for proper
connection of this wire.
Note: Feature #4, Turbo Timer, and Feature #5, Stick Shift Remote Starting, may
both be used together in the AL-1810-EDP.
Feature #7 Extended Starter Cranking Time
Factory Default Setting
Minimum (.7 Second)
(
press
“arm/lock” button to program
)
Options:
Medium Lo (1.25 Second)
(
press
“disarm/unlock” button to program
)
Medium Hi (1.75 Second)
(
press
“
II
” button to program
)
Maximum (2.5 Second)
(
press
“
III
” button to program
)
Extended Starter Cranking Time operates in conjunction with the previous feature’s
“Tachless” setting. The AL-1810-EDP processor is capable of detecting the
running engine by two separate methods- the use of the vehicle’s tachometer
(“tach”) wire for a direct engine RPM input, or by monitoring the vehicle’s
fluctuating voltage levels caused by the starting process. This feature sets the
duration of the starter output’s base timing for the voltage sensing type of starter
output operation. There are four different base starter output settings. While the
default-set minimum is sufficient for most vehicles; the Extended Starter Cranking
Page - 41
Feature #6 “Tach Wire” or “Tachless” Starter Operation
Factory Default Setting
Tachless (
press
“arm/lock” button to program
)
Option:
Tach Wire (
press
“disarm/unlock” button to program
)
This feature selects the AL-1810-EDP processor’s method of determining the status
of the engine running during remote start operation. As explained in the previous
feature’s description, “Tachless” mode has an associated base starter output time
duration. However, if the voltage fluctuation is detectable, the processor adjusts the
starter output time accordingly. When this feature is set for “Tach Wire” operation,
the base starter output increases to 3 seconds, but the processor adjusts the actual
starter engagement time accordingly. Connecting and use of the “Tach Wire” is the
most reliable form of engine running information input, and its use is recom-
mended. This feature should only be programmed by the installer.
Important: Before this feature is programmed, please refer to the “Installation
Manual” for proper wiring connection and the Tach Learning Procedure, both of
which are required for use of this feature.