background image


8/12


TRANSPORT AND ASSEMBLY OF THE WALL COLUMN 

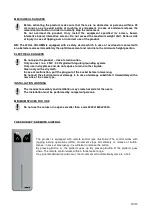
This motorized  adjustable WALL COLUMN is provided completely assembled. The correct final installation 
is illustrated here below. 
Since  the  weight  of  the  packed  trolley  is  about  30  kg,  the  lifting  and  the  transport  should  be  done  with  a 
forklift or similar equipment, or carried by two people simultaneously. 


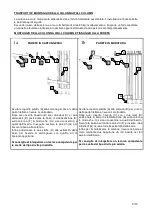
MOUNTING THE COLUMN AND FIXING IT TO THE WALL 


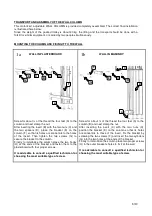
WALL IN PLASTERBOARD 


G

G

H

G

 A 


Screw for about ¾ of the thread the four feet (A) to the 
column and next clamp the nut. 
After inserting the insert (B) with the two nuts (C) and 
the  two  spacers  (D),  place  the  bracket  (E)  on  the 
column (F) so that its holes are concentric to the holes 
of  the  insert.  Then  tighten  the  two  screws  (G)  to 
secure the bracket to the column. 
Finally  to  immobilize  the  column  place  the  two  hooks 
(H)  at  the  ends  of  the  bracket  and fasten  them  to  the 
plasterboard with four proper screws. 
 

It is advisable to consult a qualified technician for 
choosing the most suitable type of screw. 


WALL IN MASONRY


 F 

G

G

 A 


Screw  for  about  ¾  of  the  thread  the  four  feet  (A)  to  the 
column (B) and next clamp the nut. 
After  inserting  the  insert  (C)  with  the  two  nuts  (D), 
position  the  bracket  (E)  on  the  column  so  that  its  holes 
are  concentric  to  those  of  the  insert.  Fix  the  bracket  by 
screwing the two screws (F) and insert the two cylinders 
(G) into the two holes at the ends of the bracket. 
Finally to immobilize the column place two proper screws 
(H) in the outer bracket’s holes to fix it at the wall. 

 
It  is  advisable  to  consult  a  qualified  technician  for 
choosing the most suitable type of screw. 


1b 

1a 

Summary of Contents for WALL COLUMN

Page 1: ...muro in tutti i passaggi di propriet che il medesimo potr avere nella sua vita Gli utilizzatori di questa apparecchiatura hanno l obbligo di leggere attentamente il contenuto di questo Manuale di Ist...

Page 2: ...trici a quelli dell inserto In seguito avvitare le due viti G per fissare la barra alla colonna Infine posizionare le due staffe H alle estremit della barra per fissarle al cartongesso con quattro vit...

Page 3: ...autorizzate dal costruttore Non utilizzare per carichi superiori a quanto consentito dal costruttore Non applicare le apparecchiature in maniera sbilanciata Non fissare alla parete prima di aver verif...

Page 4: ...V 50 Hz con regolare impianto di messa a terra Usare solo in ambienti asciutti e protetti dalla pioggia o altri liquidi Pulire la colonna a muro solo con panni asciutti In caso di qualsiasi malfunzion...

Page 5: ...e VESA 300x200 Dimensioni mm DATI DI IDENTIFICAZIONE E TARGA DELL APPARECCHIATURA Ogni esemplare della colonna a muro identificato da una targa riportante la marcatura CE come nella figura seguente af...

Page 6: ...reti motorizzata sollevabile per schermi digitali lavagne e pannelli interattivi ALTRE DIRETTIVE EUROPEE compatibilit elettromagnetica 2014 30 UE bassa tensione 2014 35 UE RoHS restrizione sull uso di...

Page 7: ...ny the product even if it should change hands All users of this product must read the contents of this handbook before attempting to assemble it and use it Even though the assembly is not difficult we...

Page 8: ...tighten the two screws G to secure the bracket to the column Finally to immobilize the column place the two hooks H at the ends of the bracket and fasten them to the plasterboard with four proper scr...

Page 9: ...authorized by the manufacturer Do not use weight loads superior to those recommended by the manufacturer Do not install the screen in an off balanced way Do not fasten to the wall before checking the...

Page 10: ...system Only use in dry places and do not expose to rain or other liquids Clean only with a dry cloth In case of malfunction pull the plug out of the socket before intervening Do not pull the electric...

Page 11: ...ble screen VESA 300x200 Dimensions mm IDENTIFICATION DATA AND EQUIPMENT PLATE Every single column is marked with a EC plate see the illustration below on the main upright with all the necessary data r...

Page 12: ...t fixable to walls for digital signages screens and interactive tables OTHER EUROPEAN DIRECTIVES Electromagnetic compatibility 2014 30 EU Low voltage 2014 35 EU RoHS restriction of hazardous substance...

Reviews: