Omax M8333S, User Manual
The Omax M8333S user manual is available for free download from our website. This comprehensive manual provides detailed instructions on how to set up and operate your Omax M8333S product. Ensure a smooth user experience by accessing the manual at manualshive.com.
Share
Download


Reviews:
No comments
Related manuals for M8333S

Luxeo 2S
Brand: Labomed Pages: 20

LSM 900
Brand: Zeiss Pages: 22

McDATA Sphereon 4500
Brand: Hitachi Pages: 6
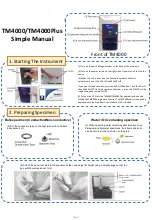
TM4000
Brand: Hitachi Pages: 3

3400-N
Brand: Hitachi Pages: 9

TM3000
Brand: Hitachi Pages: 272

TM3030 Plus
Brand: Hitachi Pages: 384

571 131
Brand: Jeulin Pages: 8

3012
Brand: Accu-Scope Pages: 4

49929
Brand: Eurotops Pages: 11

G-2030M
Brand: Galileo Pages: 2

AxioObserver D1
Brand: Zeiss Pages: 13

BHSU
Brand: Olympus Pages: 19

BX-FLA
Brand: Olympus Pages: 46

CHA-P
Brand: Olympus Pages: 20

SMZ-2
Brand: Nikon Pages: 2

SteREO Discovery Vertical Illumination Device...
Brand: Zeiss Pages: 10

CoreScope T-1701
Brand: Ken A Vision Pages: 4


