background image

33

EN

1

Getting started

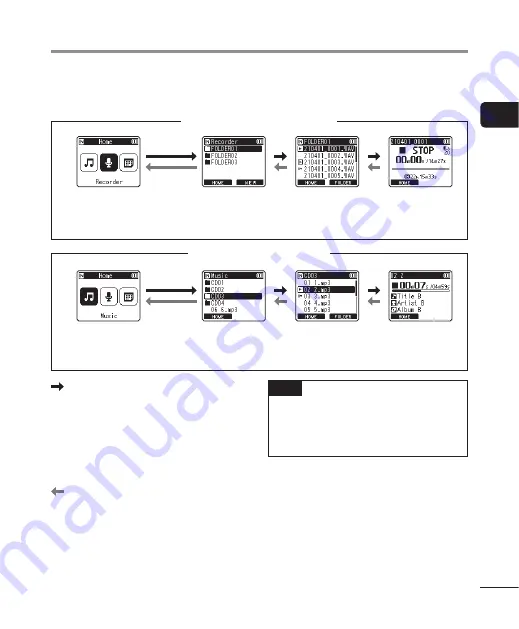
You can select a different folder while the voice recorder is in stopped or playing a file.  

See “

Folders

” (

 P.29) for a description of the voice recorder’s hierarchical folder 

structure.

When [Recorder] mode is selected

*  Each folder can store up to 200 files.

File display

File list display

Folder list display*

[

Home

] screen

When [Music] mode is selected

File display

File list display

Folder list display*

*  Each folder can store up to 200 files.

[

Home

] screen

 Forward: 

`

OK

 button

Each press on the 

`

OK

 button opens 

the currently selected folder or file in 

the list, moving forward to the next 

(lower) level in the folder hierarchy. 

When a list is displayed, you can 

perform the same function by pressing 

the 

9

 button.

 Back: 

LIST

 button

Each press on the 

LIST

 button moves 

back to the previous (higher) level 

in the folder hierarchy. When a list is 

displayed, you can perform the same 

function by pressing the 

0

 button.

TIP

• 

When navigating through a folder 

hierarchy, you can press and hold 

the 

LIST

 button to return to the file 

display. 

+

 or 

− 

button

Used to select a folder or file.

Selecting folders and files

Summary of Contents for LS-P5

Page 1: ...erstood the contents of 8 Safety precautions before using this product Keep these instructions available for future reference Read this manual thoroughly before using the product and record test audio...

Page 2: ...ecting folders and files 33 2 Recording Recording 35 Basic recording procedure 35 Adjusting Recording Levels Automatically Before Recording SMART Mode 38 Adjusting Recording Levels Manually Before Rec...

Page 3: ...pping Limiter 85 Setting the recording mode Rec Mode 85 Selecting microphone directivity Zoom Mic 86 Reducing noise during recording Low Cut Filter 87 Recording clear audio Bright Sound 87 Selecting t...

Page 4: ...g Method Fn Rec 121 Starting Recording Before You Press Record Pre Recording 123 Using Overdubbing Over Dubbing 125 Recording a Reference Tone for Use When Synchronizing Audio and Video Slate Tone 126...

Page 5: ...bes precautions and operations that should be absolutely avoided in using the voice recorder TIP Describes useful information and hints that will help you getting the most out of your voice recorder I...

Page 6: ...STOP 4 button 8 ERASE button 9 Built in stereo microphone R 0 Display MENU SCENE button F2 button REC record s button Recording indicator light PEAK indicator light LED indicator light LIST button OK...

Page 7: ...tor 3 Battery indicator 4 Music mode P 9 5 Recorder mode P 8 6 Calender Search mode P 7 4 Calender Search mode 1 3 2 4 5 6 7 1 Recording media indicator Internal memory microSD card 2 Number of files...

Page 8: ...ct indicator File Lock indicator 8 Voice recorder status indicator Recording indicator Recording pause indicator Stop indicator Playback indicator Fast playback indicator Slow playback indicator Fast...

Page 9: ...attery indicator 4 Folder name or file name 5 Function button guide display 6 Current folder name 7 File name Playback indicator File Lock indicator 8 Elapsed playback time 9 Speaker muting indicator...

Page 10: ...y indicator Ni MH Alkaline 3 Recording media indicator 4 Remaining memory available Remaining recording time available Remaining memory available on storage device 5 Recording folder 6 Recording menu...

Page 11: ...e recorder follow the steps below to have it ready for use Getting started 1 3 Inserting batteries Getting started 2 3 Charging batteries Getting started 3 Setting the time date Set the voice recorder...

Page 12: ...supplied batteries BR404 in the battery compartment of the voice recorder 1 Slide the battery cover to open 2 Insert the batteries making sure their positive and negative terminals are placed correct...

Page 13: ...s When using alkaline batteries choose Alkaline for Battery P 100 NOTE Never attempt to charge an alkaline battery lithium battery or other primary cell battery Fluid leakage or overheating may cause...

Page 14: ...rging has finished when the battery indicator changes to Battery indicator Charging time About 3 hours Approximate time needed to fully charge completely flat batteries at room temperature Battery cha...

Page 15: ...another item press the 9 or 0 button to move the blinking cursor then press the or button to change the number 3 Press the OK button to finalize the setting TIP You can press the OK button during the...

Page 16: ...rovided and set Battery to Ni MH P 12 P 100 Never attempt to charge an alkaline battery lithium battery or other primary cell battery Fluid leakage or overheating may cause the recorder to malfunction...

Page 17: ...F 1 Ambient temperature is too low 2 Ambient temperature is too high If battery life has become noticeably short on a full charge replace the batteries with new ones Insert the USB connector securely...

Page 18: ...ted in the recorder before proceeding P 12 NOTE Before charging the batteries insert the rechargeable batteries provided and set Battery to Ni MH P 12 P 100 Use only the supplied model of USB connecti...

Page 19: ...the batteries if 1 or 2 is blinking Charge the batteries in an ambient temperature of between 5 and 35 C 41 and 95 F 1 Ambient temperature is too low 2 Ambient temperature is too high If battery life...

Page 20: ...to 86 F Use of rechargeable batteries outside the temperature ranges above may result in drops in battery performance or life When not using the voice recorder for an extended period remove the rechar...

Page 21: ...riod always remove the batteries before storage When replacing the batteries use AAA alkaline dry cell batteries or BR404 nickel metal hydride rechargeable batteries Even if the battery indicator is p...

Page 22: ...oSD card straight avoiding crooked insertion Inserting a microSD card the wrong way or crookedly could damage its contact surface or cause it to jam in the slot A microSD card not inserted fully until...

Page 23: ...u can also select the internal memory as the recording media P 100 NOTE The voice recorder may not be able to recognize a microSD card formatted initialized for a computer or other device Before using...

Page 24: ...epending on the card s manufacturer and type some microSD microSDHC and microSDXC cards may not be fully compatible with the voice recorder and not be recognized properly For microSD card compatibilit...

Page 25: ...rting removing a microSD card Processing speed may be low for some microSD card types Processing performance may also be reduced by writing or deleting data repeatedly from a microSD card In this case...

Page 26: ...he time date reported by the recorder or on the current playback position saved audio recorder settings or the like TIP Turning the power OFF whenever the voice recorder is not in use minimizes batter...

Page 27: ...t HOLD mode slide the POWER HOLD switch to HOLD and confirm that Hold appears in the display Releasing HOLD mode To exit HOLD mode slide the POWER HOLD switch to A NOTE When any button is pressed duri...

Page 28: ...he desired mode 3 Press the OK button When Recorder is selected The voice recorder enters Recorder mode Audio can be recorded with the built in microphone Files recorded with the built in microphone c...

Page 29: ...ation to store music files downloaded from computers Folders for Audio Recordings Audio recordings are stored in sub folders directly under the Recorder folder Up to 99 such folders can be created P 3...

Page 30: ...ton 3 Press the F2 NEW button 4 Press the or button to select the desired folder prefix Folder prefixes Conference Podcast Meeting Recital Interview Concert Dictation Outdoors Lecture Schedule Class T...

Page 31: ...o additional folders can be created Delete unwanted folders P 75 Each of the folders directly under the Recorder folder can store up to 200 files If you make additional recordings or divide files P 11...

Page 32: ...older File HOME MUSIC ARTIST 01 Level 1 Level 2 ARTIST 02 ARTIST 03 ARTIST 04 ALBUM 01 ALBUM 02 ALBUM 03 ALBUM 04 200 001 002 003 004 Each folder can store up to 200 files You can create up to 400 fol...

Page 33: ...files Home screen Forward OK button Each press on the OK button opens the currently selected folder or file in the list moving forward to the next lower level in the folder hierarchy When a list is di...

Page 34: ...sed to select the voice recorder mode P 28 List display Displays the folders and files recorded in the voice recorder Pressing the F2 FOLDER button changes the display to the list display of the next...

Page 35: ...e destination folder and press the REC s button NOTE If On is selected for Rec standby choose Off instead P 89 1 Press the 9 or 0 button in the Home screen and select Recorder P 28 2 Press the OK butt...

Page 36: ...ing the meter If the peak of the level meter is exceeded the PEAK indicator light will light and the recorded audio may be distorted If you wish to adjust the recording level you must first select Man...

Page 37: ...hen using a microSD card in the voice recorder be sure the desired recording media setting Internal memory or microSD card has been selected P 100 Processing performance may be reduced when data has b...

Page 38: ...vel adjustment even when Recorder mode is not selected press and hold the REC s button The recordings are stored in the first sub folder the top sub folder in the folder list under the Recorder folder...

Page 39: ...matic recording level adjustment will end and the recorder exit to file view TIP If you press REC s without first pressing the STOP 4 button automatic recording level adjustment will end and recording...

Page 40: ...indicator light will turn on If you record simple recording content at the beginning it will be convenient for searching later using the Intro Play function P 99 8 Press the STOP 4 button when you wan...

Page 41: ...5 Press the REC s button to enable recording standby mode a a a Level meter changes in response to recording level and mode The recording indicator light will turn on 6 Point the built in microphone...

Page 42: ...divided and saved in separate files of up to 2 GB The files are processed as multiple files during playback If the 200th file exceeds 2 GB a new folder will be created to store the files containing th...

Page 43: ...message 75 PAUSE appears in the display Recording is stopped automatically after being paused for at least 60 minutes 2 Press the REC s button again while recording is paused Recording resumes from th...

Page 44: ...hoose from several combinations of settings suited to particular surroundings or conditions Rec Monitor P 88 Disable output of the recording monitor sound External Input P 53 Choose the type of connec...

Page 45: ...optional Speakers and other devices that can be connected via the earphone jack can be used instead of earphones NOTE Confirm that On is selected for Rec Monitor P 88 Sound will not be output to earph...

Page 46: ...onnecting a Bluetooth device P 137 Adjustments to volume have no effect on recording level 2 Adjust the volume using the or button Adjust volume while monitoring the sound currently being recorded NOT...

Page 47: ...tation Suitable for recording your own voice and other sounds that are extremely close NoisySituation Suitable for recording your own voice and other sounds that are extremely close while reducing sur...

Page 48: ...then cycle the display by pressing the or button Rec Scene NOTE The following features cannot be used while Rec Scene is in effect Voice Detect While recording P 105 Fn Rec Pre Recording P 123 Fn Rec...

Page 49: ...ut Microphone NoisySituation Rec Level Middle Rec Mode MP3 64 kbps mono sampling frequency 16 kHz Zoom Mic 0 Low Cut Filter On External Input Microphone Music Rec Level Middle Rec Mode PCM 44 1 kHz 16...

Page 50: ...tting Rec Scene NOTE For recording when NoisySituation is set point the built in microphone on the top left or top right of the voice recorder toward the speaker and place it in an upright position as...

Page 51: ...ng scene banks cannot be created when an option other than Off is selected for Rec Scene Select Off for Rec Scene 1 During recording or while the voice recorder is in stop mode press the MENU SCENE bu...

Page 52: ...automatic recording setting Rec Scene 8 Press the or button to select User 1 or User 2 9 Press the OK button to finalize the setting Current settings are saved to User 1 or User 2 10 Press the STOP 4...

Page 53: ...ch the type of plug used to the connect the device sound may recorded at a volume that is too high or too low 1 During recording or while the voice recorder is in stop mode press the MENU SCENE button...

Page 54: ...P 4 button to exit the menu screen To view an icon showing the option selected for external input press the STOP 4 button while the recorder is stopped and then cycle the display by pressing the or bu...

Page 55: ...mation on choosing an input device see Choosing an Input Device P 53 1 Connect an external microphone to the voice recorder s microphone line jack To microphone line jack 2 Start recording See Recordi...

Page 56: ...put Device P 53 1 Connect the music player to the recorder s microphone line jack To audio output terminal of other device To microphone line jack 2 Start recording See Recording P 35 for descriptions...

Page 57: ...ations NOTE Do not connect cables to or disconnect cables from the jack during recording Adjusting playback sound quality settings on the voice recorder affects the audio output signals output from th...

Page 58: ...under the Recorder folder P 29 Music files transferred from a computer Stored in folders directly under the Music folder P 32 2 Press the OK button to start playback b b c c a a a File name b Elapsed...

Page 59: ...ayback Playback ends automatically when the end of the file is reached The resume feature saves the current playback position when the recorder is turned off The next time the power is turned on playb...

Page 60: ...ing stops when the end of the file is reached Press and hold the 9 button again to fast forward from the beginning of the next file Rewinding Rewinding while the voice recorder is in stop mode With th...

Page 61: ...ck position is the beginning of the file To skip to the beginning of the previous file during playback press the 0 button twice consecutively NOTE If an index mark or temp mark is reached when skippin...

Page 62: ...n muffled by projector noise or similar sounds Voice Balancer 1 P 95 Compensates low volume portions of recorded audio files during playback Play Mode P 95 Choose the playback range Loop and random pl...

Page 63: ...l be no sound from the speaker when the earphones are connected 1 Connect the earphones to the voice recorder s earphone jack To earphone jack 2 Press the OK button to start playback 3 Adjust the volu...

Page 64: ...o be connected via Bluetooth 1 Connect the recorder and earphones via Bluetooth Recorder Earphones For information on Bluetooth connections see Connecting a Bluetooth device P 137 2 Adjust the volume...

Page 65: ...are shown below File format Sampling rate Bit count bit rate WAV format FLAC format 44 1 kHz 48 0 kHz 88 2 kHz 96 0 kHz 16 bits 24 bits MP3 format MPEG 1 Layer 3 32 kHz 44 1 kHz 48 kHz MPEG 2 Layer 3...

Page 66: ...speed set the setting to x1 0 Play 3 Press the OK button to finalize the setting Playback speed indicator TIP When changing the playback speed playback operations such as stopping playback skipping t...

Page 67: ...ng point of the segment B becomes the new starting point and playback continues 4 When the ending point C is selected repeat playback starts again 5 These steps can be repeated to re specify a new seg...

Page 68: ...s 4 Press the F1 CANCEL A button during ABC repeat playback Segment A B is canceled becomes the new start position and playback continues You can change the playback speed P 66 and fast forward rewind...

Page 69: ...during ABC repeat playback P 70 Canceling ABC repeat playback Press the F2 CNCL ABC button If pressed when ABC repeat playback is stopped cancels ABC repeat playback If pressed during ABC repeat play...

Page 70: ...mark or temp mark 2 When the desired position has been reached press the F2 INDEX button to write an index mark or temp mark NOTE Temp marks are temporary markings They are automatically erased when...

Page 71: ...ing shown for about 2 seconds in the display press the ERASE button Any subsequent index marks temp marks in the file are automatically renumbered Erasing all index marks at once You can erase all ind...

Page 72: ...ack Index marks temp marks 4 Press the OK button 5 Press the button to select Start 6 Press the OK button Erasing appears in the display and the erasing process starts Erased appears when the process...

Page 73: ...tton 4 Press the 9 or 0 button to select the desired date b b a a c c d d a Number of files saved recorded on selected date b Selected date c Date file was recorded d Today s date Dates on which files...

Page 74: ...n stop mode The recorder will return to stop mode when the 0 button is pressed or if no operations are performed for 8 seconds 3 Press the or button to select All in folder or One file All in folder E...

Page 75: ...stored after being erased so please check carefully before erasing a file When there is a microSD in the voice recorder be sure to check whether the recording media being erased is on the Internal mem...

Page 76: ...the process has finished Erasing processes can take over 10 seconds to complete To prevent the risk of damage to data never attempt to perform any of the following processes before an erasing process...

Page 77: ...e voice recorder is in stop mode press the MENU SCENE button TIP Some menus contain items that can be set during recording playback P 79 2 Press the or button to select the tab containing the item you...

Page 78: ...instead of the OK button 8 Press the STOP 4 button to exit the menu screen When the menu screen is displayed during recording or playback press the MENU SCENE button to return to the previous screen w...

Page 79: ...Zoom Mic Low Cut Filter Bright Sound Rec Monitor External Input Backlight LED 4 Menu items that can be set during Playback Property Noise Cancel 1 Voice Balancer 1 Play Mode Equalizer 2 Skip Space Bac...

Page 80: ...file you want to lock P 33 Lock File is locked Unlock File lock is canceled Sorting files Sort by You can change the playback order of the files in a folder 1 Press the or button to select File name D...

Page 81: ...equired portion and then re saved See Trimming a file Trimming P 115 for the procedure Increasing the overall volume level of a file Normalize Increase the overall volume level until the highest volum...

Page 82: ...of setting items 4 Press the or button to select Rename File 5 Press the OK button 6 Press the or button to choose a prefix to add to the file name Available Prefixes Important 2 A E OK 3 B Keep 4 C...

Page 83: ...switch the screen Information is displayed for the items Name File the number of files and Folder the number of folders The Folder item is not displayed in Recorder mode Displayed numbers of files do...

Page 84: ...record the speaker s voice clearly set Rec Level to Middle and place the voice recorder s built in microphone near the speaker s mouth 5 to10 cm away NOTE When Rec Level is set to other than Manual th...

Page 85: ...e PEAK indicator light which indicates loud input may not lit To ensure successful recording we recommend that you test the record function and volume before use Setting the recording mode Rec Mode Yo...

Page 86: ...ff for Voice Detect While Recording and Fn Rec Pre Recording Seconds of the remaining recordable time is not displayed when FLAC is set Selecting microphone directivity Zoom Mic The voice recorder s b...

Page 87: ...air conditioners or low frequency sounds from equipment such as projectors On Turns the low cut filter On Off Turns the low cut filter Off NOTE The Rec Scene setting automatically changes to Off when...

Page 88: ...vices during recording On Sound is output to connected devices during recording Off Sound is not output to connected devices during recording NOTE Sound will not be output to Bluetooth earphones if a...

Page 89: ...an be assigned to the F2 button for quick recall See Choosing a Recording Method Fn Rec P 121 for the procedure Starting recording before you press record Pre Recording With pre recording recording st...

Page 90: ...F1 button The voice recorder changes to recording level adjustment mode Press the F1 button again to return to voice sync level adjustment mode 3 Press the REC s button The blinking message Standby a...

Page 91: ...dure Voice activated recording function VCVA The voice activated recording function VCVA automatically starts recording when a sound louder than a preset voice activation level is detected and automat...

Page 92: ...ng indicator light becomes lit when recording is activated and flashes when recording is paused TIP Increasing the setting number increases the VCVA activation sensitivity enabling quieter sounds to a...

Page 93: ...he preset level for at least the set detection time 7 Press the OK button to finalize the setting 8 Press the STOP 4 button to exit the menu screen Recording a Reference Tone for Use When Synchronizin...

Page 94: ...ally skips the non voice portions of the file and plays only the speaking portions Off The voice playback function is disabled Reducing noise during playback Noise Cancel Use the Noise Cancel function...

Page 95: ...the batteries deplete more quickly Selecting playback modes Play Mode Several playback modes are available for different listening styles 1 Press the or button to select Recorder or Music When Record...

Page 96: ...Range is set to All after the last file in the current folder has been played the first file in the next folder is being played When playback reaches the end of the last file in the voice recorder En...

Page 97: ...moving the playback position backward by the set amount 2 Press the or button to select a setting When Forward Skip was selected File Skip 10 sec Skip 30 sec Skip 1 min Skip 5 min Skip 10 min Skip Wh...

Page 98: ...EAK indicator light On LED indicator light is switched on Off LED indicator light stays off TIP Even if you set the LED setting to Off the LED indicator light will flash while files are being transfer...

Page 99: ...omatically Off Turns Intro Play off Selecting the speaker output Speaker You can set the built in speaker to be On or Off when the earphones are not connected When set to Off sound will not be output...

Page 100: ...memory on the voice recorder microSD card Uses on the microSD card Setting power save mode Power Save The voice recorder automatically enters power save mode if the voice recorder is stopped for a set...

Page 101: ...button to finalize the setting TIP When setting the hour or minute each time you press the F2 button the display changes between the AM PM and 24 hour clock formats Example 10 38 PM 10 38 PM default...

Page 102: ...erent USB applications See Setting the USB connection USB Settings P 131 for the procedure Restoring the default settings Reset Settings The Reset Settings function restores all the voice recorder s f...

Page 103: ...recording media Format Formatting a recording media erases all existing files saved on it Be sure to transfer all important files to a computer before formatting See Formatting recording media Format...

Page 104: ...104 EN 4 Menu Device menu Device Menu Viewing Certification Marks Certification View the recorder s product certifications...

Page 105: ...cording Select a file Select a file for which you want to extract the speech portion While recording Extract the speech portion while recording 5 Press the OK button to move to the respective setting...

Page 106: ...with On selected for While recording will be saved 2 Press the OK button Setting fixed appears when the process has finished To check for an icon showing whether voice detection is active press the S...

Page 107: ...roperly extract speaking portions when they were low in volume when recorded level meter readout of 12 dB or less or due to surrounding noise The time needed for the extraction process will increase i...

Page 108: ...in the internal memory or inserted microSD card to a different folder in the internal memory Copy to memory Copies one or more files saved in the internal memory or inserted microSD card to a differen...

Page 109: ...deselect a previously selected file by selecting it and pressing the OK button again 2 Repeat Step 1 to select all the files you want to move or copy then press the F2 button When All files was selec...

Page 110: ...ed or copied NOTE Files cannot be copied if there is insufficient remaining memory Files cannot be moved or copied if there are over 200 files To prevent the risk of data damage never remove the batte...

Page 111: ...ing items 4 Press the or button to select File Divide 5 Press the OK button 6 Press the OK button and play the file to the desired division point P 58 You can change the playback speed P 66 and fast f...

Page 112: ...t folder contains 200 files a new folder will be created to hold the additional files NOTE File Divide can be performed only when the file list is displayed Locked files P 80 cannot be divided It may...

Page 113: ...desired erasing point P 58 You can change the playback speed P 66 and fast forward rewind P 60 7 Press the F2 button at the partial erase start position TIP Playback continues while Start position is...

Page 114: ...o please check carefully before erasing a file Locked files and read only files cannot be erased P 80 Before erasing a file or folder charge or replace the batteries to ensure they will not run out be...

Page 115: ...the file to the desired trimming point P 58 You can change the playback speed P 66 and fast forward rewind P 60 7 Press the F2 button at the position where you want to start trimming TIP Playback cont...

Page 116: ...not be trimmed even if it is a PCM file Locked files and read only files cannot be trimmed P 80 Before trimming a file charge or replace the batteries to ensure they will not run out before the proces...

Page 117: ...the voice recorder is in stop mode 3 Press the OK button to move the cursor into the list of setting items 4 Press the or button to select Fade in out 5 Press the OK button 6 Press the button to selec...

Page 118: ...the battery level and charge the batteries or insert fresh batteries as needed P 12 P 13 P 20 Check the amount of memory available and insert a new microSD card or delete files to free up additional s...

Page 119: ...lected starting time 10 Press the OK button to save the start and end times 11 Press the STOP 4 button to exit the menu screen Starting Timed Recording 1 Press the MENU SCENE button while the voice re...

Page 120: ...reen NOTE Timer Rec On Off reverts to Off when timed recording ends Timed recording will not start if the recorder is in use or recording is in progress at the starting time selected for Timer Rec TIP...

Page 121: ...select the option you plan to assign to the F2 button Pre Recording Recording starts approximately two seconds before the REC s button is pressed P 123 V Sync Rec Recording starts automatically when t...

Page 122: ...for Fn Rec selects Off for Voice Detect While Recording P 105 Selecting Pre Recording or Over Dubbing for Fn Rec selects Off for Rec Scene P 47 TIP The following is required for using the Over Dubbing...

Page 123: ...corded audio Recording mode Recording starts Approx 2 s The recorded audio may include the click made when the REC s button is pressed to start recording This can be prevented by starting recording re...

Page 124: ...ordings made while pre recording is active will begin approximately two seconds before the REC s button is pressed Step 7 Press the REC s button to start recording 8 Press the STOP 4 button to stop re...

Page 125: ...Rec P 121 2 Connect the earphones to the voice recorder s earphone jack The playback sound is output from the earphones To earphone jack 3 Select a file to be overdubbed P 33 4 Press the F2 OVER DUB...

Page 126: ...on while the voice recorder is in stop mode 2 Press the or button to select the Rec Menu tab 3 Press the OK button to move the cursor into the list of setting items 4 Press the or button to select Sla...

Page 127: ...Standby is On Go to Step Rec Standby is Off Go to Step 2 Press the REC s button to prepare for recording 3 Press the 9 or 0 button to adjust the recording level 4 Press the REC s button to start recor...

Page 128: ...put on the voice recorder or the camera s built in speaker during filming TIP Having the slate tone waveform available as a marker will help you synchronize the audio and video when using OM Workspace...

Page 129: ...voice recorder P 63 To earphone jack To camera audio input jack 2 Press the MENU SCENE button while the voice recorder is in stop mode 3 Press the or button to select the Rec Menu tab 4 Press the OK b...

Page 130: ...n to return to the menus 11 Press the STOP 4 button to exit the menu screen Press and hold the STOP 4 button when the voice recorder is stopped to check setting indicators meanings NOTE Changes to tes...

Page 131: ...items 4 Press the or button to select USB Settings 5 Press the OK button 6 Press the or button to select USB Connection 7 Press the OK button 8 Press the or button to select a setting PC Choose this o...

Page 132: ...the or button to select a setting Storage Class Select to have the voice recorder recognized as an external memory device by a connected computer Composite Select to have the voice recorder recognized...

Page 133: ...st of setting items 4 Press the or button to select Format 5 Press the OK button 6 Press the or button to select the recording media to be formatted 7 Press the OK button 8 Press the button to select...

Page 134: ...seconds to complete To prevent the risk of damage to data never attempt to perform any of the following processes before a formatting process has finished Disconnecting the USB connection AC adapter R...

Page 135: ...Connecting to Bluetooth Compatible Audio Devices Controlling the Recorder Using the Dedicated Smartphone App P 142 Connecting Simultaneously to Smartphones and Audio Devices Automatically Connecting t...

Page 136: ...peration with all Bluetooth compatible devices We will assume no responsibility for any loss of data resulting from the use of the Bluetooth function Notes on security when using Bluetooth devices Wit...

Page 137: ...hen the connection settings have been deleted Connection P 144 Use this option when reconnecting to paired devices after the connection is lost or to connect to a device other than the one to which th...

Page 138: ...ing appears in the display and the connecting process starts Connection Completed appears when the process has finished 12 Press the STOP 4 button to exit the menu screen 4 About pairing Paring will n...

Page 139: ...ected to a device other than that to which you want to connect end the connection before proceeding P 141 2 Press the MENU SCENE button while the voice recorder is in stop mode 3 Press the or button t...

Page 140: ...ple devices cannot be paired simultaneously Configure the connection settings separately for each device The recorder can connect with only one audio device at a time It can connect with both an audio...

Page 141: ...ress the or button to select Device Menu tab 3 Press the OK button to move the cursor into the list of setting items 4 Press the OK button 5 Press the or button to select Audio Device 6 Press the OK b...

Page 142: ...download the application using a mobile phone line such as 4G depending on your particular contract you may incur packet communication fees Connecting to Smartphones via Pairing The initial connection...

Page 143: ...select the network name displayed by the recorder in Step 9 Enter the passcode The devices will be paired TIP For information on searching for networks and entering the passcode see the user manual f...

Page 144: ...oice recorder is in stop mode 2 Press the or button to select the Device Menu tab 3 Press the OK button to move the cursor into the list of setting items 4 Press the OK button 5 Press the or button to...

Page 145: ...rs Never disconnect the USB cable before data communication has finished Always use the procedure on P 147 to disconnect the USB cable Data may not be transferred correctly if you disconnect the conne...

Page 146: ...s menu Select PC for USB Connection P 131 TIP For information on the computer s USB port see the computer s user manual NOTE Insert the USB connector securely all the way Operation will not be normal...

Page 147: ...that the LED indicator light is not flashing disconnect the USB cable from the recorder and computer TIP You can disconnect the USB cable and use the voice recorder before the batteries are fully cha...

Page 148: ...l memory error occurred Contact the Customer Support Center Card error The microSD card was not recognized correctly Remove and reinsert the microSD card P 22 P 24 Memory full There is no remaining me...

Page 149: ...copied A file with the same name as a file being moved copied exists in the destination folder Select another file This file can t be divided An attempt was made to divide a file that is not an MP3 o...

Page 150: ...es has been reached Select another folder P 33 Playback is inaudible The earphones are connected to the earphone jack To output the playback through the built in speaker disconnect the earphones The r...

Page 151: ...ile was recorded in a different folder Select another folder P 33 A music file cannot be found in the destination folder to which it was copied The music file was in second level sub folder of a trans...

Page 152: ...in PCM 44 1kHz 16bit or PCM 44 1kHz mono format Select a file recorded in PCM 44 1kHz 16bit or PCM 44 1kHz mono format P 33 P 58 PCM 44 1kHz 16bit or PCM 44 1kHz mono is not set for Rec Mode Set PCM...

Page 153: ...ory default settings Time clock settings and recorded files are retained P 102 Unable to connect with a Bluetooth device The Bluetooth device to be connected is not in a connectable state Make the Blu...

Page 154: ...rectional A directional gun microphone handy for outdoor recording of wild birds singing and other highly directional applications The metal body provides a highly rigid body ME34 compact zoom microph...

Page 155: ...nt An adapter that helps prevent noise being transmitted to the recorder from the camera to which it is attached The shock mount effectively mitigates the sounds made by camera controls and the like f...

Page 156: ...order gets dirty If the recorder is very dirty soak the cloth in mild soapy water and wring well Wipe the recorder with the damp cloth and then wipe it with a dry cloth s Display Wipe gently with a so...

Page 157: ...manual or unauthorized distribution of reproductions thereof Note that we will not be held liable in the event of damages lost earnings or any claims from third parties resulting from improper use of...

Page 158: ...MPLIANCE WITH THE AVC STANDARD AVC VIDEO AND OR ii DECODE AVC VIDEO THAT WAS ENCODED BY A CONSUMER ENGAGED IN A PERSONAL AND NON COMMERCIAL ACTIVITY AND OR WAS OBTAINED FROM A VIDEO PROVIDER LICENSED...

Page 159: ...ment area so the actual usable capacity will always be slightly less than the displayed capacity 4 Bluetooth Specification Standard Version 5 0 Support Transmit Power Level Class 1 Communication Dista...

Page 160: ...atteries 4 Operating temperature 0 to 42 C 32 to 107 6 F Frequency response 4 When recording from microphone line jack Linear PCM FLAC format 96 0 kHz 24 bits 20 Hz to 44 kHz 88 2 kHz 24 bits 20 Hz to...

Page 161: ...36 hours approx 44 1 kHz 24 bits 50 hours approx 33 hours approx 44 1 kHz 16 bits 56 hours approx 37 hours approx 44 1 kHz mono 59 hours approx 39 hours approx FLAC format 96 0 kHz 24 bits 23 hours ap...

Page 162: ...format 320 kbps 63 hours approx 42 hours approx 128 kbps 64 hours approx 43 hours approx 64 kbps mono 72 hours approx 48 hours approx NOTE The figures given here for battery life are the results of i...

Page 163: ...32 hours approx 44 1 kHz 16 bits 23 hours 30 minutes approx 97 hours approx 48 hours approx 44 1 kHz mono 47 hours approx 194 hours approx 96 hours approx 4 FLAC format Recording mode Internal memory...

Page 164: ...0 hours approx 64 kbps mono 520 hours approx 2140 hours approx 1060 hours approx NOTE Actually available recording times may be shorter than the figures shown here when making short recordings repeate...

Page 165: ...de Recording time 96 0 kHz 24 bits 2 hours 50 minutes approx 88 2 kHz 24 bits 3 hours 10 minutes approx 48 0 kHz 24 bits 5 hours 50 minutes approx 48 0 kHz 16 bits 8 hours 50 minutes approx 44 1 kHz 2...

Page 166: ...ngs that can be recorded The figures below are guideline values 16 GB 3600 tracks approx At 128 kbps 4 minutes per track Note that voice recorder specifications and appearance are subject to change wi...

Page 167: ...NG s Do not use the voice recorder in an atmosphere that might contain flammable or explosive gases It may cause fire or explosion s Do not attempt to disassemble repair or modify the voice recorder I...

Page 168: ...service center Do not touch batteries with bare hands when removing them Remove batteries outdoors and away from flammable objects s When carrying the voice recorder by its strap take care to prevent...

Page 169: ...tor immediately s Do not attempt to recharge alkaline lithium or any other non rechargeable batteries s Keep batteries out of the reach of infants and children Batteries could be swallowed by infants...

Page 170: ...ulations Operating precautions Do not leave the voice recorder in hot or humid locations such as in direct sunlight inside a vehicle or on a beach during summer Do not store the voice recorder in humi...

Page 171: ...ture or cause thereof Recorded file precautions Note that we will not be held liable for recorded files being erased or becoming unplayable due to voice recorder or computer failure Recording of copyr...

Page 172: ...date of issue 2022 01 BS207100 2022 https om digitalsolutions com...

Reviews: