background image

EN

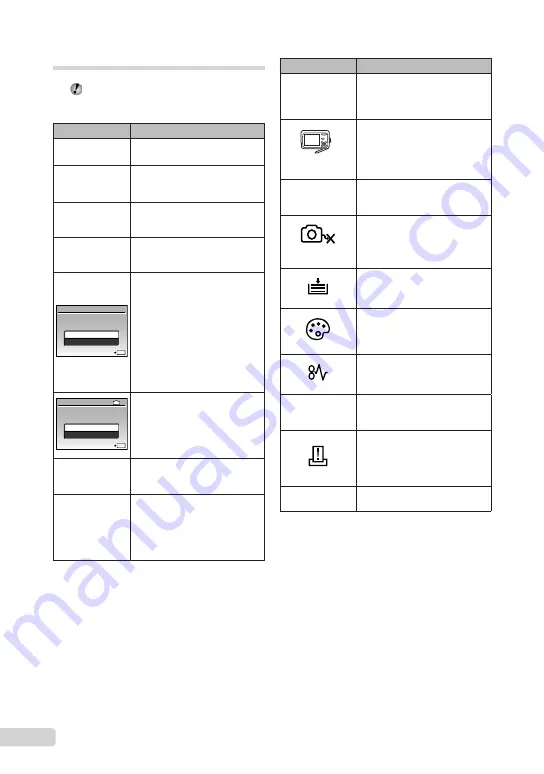
Error message

  When one of the messages below is 

displayed on the monitor, check the 

corrective action.

Error message

Corrective action

q

CARD ERROR

Card problem

Insert a new card.

q

WRITE 

PROTECT

Card problem

Use a computer to cancel the 

read-only setting.

>

MEMORY FULL

Internal memory problem

Insert a card.

Erase unwanted images.

*1

q

CARD FULL

Card problem

Replace the card.

Erase unwanted images.

*1

OK

SET

CARD SETUP

CLEAN CARD

FORMAT

Card problem

Use 

ab

 to select [CLEAN 

CARD], and press the 

o

 button. Take out the card, 

wipe the contact area (p. 48) 

with a soft, dry cloth, and then 

load the card again.

Use 

ab

 to select [FORMAT], 

and press the 

o

 button. Next, 

use 

ab

 to select [YES], and 

press the 

o

 button.

*2

IN

OK

SET

MEMORY SETUP

POWER OFF

MEMORY FORMAT

Internal memory problem

Use 

ab

 to select [MEMORY 

FORMAT], and press the 

o

 button. Next, use 

ab

 to 

select [YES], and press the 

o

 button.

*2

L

NO PICTURE

Internal memory/Card problem

Take pictures before viewing 

them.

r

PICTURE 

ERROR

Problem with selected image

Use photo retouch software, 

etc. to view the image on a 

computer. If the image still 

cannot be viewed, the image file 

is corrupted.

Error message

Corrective action

r

THE IMAGE 

CANNOT

BE EDITED

Problem with selected image

Use photo retouch software, etc. 

to edit the image on a computer.

CARD-COVER 

OPEN

Operation problem

Close the battery/card 

compartment cover.

g

BATTERY 

EMPTY

Battery problem

Charge the battery.

NO 

CONNECTION

Connection problem

Connect the camera and 

computer or printer correctly.

NO PAPER

Printer problem

Load paper into the printer.

NO INK

Printer problem

Refill the ink in the printer.

JAMMED

Printer problem

Remove the jammed paper.

SETTINGS 

CHANGED

*3

Printer problem

Return to the status where the 

printer can be used.

PRINT ERROR

Printer problem

Turn off the camera and printer, 

check the printer for any 

problems, and then turn the 

power on again.

r

CANNOT PRINT

*4

Problem with selected image

Use a computer to print.

*1

  Before erasing important images, download them to 

a computer.

*2

  All data will be erased.

*3

  This is displayed, for instance, when the printer’s 

paper tray has been removed. Do not operate 

the printer while making the print settings on the 

camera.

*4

  This camera may be unable to print images taken by 

other cameras.

Summary of Contents for X-560WP - Digital Camera - Compact

Page 1: ...safe place for future reference We recommend that you take test shots to get accustomed to your camera before taking important photographs In the interest of continually improving products Olympus res...

Page 2: ...oting Modes 17 Using Shooting Functions 20 Using Playback Features 23 Menus for Shooting Functions 24 Menus for Playback Editing and Printing Functions 28 Menus for Other Camera Settings 31 Printing 3...

Page 3: ...E OFF NTSC VIDEO OUT POWER SAVE OFF ON Page tab Submenu 2 To quickly move to the desired submenu press c to highlight the page tab and then use ab to move the page tab Press d to return to the submenu...

Page 4: ...guide p 3 p 22 p 23 F button exposure compensation p 21 button macro p 21 button flash p 20 Y button self timer p 21 K button shooting switching shooting modes p 14 q button playback p 15 L D button b...

Page 5: ...shooting functions 8 F SILENT MODE p 33 1 A IMAGE QUALITY p 24 2 B CAMERA MENU WB p 25 ISO p 25 R still pictures movies p 26 PANORAMA p 26 AF MODE p 27 3 C SWITCH SHOOTING MODES P p 14 G p 17 DIS MOD...

Page 6: ...mp p 21 3 Multi connector p 33 34 41 4 Connector cover p 33 34 41 51 5 Strap eyelet p 10 6 Battery card compartment cover p 11 44 51 Camera unit 3 4 6 5 7 9 10 1 2 8 11 7 Shutter button p 14 43 8 n bu...

Page 7: ...ing shooting modes p 14 5 m button p 3 5 6 DISP E button changing information display menu guide p 3 22 23 7 q button playback p 15 8 o button OK FUNC p 3 22 9 L D button backlight boost erase p 16 22...

Page 8: ...de p 33 4 Macro super macro p 21 5 AF lock p 18 6 Battery check p 10 44 7 Flash standby camera shake warning flash charge p 43 8 AF target mark p 14 9 Recording with sound p 26 10 Number of storable s...

Page 9: ...mage Movie 1 Silent mode p 33 2 Print reservation number of prints p 37 3 Recording with sound p 26 29 46 4 Protect p 29 5 Battery check p 10 44 6 Aperture value p 14 7 Exposure compensation p 21 8 Wh...

Page 10: ...charge the battery Charge the battery when the error message shown below appears BATTERY EMPTY Monitor top right Error message Flashes in red Attaching the camera strap Pull the strap tight so that it...

Page 11: ...battery card compartment cover When using the camera be sure to close the battery card compartment cover 3 Notch Index area Insert the card straight until it clicks into place Do not touch the contac...

Page 12: ...e microSD card straight out Do not touch the contact area on the microSD Attachment and or microSD card Arrow pad and operation guide The symbols displayed on various setting and movie playback screen...

Page 13: ...2 and 3 use abcd and the button to set M month D day TIME hours and minutes and Y M D date order For a precise time setting press the o button as the time signal strikes 00 seconds To change the date...

Page 14: ...s not displayed press the K button a few times to select it Current shooting mode display Press the n button again to turn off the camera Before shooting make sure that the lens is clean 2 Hold the ca...

Page 15: ...while d is pressed Press the button to resume playback 2009 08 26 12 30 100 0004 00 14 00 34 IN During pause To stop movie playback Press the button 4 To take the picture gently press the shutter but...

Page 16: ...ing images during playback Single image erase 1 Press the D button when the playback image to be erased is displayed ERASE OK IN NO YES SET CANCEL MENU 2 Press a to select YES and press the button K E...

Page 17: ...tton halfway down or press the g button to check which shooting mode the camera has automatically selected In some cases the camera may not select the desired shooting mode When the camera cannot iden...

Page 18: ...NAPSHOT cPET The camera takes a picture in the mode for the shooting scene 1 When the subject is dark noise reduction is automatically activated This approximately doubles the shooting time during whi...

Page 19: ...ocus on the subject and gently press the button all the way down to start recording Press halfway Press fully 00 34 REC Lights up red during recording Remaining recording time p 49 3 Gently press the...

Page 20: ...ce the occurrence of red eye in your photos FILL IN The flash fires regardless of the available light FLASH OFF The flash does not fire Using the zoom Pressing the zoom button adjusts the shooting ran...

Page 21: ...lose as 20 cm 7 9 in 1 60 cm 23 6 in 2 to the subject SUPER MACRO 3 This enables shooting as close as 8 cm 3 1 in to the subject 1 When the zoom is at the widest W position 2 When the zoom is at the m...

Page 22: ...the g button The displayed shooting information changes in the order shown below each time the button is pressed Shooting mode display p 8 10M 2 0 P 4 IN NORM 10M 2 0 P 4 IN NORM 10M 2 0 P 4 IN ISO 16...

Page 23: ...in index view Use abcd to select an image and press the o button to display the selected image in single image view To scroll an image in close up view Use abcd to move the viewing area Changing the i...

Page 24: ...up to A4 8 5 11 in 2M 1600 1200 Suitable for printing pictures at A5 5 7 in 1M 1280 960 Suitable for printing pictures at postcard size VGA 640 480 Suitable for viewing pictures on a TV or using pict...

Page 25: ...ational Organization for Standardization ISO standards specify the sensitivity for digital cameras and film thus codes such as ISO 100 are used to represent sensitivity In the ISO setting although sma...

Page 26: ...d with the movies cannot be played back on this camera To listen to the sound connect to a TV or PC Creating panoramic images PANORAMA B CAMERA MENU PANORAMA K P h Panorama shooting lets you create a...

Page 27: ...gn the AF target mark on the subject and press b 2 When the camera recognizes the subject the AF target mark automatically tracks the subject movement to focus on it continuously 3 To cancel the track...

Page 28: ...darkened by backlighting and dim lighting are brightened REDEYE FIX Eyes that are reddened by the flash are corrected 1 Use ab to select a correction method and press the o button 2 Use cd to select a...

Page 29: ...Submenu 2 Application U 90 The image is rotated 90 clockwise V 0 The image is not rotated t 90 The image is rotated 90 counter clockwise 1 Use cd to select an image 2 Use ab to select the rotation dir...

Page 30: ...e ab to select SEL IMAGE and press the o button 2 Use abcd to select the image to be erased and press the o button to add a R mark to the image 1 4 2 5 3 6 IN OK MENU BACK SEL IMAGE GO R mark 3 Repeat...

Page 31: ...the backup Changing the display language W E SETUP W Changing the display language p 13 Submenu 2 Application Languages 1 The language for the menus and error messages displayed on the monitor is sele...

Page 32: ...date display order 2009 08 26 12 30 OK X Y M D TIME MENU CANCEL SET Y M D Date order Saving the shooting mode setting when the camera is turned off SAVE SETTINGS E SETUP SAVE SETTINGS Submenu 2 Applic...

Page 33: ...onnector AV cable supplied Connector cover 2 Use the camera to select the same video signal system as the one of connected TV NTSC PAL 3 Turn on the TV and change INPUT to VIDEO an input jack connecte...

Page 34: ...instruction manual 1 PictBridge is a standard for connecting digital cameras and printers of different makers and printing out pictures directly The printing modes paper sizes and other parameters tha...

Page 35: ...e only when print reservations have been made Print Reservations DPOF p 37 4 Use ab to select SIZE Submenu 3 and press d If the PRINTPAPER screen is not displayed the SIZE BORDERLESS and PICS SHEET ar...

Page 36: ...cting WITHOUT prints the images without the date FILE NAME WITH WITHOUT Selecting WITH prints the file name on the image Selecting WITHOUT does not print any file name on the image P Proceeds to the s...

Page 37: ...n are saved in the image on the card This enables easy printing at a printer or print shop supporting DPOF by using only the print reservations on the card without a computer or a camera 1 DPOF is a s...

Page 38: ...s prints the image with the shooting time OK SET BACK MENU PRINT ORDER SET CANCEL 1 1 1 1 6 Use ab to select SET and press the o button Reserving one print each of all images on the card U 1 Follow St...

Page 39: ...ress the o button 4 Use cd to select the image with the print reservation you want to cancel Use ab to set the print quantity to 0 5 If necessary repeat Step 4 and then press the o button when finishe...

Page 40: ...g System Windows 2000 Professional XP Home Edition XP Professional Vista Mac OS X v10 3 10 5 Processor Pentium III 500MHz or faster Power PC G3 500MHz or faster Intel Core Solo Duo 1 5GHz or faster RA...

Page 41: ...ouble click the OLYMPUS Master 2 icon Windows appears on the desktop Macintosh appears in the OLYMPUS Master 2 folder Browse window appears after starting the software When you start OLYMPUS Master 2...

Page 42: ...fer and save the image data on your computer while the camera and the computer are connected System requirements Windows Windows 2000 Professional XP Home Edition XP Professional Vista Macintosh Mac O...

Page 43: ...the camera Press the K button to set a shooting mode Wait until flash charge stops blinking before taking pictures Monitor Difficult to see Condensation 1 may have formed Turn off the power and wait f...

Page 44: ...are etc to view the image on a computer If the image still cannot be viewed the image file is corrupted Error message Corrective action r THE IMAGE CANNOT BE EDITED Problem with selected image Use pho...

Page 45: ...contrast at the same distance as the subject compose the shot and take the picture Subjects with low contrast When extremely bright objects appear in the center of the screen Object with no vertical...

Page 46: ...nt settings This is especially true for sunshade under a clear sky mixed natural and artificial light settings and so on Image quality Taking sharper pictures Taking pictures with the optical zoom Avo...

Page 47: ...s with usage The supplied LI 41C battery charger is used only for LI 42B LI 40B battery Do not charge other type of battery with the supplied battery charger It might cause explosion leaking overheati...

Page 48: ...capacity cards enables you to take more pictures Index area Notes can be filled in here Contact area Contact section of the card with the internal camera terminal Do not touch the contact area direct...

Page 49: ...3 178 179 M 6 6 347 353 H 2560 1920 L 6 6 353 359 M 12 13 673 695 I 2048 1536 L 10 10 565 576 M 21 21 1 102 1 141 J 1600 1200 L 17 17 913 940 M 32 35 1 728 1 880 K 1280 960 L 26 27 1 390 1 453 M 48 5...

Page 50: ...rprints or stains are found on the contact area wipe the area with a soft dry cloth Important information about water resistant feature The waterproof feature is warranted 1 to operate at depths up to...

Page 51: ...or more or at low temperature 0 C 32 F or less Failure to do so may break down water resistance Do not use chemicals for cleaning rust prevention anti fogging repairing etc Failure to do so may break...

Page 52: ...the product securely on a stable tripod stand or bracket Power Source Connect this product only to the power source described on the product label Foreign Objects To avoid personal injury never insert...

Page 53: ...use any other chargers Never heat or incinerate batteries Take precautions when carrying or storing batteries to prevent them from coming into contact with any metal objects such as jewelry pins fast...

Page 54: ...tery when using it for the first time or if it has not been used for a long period When operating the camera with battery power at low temperatures try to keep the camera and spare battery as warm as...

Page 55: ...modifications not expressly approved by the manufacturer may void the user s authority to operate this equipment This equipment has been tested and found to comply with the limits for a Class B digit...

Page 56: ...requency Hz Plug type China 220 50 A Hong Kong 200 220 50 BF India 230 240 50 C Indonesia 127 230 50 C Japan 100 50 60 A Korea rep 220 60 C Malaysia 240 50 BF Philippines 220 230 60 A C Singapore 230...

Page 57: ...od of one 1 year from the date of purchase If any Product proves to be defective within the one year warranty period the customer must return the defective Product to any of Olympus Service Centers fo...

Page 58: ...PRODUCTS OR ANY PART THEREOF OR THE MERCHANTABILITY OF THE PRODUCTS OR THEIR FITNESS FOR A PARTICULAR PURPOSE OR RELATING TO THE INFRINGEMENT OF ANY PATENT COPYRIGHT OR OTHER PROPRIETARY RIGHT USED OR...

Page 59: ...L WARRANTY SERVICE International warranty service is available under this warranty For customers in Europe CE mark indicates that this product complies with the European requirements for safety health...

Page 60: ...ty under this warranty shall be limited to repairing or replacing the product Any liability for indirect or consequential loss or damage of any kind incurred or suffered by the customer due to a defec...

Page 61: ...ric system Digital ESP metering system Shutter speed 4 to 1 1000 sec Shooting range 0 6 m 2 0 ft to W 1 0 m 3 3 ft to T normal 0 2 m 0 7 ft to W 0 6 m 2 0 ft to T macro mode 0 08 m 3 1 in to W only su...

Page 62: ...ents AC 100 to 240 V 50 to 60 Hz Output DC 4 2 V 600 mA Charging time Approx 2 hours when charging the supplied LI 42B Operating environment Temperature 0 C to 40 C 32 F to 104 F operation 20 C to 60...

Page 63: ...1 48 ISO 25 L LIGHTING FIX 28 Lithium ion battery 2 A AF lock 18 AF MODE 27 AF TRACKING 27 ALL PERFECT FIX 28 ALL INDEX 35 ALL PRINT 35 All image print reservation U 38 AUTO ISO 25 AUTO WB 25 AV cable...

Page 64: ...L 30 37 PRINT ORDER PRINT SELECT MODE 37 Print reservations 37 Printing pictures 34 Protect 0 29 R REDEYE 20 REDEYE FIX 28 RESET D 27 Resizing Q 28 S SAVE SETTINGS 32 s Scene 17 SELFTIMER Y 21 SETUP E...

Page 65: ...65 EN W White balance WB 25 X xD Picture Card 11 48 Z Zoom 20...

Page 66: ...VN377901...

Reviews: