background image

E-17

ENGLISH

WATCHING VIDEO

1

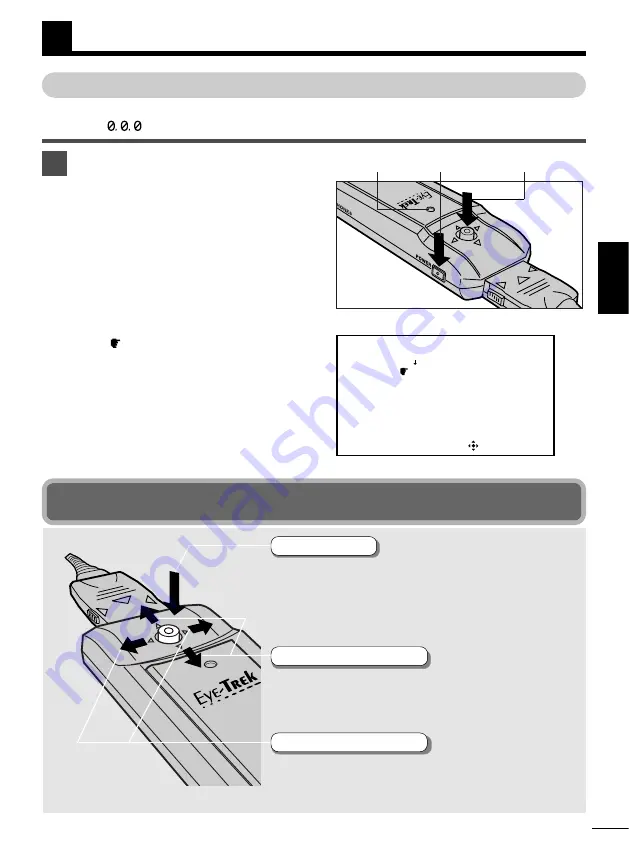
Turn the power on and select the desired
language.

1. Turn on the connected video component.
2. Press the POWER switch on the Eye-Trek

control unit. The power indicator lights in
green, then the language selection screen
appears. 

3. Move the Multi Control button up/down

(

,

Ä

) to select the desired language for

the On-Screen Display. Then press the
Multi Control button.
A warning appears on the screen.

The 

mark appears next to the selected

language.

The language selection screen will not appear the
next time the power is turned on. Refer to the
reset instructions to change the language (

Z

pg.

24).

TURNING ON THE POWER FOR THE FIRST TIME

Before watching an image, 

1

Select the desired language for the Menu screen, and 

2

Enter the

password (“

”).

On-Screen Display


OK

E N G L I S H

日本語

D E U T S C H
F R A N Ç A  I  S
 I  T A L  I  A N O
E S P A Ñ O L

Multi Control 
button

POWER 
switch

Power 
indicator

Multi Control button 

To the video component

To the display unit

The Multi Control button lets you easily control all
Eye-Trek functions from one convenient location.

Selects numbers for the password (

Z

pg.18-19, 26).

Adjusts volume while watching an image. (

Z

pg.21).

Selects desired items in the Menu screen (

Z

pg.22-25).

Adjusts the contrast while watching an image. (

Z

pg.21)

Adjusts the items you want to set while the Menu is on
the display (

Z

pg.22-24).

Press

Move right/left

•••••

§ ©

Confirms the warning/health warning screens (

Z

pg.18-19).

Displays the menu screen while watching an image 
(

Z

pg.20, 22-25).

Sets items selected on the Menu (

Z

pg.17, 20-25).

Sets the password (

Z

pg.18-19, 26).

Move up/down

•••••

¶ Ä

Summary of Contents for Eye-Trek FMD-250W

Page 1: ...TRUCTION MANUAL Nous vous remercions pour l achat d un produit OLYMPUS Veuillez conserver ce manuel port e de main pour un usage ult rieur MODE D EMPLOI Le agradecemos por la adquisici n de un product...

Page 2: ...TION SAFETY NOTICE The exclamation point within an equilateral triangle is intended to alert the user to the presence of important operating and maintenance servicing instructions in the literature ac...

Page 3: ...ine plug a plug having one blade wider than the other This plug will fit into the power outlet only one way This is a safety feature If you are unable to insert the plug fully into the outlet try reve...

Page 4: ...ference Causing Equipment Regulations Damage Requiring Service Unplug this product from the wall outlet and refer servicing to qualified service personnel under the following conditions a When the pow...

Page 5: ...r those people Anyone who cannot see the whole image clearly or who wears glasses that make it hard to see the whole screen clearly or who has an eye movement disorder or visual field disorder Under t...

Page 6: ...duct when you are subject to strong vibrations such as in a car on a bumpy road This may cause dizziness nausea headaches or motion sickness Do not use this product continuously for long periods Conti...

Page 7: ...d places such as in the rain snow fog or a steamy bathroom Do not use it if it has condensation inside or if your hands are wet Do not use it near flammable gas liquid or vapor Do not expose it to ver...

Page 8: ...g periods Doing so may cause the product to be deformed by heat resulting in a malfunction and an electric shock hazard Note the following points when plugging the AC adapter into a power outlet When...

Page 9: ...Y UNIT E 15 WATCHING VIDEO E 17 TURNING ON THE POWER FOR THE FIRST TIME E 17 TURNING ON THE POWER AFTER THE FIRST TIME E 19 SELECTING SCREEN FORMAT E 20 ADJUSTING THE AUDIO VIDEO E 21 SAVING LOADING A...

Page 10: ...of use but this is not a malfunction A black or white spot or a red green or blue point may be observed but this is not a malfunction More than 99 99 of this product s effective pixels are guaranteed...

Page 11: ...E 11 ENGLISH CHECKING THE CONTENTS Display unit AC adapter AV cable Instruction manual Control unit...

Page 12: ...al Multi Control button POWER switch Headphone Nose pad Headphone holder Frame Frame adjuster DISPLAY UNIT Display cable CONTROL UNIT Power indicator green AC adapter connector AV cable Video yellow A...

Page 13: ...acks of the video component If the AV cable is plugged into the input jacks no image or sound will appear The video component s output jacks are usually on the rear side of the unit Jacks on the front...

Page 14: ...o camera etc To audio video output jack If the connected video component uses a mini jack and cannot be directly connected with the AV cable use plug adapters AV cable provided If the S video jack and...

Page 15: ...d the image may appear dim If the image still cannot be seen properly or is dim after adjusting the nose pad switch the left and right frames Z pg 28 When wearing the display unit over glasses pull th...

Page 16: ...ame arms You can narrow the space between the frame arms using the frame adjusters when the frame arms don t fit your face When removing the display unit first remove the headphones from your ears If...

Page 17: ...lect the desired language for the Menu screen and 2 Enter the password On Screen Display E N G L I S H D E U T S C H F R A N A I S I T A L I A N O E S P A O L Multi Control button POWER switch Power i...

Page 18: ...password entry screen appears press the Multi Control button three times to select the number for the three digits The password is set to when this product is used for the first time or after it is re...

Page 19: ...2 Enter the password When the password has been registered 1 When the password entry screen appears move the Multi Control button up down to select the registered numbers then press it to complete th...

Page 20: ...or Hi Vision images played back through a MUSE NTSC converter m Selecting the WIDE mode When a standard image 4 3 aspect ratio is viewed in the WIDE mode and when the image is adjusted to fill up the...

Page 21: ...Control button If there is no operation for 3 seconds or more the adjusted volume level will be activated and the display will return to the normal screen Adjusting the contrast 1 Move the Multi Contr...

Page 22: ...EO SETTINGS then press it or move it to the right When EXIT is selected the Menu disappears from the screen and returns to the normal screen 1 Select the desired item in VIDEO SETTINGS 1 Move the Mult...

Page 23: ...SRS BASS and TREBLE Each level changes as follows Right OFF 1 2 3 Left 3 2 1 OFF To get the most out of SRS cancel your video component s sound effects surround etc SRS doesn t function if your sound...

Page 24: ...io video settings Menu items Functions Multi Control Selections Default button settings E 24 EXIT WIDE NORMAL CONTRAST BRIGHTNESS TINT COLOR ORIGINAL SRS BASS TREBLE VOLUME LIMIT VOLUME SAVE LOAD WATC...

Page 25: ...ht to complete the setting 2 The word SAVE on the screen blinks and the audio video settings you have set are saved VOLUME LIMIT and VOLUME cannot be saved Select EXIT to return to the Menu screen The...

Page 26: ...up down to select YES then press it The password entry screen appears REGISTERING CHANGING THE PASSWORD 3 Enter a password 1 Move the Multi Control button up down to select 3 numbers then press it Th...

Page 27: ...cable Protect the display unit frame from contact with hair liquids cosmetic products or other chemicals If any gets on the frame wipe it with a soft cloth moistened with a solution of neutral deterg...

Page 28: ...ster out to detach 3 Detach the other adjuster following the same procedures Frame Left Adjuster Inside Frame Left Adjuster Outside 2 Attaching the frames 1 Push the frame into the display unit while...

Page 29: ...lanced Separate Y video signal 0 75 Vp p 75 unbalanced Separate C video signal 300 mVp p 75 unbalanced Stereo audio signal 200 mVrms Power supply Rated 7 5 V DC Ambient Temperatures Operation 5 to 35...

Page 30: ...ad and frame adjuster Video settings Adjust video settings properly pg 21 22 CONTRAST TINT etc with the Multi Control button pg 24 are adjusted improperly The image disappears About 2 1 2 hours have R...

Page 31: ...MEMO ENGLISH...

Reviews: