background image

16

Basic operation

En

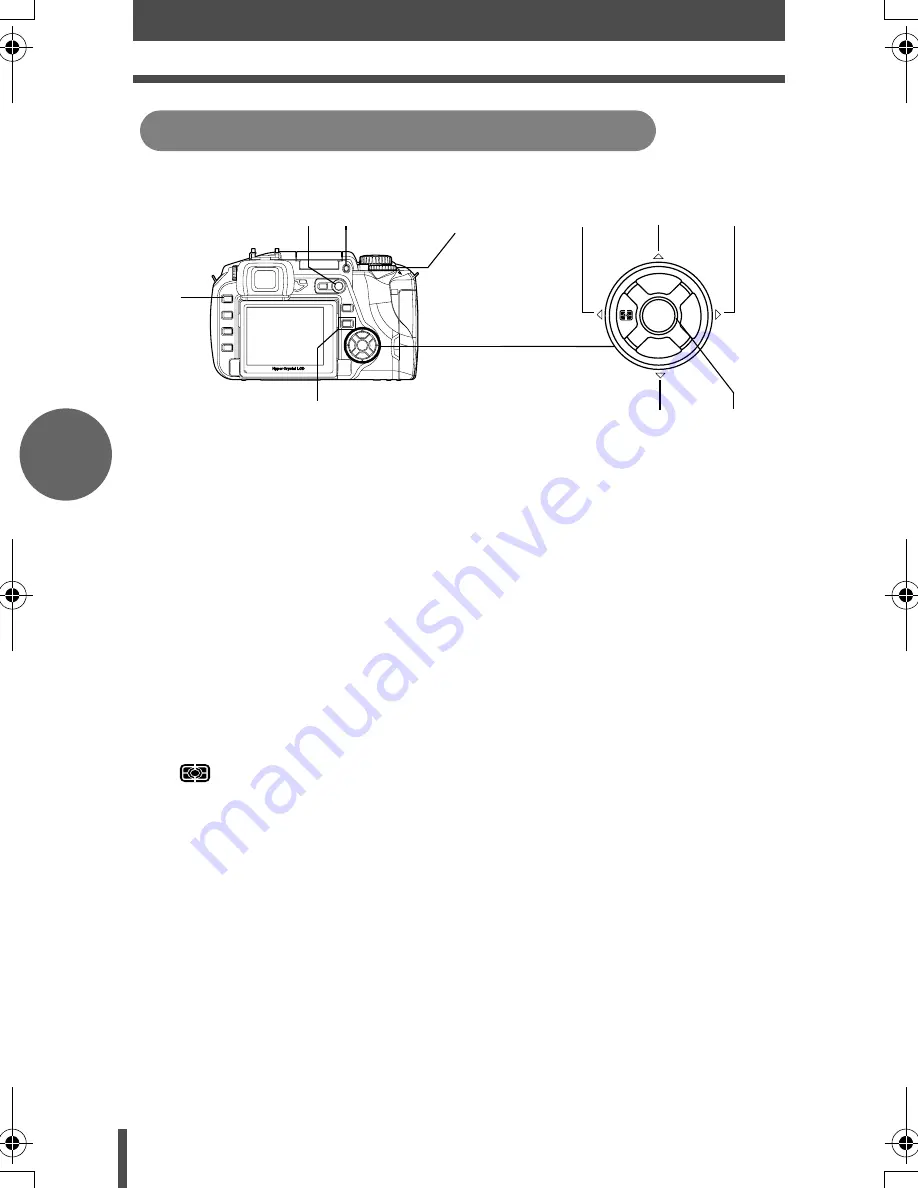
Frequently used functions during shooting can be easily set.

1

q

 (Playback) button

Switches to the play mode.

2

u

 (Live view) button

Displays the subject on the monitor while shooting.

3

#

UP button

Activates the built-in flash.

Pressing the following buttons display the menu on the monitor.
Set by rotating the control dial while looking at the menu.

4

j

 (Drive) button

Sets the single-frame/sequential shooting, remote control shooting and self-
timer shooting.

5

 (Metering) button

Sets the metering mode.

6

WB

 (White balance) button

Sets the white balance.

7

AF

 (Focus mode) button

Sets the focus mode.

8

ISO

 button

Sets the ISO sensitivity.

9

i

 button

Confirms the setting.

Buttons used during shooting mode

WB

OK

ISO

AF

1

2 3

4

5

6

7

8

9

Control dial

s003_En-Fr-Es-De.book  Page 16  Tuesday, December 27, 2005  4:34 PM

Summary of Contents for EVOLT E-330

Page 1: ...2 30 58 86 ENGLISH FRAN AIS ESPA OL DEUTSCH...

Page 2: ...he actual product Getting started 3 Charging the battery 3 Attaching the strap 3 Loading the battery 4 Attaching a lens to the camera 5 Inserting a card 6 Removing the card 7 Preparations 8 Power on 8...

Page 3: ...fastened securely 4 Repeat steps 1 3 to attach the other end of the strap to the other eyelet Notes Attach the strap correctly as shown above so that the camera does not fall off If the strap is attac...

Page 4: ...over 3 Load and push the battery in until it is locked by the battery lock 4 Close the battery compartment until a click is heard Unloading the battery Press the battery lock to unlock and remove the...

Page 5: ...the camera s body Rotate the lens clockwise until you hear it click 3 Remove the lens cap Removing the lens from the camera While pressing the lens release button remove the lens from the camera by r...

Page 6: ...he card as shown in the illustration until it is locked into place Notes Do not push the card in with a pen or similar hard or pointed object Never open the battery compartment cover or card cover or...

Page 7: ...the eject button all the way in and let it pop out then press it all the way in again The card will be ejected If you press the eject button too hard the card may jump out of the camera Pull out the...

Page 8: ...filter surface The SSWF Super Sonic Wave Filter indicator blinks while dust reduction is working Power on SSWF indicator Set the power switch to ON To turn off the power set the power switch to OFF Se...

Page 9: ...set the year then press d to move to the month setting To return to the previous setting press b The first two digits of the year Y are fixed 5 Repeat this procedure until the date and time are comple...

Page 10: ...isplayed The control panel screen is not displayed when the shutter button is pressed 3 Release the shutter Press the shutter button all the way fully When a picture is taken a shutter sound is output...

Page 11: ...1 minute The camera activates again as soon as you touch any button the shutter button arrow pad etc gADVANCED MANUAL Sleep timer P 116 Notes Press the shutter button gently If it is pressed hard the...

Page 12: ...al towards U the image is enlarged in steps of 2x 14x Playback the image you want to erase and press the S erase button Select YES and press the i button to erase Playing back images WB OK ISO AF Disp...

Page 13: ...D ROM into the CD ROM drive Windows Click on the OLYMPUS Master button Macintosh Double click on the Installer icon Follow the on screen prompts to install Set the camera s power switch to ON The sele...

Page 14: ...looking though the viewfinder rotate the diopter adjustment dial little by little When you can see the AF frame clearly adjustment is complete The monitor s angle can be changed to suit the environmen...

Page 15: ...hutter speed manually il j Select according to your shooting requirement 20 different scene modes are available Select from the SCENE mode according to the shooting situations 1 Set the mode dial to 2...

Page 16: ...play the menu on the monitor Set by rotating the control dial while looking at the menu 4 j Drive button Sets the single frame sequential shooting remote control shooting and self timer shooting 5 Met...

Page 17: ...reduction Live view Displays the current date and time Displays when Auto bracketing has been set Displays when noise reduction has been set Displays the selected live view mode 8 ISO sensitivity Dis...

Page 18: ...1 Press the MENU button 2 Use to select J CARD SETUP then press d 3 Use ac to select ALL ERASE then press the i button Select the language to be displayed on the monitor 1 Press the MENU button 2 Use...

Page 19: ...Plus You can upgrade your software to OLYMPUS Master Plus using the upgrade button on the OLYMPUS Master main menu You need to have the OLYMPUS Master installed in a computer with an internet connect...

Page 20: ...ns infinity Eye point 18 mm 0 7 from the cover glass 1 m 1 Diopter adjustment range 3 0 1 0 m 1 Optical path fraction Quick return half mirror Depth of field Can be checked with the j button when PREV...

Page 21: ...on Exposure can be adjusted in 1 3 1 2 or 1 EV step within a range of 5 EV White balance Product type Image pickup device Mode setting Auto Preset WB 7 settings Customized WB One touch WB Recording Me...

Page 22: ...M1 Product type Rechargeable Lithium ion battery Nominal voltage DC 7 2 V Nominal capacity 1500 mAh No of charge and discharge times Approx 500 times vary with usage conditions Ambient temperature 0 C...

Page 23: ...tand tripod bracket table or cart Mount only on a stable tripod stand or bracket Follow the instructions that describe how to safely mount the product and use only the mounting devices recommended by...

Page 24: ...mproper adjustment of other controls could damage the product and require extensive repair work by a qualified technician d The product has been dropped or damaged in any way e The product exhibits a...

Page 25: ...ltage points which could cause serious burns or electrical shock z Do not let water or foreign objects inside the camera A fire or electric shock may result If the camera is accidentally dropped in wa...

Page 26: ...ding the power plug If the following cases occur stop using and contact an Olympus dealer or authorized customer support center The power plug or cable produces heat burning smell or smoke The power p...

Page 27: ...r insert anything other than the specified battery into the compartment z If the battery leaks becomes discolored or deformed or appears abnormal in any way during operation stop using the camera imme...

Page 28: ...arger designed to operate on the AC voltage in the area where you are using the camera Otherwise fire explosion smoke overheat electric shock or burns may result WARNING z Do not damage the charger s...

Page 29: ...for Camera File System DCF standards stipulated by the Japan Electronics and Information Technology Industries Association JEITA CE mark indicates that this product complies with the European requirem...

Reviews: