background image

32

Formatting

Formatting

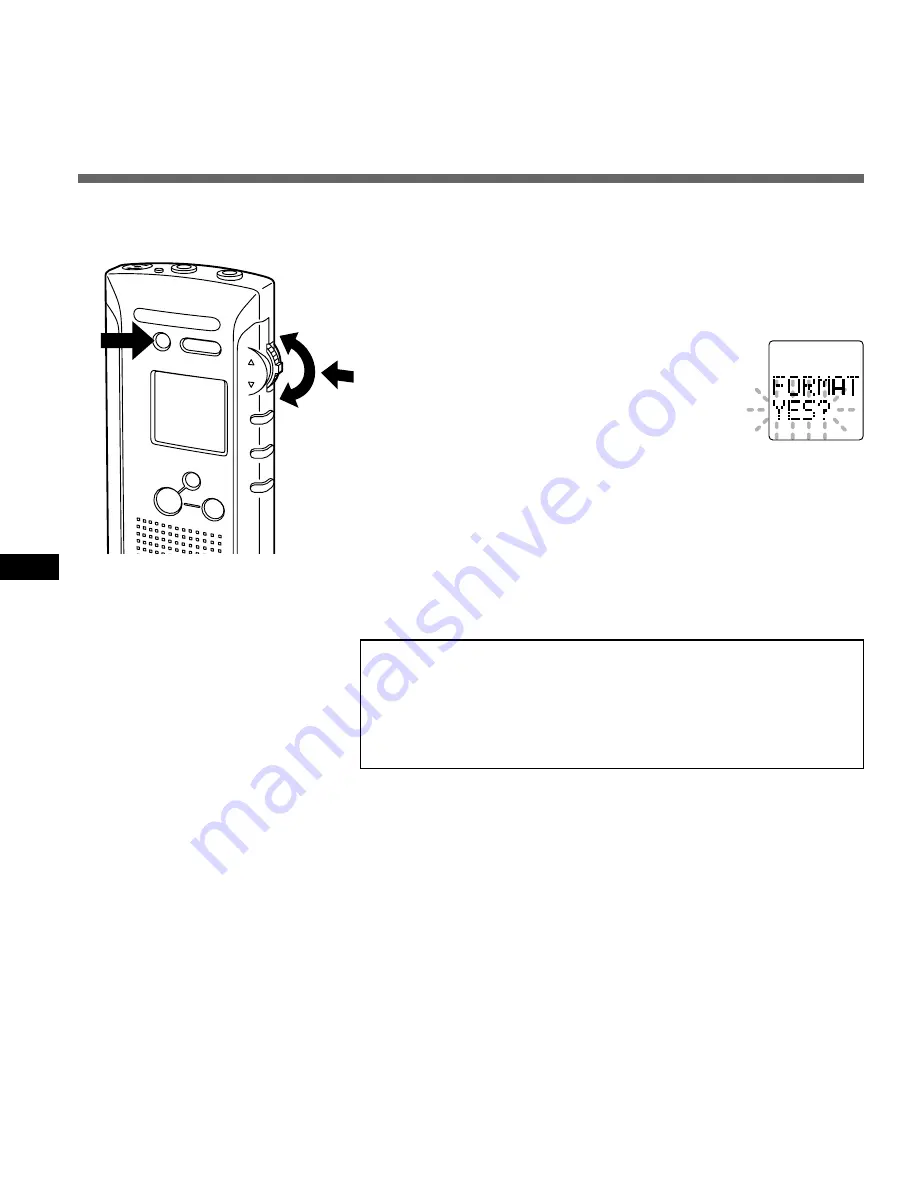
If you want to initialize the built-in flash memory to its factory defaults, follow these steps:

1

Press the MENU/VOL switch.

2

 Move the MENU/VOL switch up

or down to choose “FORMAT”.

“YES?” will flash.

3

Press the ERASE button for 1 second or longer.

“FORMAT” flashes and then “OK” appears on the display
when formatting is complete.

................................................................................................

To Abort Formatting

In Step 2, press the STOP button while “YES?” is flashing.
The recorder will return to the initial screen before Step 1.

Caution

Formatting will clear the flash memory of all recorded
messages, and reinitialize the clock and other settings.
If you want to initialize the flash memory to its factory defaults,
reset the recorder (P.33) after formatting.

3

2

1

SP DICT

INDEX/   

FOLDER

REC

STOP

ERASE

MENU

/VOL

Summary of Contents for DS320 - Digital Voice Recorder

Page 1: ...se read these instructions for information about using the product correctly and safely Keep the instructions handy for future reference To ensure successful recordings we recommend that you test the record function and volume before use ViaVoicekit ...

Page 2: ...n the unit Do not place the recorder on top of or near electric appliances such as TVs or refrigerators Avoid sand or dirt These can cause irreparable damage Avoid strong vibrations or shocks Do not disassemble repair or modify the unit yourself Do not operate the unit while operating a vehicle such as a bicycle motorcycle or go cart Keep the unit out of the reach of children Do not use the unit a...

Page 3: ... from getting inside the product Do not moisten the AC adapter or touch it with a wet hand Do not use the AC adapter in the vicinity of flammable gas including gasoline benzine and lacquer thinner Do not insert a dirty power supply plug into a power outlet Do not damage the power cord In case the internal parts of the AC adapter are exposed because it has been dropped or otherwise damaged the AC a...

Page 4: ...4 Hardware Section ...

Page 5: ...13 Basic Operations Recording 14 Playing and Volume Control 18 Erasing 21 Other Functions Recording Modes 25 Microphone Sensitivity 26 Using the Variable Control Voice Actuator VCVA 27 Dictation Mode 28 Index Marks 29 Transferring Messages 30 System Sounds Alarms 31 Formatting 32 Reset 33 Other Information Menu List 33 Troubleshooting 34 Specifications 35 Accessories optional 35 Software reference...

Page 6: ... to 99 messages per folder for easy identification at a later time The Variable Control VoiceActuator VCVA helps save memory by pausing recording when it senses silence Overwrite recording insert recording and partial erasure functions make it easy to correct and edit recordings The LCD panel includes a dot matrix display which clearly displays message numbers a real time counter remaining recordi...

Page 7: ...ward button 6 STOP button 7 Strap hook 8 Built in speaker 9 REC Record button 0 INDEX FOLDER button Display LCD panel ERASE button Record indicator lamp Built in microphone Earphone jack Microphone jack HOLD switch Battery cover POWER jack PC I F interface connector 3 4 5 7 1 0 9 8 2 6 Identification of Parts ...

Page 8: ...battery indicator 0 Recording date time mark Standby Mode and Display Shut Off If the recorder is stopped or paused for 30 minutes or longer it goes into standby mode power saving mode and the display shuts off To exit standby mode and turn on the display press any one of the STOP REC PLAY FF or REW buttons or the MENU VOL switch To put the recorder into standby mode power saving mode and shut off...

Page 9: ...econd before appearing as shown at right The message number under NEW is the number of the next message to be recorded in this folder For example if you have three messages in this folder you will see 4 Note If the battery cover is not closed completely OPEN appears on the display and the recorder will not work Inserting Batteries Remaining recording time Folder Message number Inserting Batteries ...

Page 10: ...of different types and or brands Remove the batteries if you are not going to use the recorder for an extended period of time Using the AC Adapter Replacing Batteries Using the AC Adapter Plug in the optional AC adapter Olympus Model A321 or A322 into a household power outlet and connect the power plug to the recorder s power connector DC 3 V as shown in the illustration Do not connect the AC adap...

Page 11: ...sabled and the display becomes blank This is useful when the recorder is carried in a bag briefcase or your pocket because no buttons will work accidentally Remember to release the HOLD switch when using the recorder Notes When setting the HOLD switch to the HOLD position while playing a message the recorder continues playing until reaching at the end of message When setting the HOLD switch to the...

Page 12: ... and minute 5Press the MENU VOL switch The month cursor will flash 6Set the month and press the MENU VOL switch The date cursor will flash 7Set the date and press the MENU VOL switch The hour cursor will flash 8Set the hour and press the MENU VOL switch The minute cursor will flash 9Set the minute and press the STOP button This completes the date time setup procedure Note If you leave the recorder...

Page 13: ...AAAA screen 3Press the MENU VOL switch The cursor flashes at the first character position 4Move the MENU VOL switch up or down to choose the first character Characters are selectable from A to Z and 0 through 9 5Press the MENU VOL switch Accepts the character and moves to the next position Repeat the steps above to set a four character ID 6Press the STOP button This completes the ID setup procedur...

Page 14: ...mented by one The message number under NEW is the number of the next 2 1 3 SP DICT INDEX FOLDER REC STOP ERASE MENU VOL message to be recorded in this folder Pause Recording Pause Press the REC button while recording The elapsed recording time indicator on the display and the record indicator lamp will flash Resume Recording Press the REC button again Recording will resume with the same message nu...

Page 15: ...asing you can transfer messages to a PC see software section While recording is in progress never disconnect or connect the AC adapter even if the recorder contains batteries This may result in failure to play the recorded message If the recorder is paused for 30 minutes or longer while recording it enters standby mode and the display shuts off To release the recorder from standby mode and turn on...

Page 16: ...ssage into which you want to insert recording 3Press the PLAY button to play the message 4Press the STOP button at the point where you want the insertion to start 5Press the MENU VOL switch 6Move the MENU VOL switch up or down to choose R MODE 7Press the MENU VOL switch to choose INSERT 8Press the STOP button Insert recording is now set 4 8 1 2 6 3 5 7 SP DICT INDEX FOLDER REC STOP ERASE MENU VOL ...

Page 17: ... soon as another operation such as Playback is executed the recorder will go back to Overwrite mode Insert recording will not work if there is no recording time available Listening While Recording Audio Recording Monitor Insert an earphone into the earphone jack to monitor what is being recorded The volume is fixed 10 9 SP DICT INDEX FOLDER REC STOP ERASE MENU VOL ...

Page 18: ...unter The length of the message being played is displayed below in hour minute second format 4Press the STOP button to stop playing Notes The recording date and time appears on the display for 2 seconds at the beginning of each message The recorder stops automatically when it finishes playing each message Insert an earphone into the earphone jack to monitor playback The built in speaker will be tu...

Page 19: ... Warning Do not turn the volume too high when listening with an earphone You could damage your hearing Pause Playing Pause Press the PLAY button The elapsed playing time indicator on the display will flash Resume Playing Press the PLAY button again Playing will resume at the point of interruption Notes The recorder will stop if you press the STOP button while it is paused If the recorder is paused...

Page 20: ...order will skip back to the beginning of the message and then stop automatically Release the FF button The recorder will resume normal playback If you do not release the FF button the recorder will skip to the end of the message and then stop automatically Release the REW button The recorder will resume normal playback If you do not release the REW button the recorder will skip back to the beginni...

Page 21: ...essage numbers of subsequent messages are changed automatically and available recording time increases approximately by the length of the erased message Notes If you do not press the ERASE button within 4 seconds after Step 3 above or if you press the STOP button the recorder will cancel message erasure and will return to the screen in Step 2 The remaining recording time available after message er...

Page 22: ...en erased The recorder returns to the initial screen for the folder from which all messages have been erased and available recording time increases approximately by the length of the erased messages Notes If you do not press the ERASE button or if you press the STOP button within 3 minutes after Step 3 above the recorder will cancel message erasure and will return to the screen in Step 1 If a grou...

Page 23: ...LAY button to play the message 4Press the STOP button where you want the partial erasure to begin 5Press the MENU VOL switch 6Move the MENU VOL switch up to choose ERASE 7Press the MENU VOL switch Playback resumes automatically 8Press the MENU VOL switch again at the point where you want the partial erasure to stop The erasure ending time indicator will flash 4 1 2 6 3 5 7 8 SP DICT INDEX FOLDER R...

Page 24: ...length of the partial erasure Notes If you do not press the ERASE button within 4 seconds after Step 8 above or if you press the STOP button the recorder will return to STOP mode and partial erasure will be cancelled Remaining recording time available after partial erasure depends on the recording mode R TIME setting Erasing 9 SP DICT INDEX FOLDER REC STOP ERASE MENU VOL ...

Page 25: ...se the recording mode The MENU VOL switch toggles between SP and LP modes each time you press it 3Press the STOP button This completes the setup procedure Notes Recording mode cannot be changed in the middle of a message The remaining recording time indicator is updated when recording mode is switched SP mode is recommended in the following situations A better quality recording is desired Meetings...

Page 26: ...If an optional microphone is plugged into the microphone jack its sensitivity can be switched If the microphone sensitivity is set to DICT the microphone will only record nearby sounds Place the built in microphone close to the speaker s mouth 2 to 4 inches Recording Meetings and Lectures Set the microphone sensitivity to CONF conference recording to record meetings or lectures Meetings and lectur...

Page 27: ...n to choose VCVA 3Press the MENU VOL switch to choose ON 4Press the STOP button This completes the VCVA setup procedure 5Press the REC button The recorder will start recording in VCVA mode Notes When the VCVA senses sound louder than its start stop actuation level setting recording starts automatically When it senses silence for 3 seconds or longer recording pauses automatically and the recorder e...

Page 28: ...ensitivity See P 26 To change alarm setting See P 31 Notes Place the built in microphone close to the speaker s mouth 2 to 4 inches Use of an optional ME12 noise canceling microphone is recommended for recording with minimum ambient noise effects SP DICT INDEX FOLDER ERASE MENU VOL Adjusting the VCVA start stop actuation level Move the MENU VOL switch up or down while recording to adjust the VCVA ...

Page 29: ...hile playing The recorder will search for the next index mark in the message and continue playback from that point Press the INDEX FOLDER button while fast forwarding The recorder will search for the next index mark in the message and then stop immediately Press the INDEX FOLDER button while reversing The recorder will search for the previous index mark in the message and then stop immediately Not...

Page 30: ...you want to move 3Press the MENU VOL switch 4Move the MENU VOL switch up to choose MOVE The source folder is displayed on the left and the destination folder on the right 5Press the MENU VOL switch An arrow mark flashes and then OK appears on the display when the message is moved NEW appears on the display in the destination folder Canceling a move In Step 5 press the STOP button before pressing t...

Page 31: ...e setup procedure Guide of system sounds Tone Explanation 4 1 3 2 SP DICT INDEX FOLDER REC STOP ERASE MENU VOL Beep long beep beep long beep Long beep every 15 seconds Low pitched beep Beep Beep beep beep beep Available recording memory is exhausted The recorder has finished playing the last message Less than 90 seconds of available recording time is left while recording The end or beginning of a ...

Page 32: ...es and then OK appears on the display when formatting is complete To Abort Formatting In Step 2 press the STOP button while YES is flashing The recorder will return to the initial screen before Step 1 Caution Formatting will clear the flash memory of all recorded messages and reinitialize the clock and other settings If you want to initialize the flash memory to its factory defaults reset the reco...

Page 33: ...rify the correct time and reset the time and date Voice data is not erased when the recorder is reset Menu List Notes Stop the recorder before choosing any menu settings The recorder will stop if you leave it idle for 3 minutes or longer during menu setup operations R TIME Press the MENU VOL switch M SENS VCVA ALARM TIME DATE MOVE FORMAT Move the MENU VOL switch up and down P 25 P 26 P 27 R MODE P...

Page 34: ...down with the MENU VOL switch Q 7 Unable to set index marks A 7 All 16 index marks have been used already Q 8 Clock resets A 8 The flash memory has been formatted Q 9 Incorrect time is shown A 9 The batteries were replaced too slowly Q 10 AC adapter won t work A 10 You are not using the properAC adapter Q 11 ERROR appears on the display A 11 Was the battery cover opened or was the AC adapter conne...

Page 35: ...aries greatly according to type of batteries used and the conditions of use Specifications Accessories optional Accessories optional Headset E99 A helpful tool for transcription or concentrated work in busy office environments Conference microphone ME7 A highly sensitive directional microphone shotgun microphone Used to record speakers at a distance External microphone ME10 A lavalier omnidirectio...

Page 36: ...36 Software Section ...

Page 37: ...g a Voice Model 44 Connecting the Digital Voice Recorder DS 320 47 Let s Start Starting DSS Player 48 Downloading Recorded Voice Data to a PC 48 Selected File Downloading Window 49 Selected File Downloading Procedure 50 Voice File Playback Window 51 Voice File Playback Procedure 52 Sending Voice Files by E mail 53 Voice Recognition 54 Other Information Converting File Formats 58 Uninstalling DSS P...

Page 38: ...i 256 color display Features of DSS Player and IBM ViaVoice PC storage and management of voice recordings made with the DS 320 digital voice recorder Playback of voice files Recording of voices directly on a PC using the DS 320 digital voice recorder Conversion of DSS format files into WAVE format files Transmission of voice files via e mail Conversion of recorded voices into text using voice reco...

Page 39: ...ion program After exiting all applications click Next 4Confirm the licensing agreement You have to agree with this agreement to install DSS Player Click Yes if you agree with it 5Selection of the installation destination directory Select the installation destination for DSS Player Click Browse to change the current installation destination If you do not want to change it simply click Next 6Selecti...

Page 40: ...r This option includes support for dictation into Word and natural commands for Word Excel and Outlook If you choose not to install this support now you can install it later User Information Type your name and company name if appropriate Click Next when you have finished Installing IBM ViaVoice Software To use Voice recognition you must also install IBM ViaVoice and then setup your sound system Du...

Page 41: ...on your computer select the option to have ViaVoice automatically start theAdobeAcrobat Reader installation program AdobeAcrobat Reader enables you to view the ViaVoice Command Reference Click Next when you have finished Setup Complete This window indicates that you have successfully installed the software ...

Page 42: ...obably the one you typed earlier Leave it as it is or type a name by which you want ViaVoice to know you As you use ViaVoice words you add and other enhancements you make go into your personal speech files These files are associated with your user name You can use any name that contains the letters a to z in both uppercase and lowercase as well as numbers but it must not contain typographic symbol...

Page 43: ...ausing naturally between phrases or after punctuation marks Imagine you are speaking to someone for whom English is not the native language After you have read the sentences ViaVoice will display the quality of your audio Should ViaVoice find that the audio quality is poor click Fixing Poor Audio Quality to learn how to take corrective action During these tests the Audio Setup Wizard might display...

Page 44: ... some text will become grey In the window below the first sentence and all but the last word of the next sentence have been recognised If ViaVoice does not recognise what you say simply say the text again until it is greyed When you have finished reading this text aloud ViaVoice displays the Choosing a Story window Select the story that you want to read aloud for creating your voice model If the s...

Page 45: ...ver if you have a strong regional accent we recommend that you click Continue Reading so that you can record more sentences giving ViaVoice more data for analysis Doing everything you can to give ViaVoice as much information about your voice as possible is one of the best ways to ensure excellent recognition accuracy Creating a Voice Model ...

Page 46: ... window after clicking Analyse Wait until ViaVoice has fully processed your recording before turning off your computer or working with other processing intensive programs Creating a Voice Model Creating a Voice Model ...

Page 47: ...OLD switch is released and that the recorder is in stop mode 1Connect the provided KP3 serial cable to the serial port of the PC 2Connect the other end of the provided serial cable to the DS 320 digital voice recorder For details or locations of the serial port on your PC refer to your PC s user manual Do not unplug the serial connection cable during communication Otherwise the data may be corrupt...

Page 48: ...he downloading window is displayed 5 4 3 Downloading Recorded Voice Data to a PC Downloading refers to transmitting voice files from the DS 320 digital voice recorder to the PC DSS Player provides the following two methods for downloading voice files in the PC Downloading selected files One or more voice files can be selected and downloaded to the PC Downloading the folder All voice files in a sel...

Page 49: ...ely after the startup To display the main window immediately after start up open the Option menu and uncheck Open Download Window After Start 1 Main Window button Click to close the downloading window and open the main window 2 Folder Select the folder in the DS 320 digital voice recorder 3 Folder View Shows the list of voice files in the folder selected with 2 1 2 3 ...

Page 50: ...ntaining one hour of voice recorded in standard mode takes about 14 minutes with a serial To check the contents of a voice file select it and click the Play button The DS 320 digital voice recorder will play back the file 3 connection when Pentium 300 MHz is used When downloading a large voice file it is recommended that you use the optional AC adapter as a power source The downloading destination...

Page 51: ...ding Window button Closes the main window and opens the downloading window 2 Current Folder Provides selection of folders in the PC 3 Voice File list box Shows the list of voice files in the folder selected in 2 4 Playback control buttons Used for playing back or stopping audio files 5 OLE button Click to export voice files to E mail software or another application 1 2 3 4 5 Voice File Playback Wi...

Page 52: ... when C ProgramFiles Olympus DssPly32 Message Folder_A has been selected 2Select the voice file Select the voice file from the voice file list box The illustration shows the display when the file DS640001 dss is selected 3Play back the voice file Press the Play button 1 For details on other operations including fast forward fast reverse stop play speed control volume control and time axis control ...

Page 53: ... to be attached and drag and drop the OLE button to the mail creation window Move the files while holding the left button of the mouse and release the button on the destination If your mailing software does not support drag and drop use the file attaching function of the mailing software and select the desired voice files from the folder containing voice files Even if the e mail recipient does not...

Page 54: ...Click the ViaVoice button of IBM ViaVoice VoiceCenter then select Tools and Analyze My Voice 3The ViaVoice User Wizard window appears Select Olympus DSS File in the Device list box then click the Next button 4The Audio Setup window opens Perform audio setup by following the instructions displayed on your screen For audio setup or enrolling using the DS 320 digital voice recorder use the provided P...

Page 55: ...voice through the DS 320 microphone so that it can understand your recorded voice The User Wizard makes it easy to do this When you see this window click Start then read the text in the box aloud speaking in a normal tone of voice As ViaVoice recognises what you read that text will turn grey In the window below the first sentence and all but the last word of the next sentence have been recognised ...

Page 56: ...mal tone of voice When ViaVoice has enough data the Story Finished window will appear Click Analyse to have ViaVoice create your voice model However if you have a strong regional accent we recommend that you click Continue Reading so that you can record more sentences giving ViaVoice more data for analysis Giving ViaVoice as much information about your voice as possible is the best way to ensure e...

Page 57: ...s on Recording for Voice Recognition When recording voices for use in voice recognition set up your DSS recorder as follows Set the microphone sensitivity to DICT Set the recording mode to SP Set the Variable Control Voice Actuator VCVA to OFF Only record voices that have already been registered in the voice recognition software Record in a relatively quiet environment Speak within 2 to 4 inches o...

Page 58: ... quality of wave files recorded with 11 025kHz 16 bit monaural PCM is equivalent to the SP mode of DSS format The WAVE format requires 1 3 MB of data per minute It does not show index marks and priority levels AAAA 0001 dss Extension File No Sequential number assigned automatically by the recorder ID No set by the user Uninstalling DSS Player or IBM ViaVoice Uninstallation refers to removing softw...

Page 59: ... space available Connect the connection cable Install DSS Player Set the HOLD switch to hold off position Increase the speaker or headphones volume Increase the playback volume in Windows or DSS Player Connect speakers or headphones Connect a sound card Increase the playback volume in Windows or DSS Player Release muting Install the voice recognition software Install the voice recognition software...

Page 60: ...s digital apparatus does not exceed the Class B limits for radio noise emissions from digital apparatus as set out in the Radio Interference Regulations of the Canadian Department of Communications Cet apparail numerique ne depasse pas limits de Categorie B pour les emissions de gruit radio emanant d appareils numeriques tel que prevu dans les Reglements sur l Interference Radio du Department Cana...

Reviews: