background image

24

Erasing

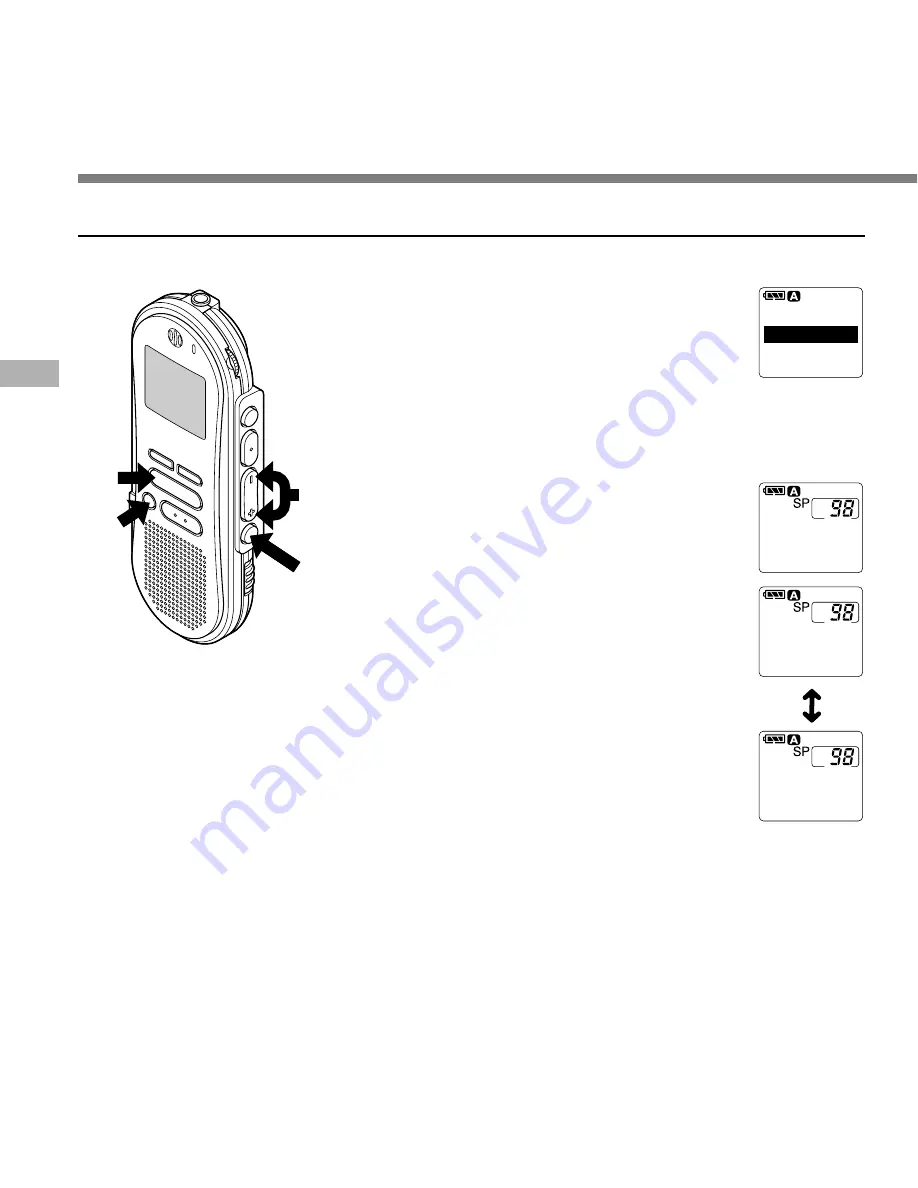
To Partially Erase a File

You can erase a selected part of a file.

Erasing

T O T A L 1 3 4

F O L D E R A

E R A S E

0 1

M

0 5

S

P A R T I A L

(

)

1

H

5 8

M

1 8

S

0 0

M

1 5

S

[ L E N G T H ]

[ L E N G T H ]

(

)

0 0

M

5 1

S

1

H

5 8

M

1 8

S

3
4

1

2

1

Press the 

FOLDER/MENU

 button to

choose a folder.

The folder name is displayed for
approximately 2 seconds.

2

Press the 

FF/+

 or 

REW/–

 button to

choose the file you want to erase a
part.

3

Press the 

PLAY

 button to play the

file.

4

Press the 

ERASE

 button where you

want to start erasing.

“PARTIAL ERASE” and the total time of the
file are displayed alternately while playing.

Summary of Contents for DS-660

Page 1: ...l Voice Recorder Please read these instructions for information about using the product correctly and safely Keep the instructions handy for future reference To ensure successful recordings we recomme...

Page 2: ...r further away from such equipment Avoid sand or dirt These can cause irreparable damage Avoid strong vibrations or shocks Do not disassemble repair or modify the unit yourself Do not operate the unit...

Page 3: ...ith a wet hand Do not use the AC adapter in the vicinity of flammable gas including gasoline benzine and lacquer thinner In case the internal parts of the AC adapter are exposed because it has been dr...

Page 4: ...minutes in SP mode and approximately 11 hours in LP mode 1 The five folders can hold 199 files each for the maximum of 995 recordings P 12 You may assign your own names to folders P 31 Recorded files...

Page 5: ...28 Alarm Playback Function ALARM 29 Assigning Folder Names FolderName 31 Assigning File Comments COMMENT 34 Other functions LCD Display Information 35 Formatting the Recorder FORMAT 36 Menu List 37 Us...

Page 6: ...d button 9 FF Fast Forward button 0 FOLDER MENU button HOLD switch Built in speaker STOP button ERASE button Identification of Parts 1 2 3 4 5 6 7 8 9 0 q e w r PLAY button DISPLAY button Display LCD...

Page 7: ...ontrol Voice Actuator indicator 4 Record mode indicator 5 Folder 6 Current file number 7 Erase lock indicator 8 Character Information display Display LCD Screen 8 7 6 5 1 2 3 4 How to Use the Clip Pre...

Page 8: ...d or brands If it takes longer than 1 minute to replace dead batteries you may have to reset the time when you load fresh batteries P 10 Remove the batteries if you are not going to use the recorder f...

Page 9: ...er to hold during Stop mode the display goes dark If you press any button the time will flash for about 2 seconds but the function of the button is disabled The alarm will sound at the scheduled time...

Page 10: ...time or after the recorder hasn t been used for a long time Proceed from step 1 1Set the hour 1 Press the FF button or REW button to set the hour 2 Press the REC SET button to accept the hour You can...

Page 11: ...menu Note If you press the STOP button during the setup operation the recorder will save the items that were set to that point 1Press and hold the FOLDER MENU button for 1 second or longer The menu o...

Page 12: ...approximately 2 seconds a Folder name b Total number of recorded files in the folder 2Press the NEW button to create a new file c New file number d Current recording mode e Remaining recording time 3...

Page 13: ...e files to your computer using DSS Player Software P 38 You cannot select a different mode than that of the original file before append recording P 18 To instantly review a recording Quick review Pres...

Page 14: ...tor lamp glows red 4Press the STOP button to stop overwriting Overwrite Recording You can overwrite a previously recorded file from any point within the file Note that the overwritten recordings will...

Page 15: ...stop inserting additional recording Insert Recording Additional recordings can be inserted into previously recorded files 1 4 3 2 T O T A L 1 3 4 F O L D E R A Notes You can pause and resume insert r...

Page 16: ...FOLDER MENU button for 1 second or longer The menu opens P 37 2Press the FF or REW button until VCVA flashes on the display 3Press the REC SET button The VCVA setup process begins 4Press the FF or REW...

Page 17: ...ny of 15 different values The higher the value the more sensitive the recorder to sounds At the highest value even the faintest sound will activate recording The VCVA pause sound level can be adjusted...

Page 18: ...de 1Press and hold the FOLDER MENU button for 1 second or longer REC MODE will be displayed on the screen P 37 2Press the REC SET button The recording mode setup process begins 3Press the FF or REW bu...

Page 19: ...mode suited for dictation Notes If you want to record clear or noise free dictation select DICT mode and place the microphone 3 to 4 inches from the source If the ambient background noise is too loud...

Page 20: ...e record play indicator lamp glows green a Current playback time b Total recording time of the file being played 4Adjust the VOLUME control to your liking 5Press the STOP button at any point you want...

Page 21: ...pressed within 2 seconds the recorder skips to the beginning of the next file Press the REW button once while stopped If the REW button is pressed at the beginning of a file the recorder starts rewind...

Page 22: ...a File to be erased 4Press the ERASE button once more when FILE ERASE is flashing The display changes to FILE ERASE and erasing will start ERASE DONE is displayed when the file is erased File numbers...

Page 23: ...n ALL ERASE is flashing The display changes to ALL ERASE and erasing will start ERASE DONE is displayed when the files are erased Locked files are reassigned file numbers in ascending order 2 3 1 T O...

Page 24: ...T H 0 0 M 5 1 S 1 H 5 8 M 1 8 S 3 4 1 2 1Press the FOLDER MENU button to choose a folder The folder name is displayed for approximately 2 seconds 2Press the FF or REW button to choose the file you wan...

Page 25: ...A R T E R A S E 0 1 M 0 5 S E N D 5Press the ERASE button once more where you want to stop erasing The erase starting point time set in step 4 and the ending point time set in this step appear on the...

Page 26: ...on OFF LOW HI If the display is already set to Noise Cancel start from step 2 Change the Noise Cancel level within 8 seconds otherwise the level is set at the displayed level and the display returns t...

Page 27: ...ng erased OFF Unlocks the file and allows it to be erased a Erase lock indicator 7Press the REC SET button to complete the setup screen 8Press the STOP button to close the menu Locking Files LOCK Lock...

Page 28: ...laying a file The recorder stops for 1 second when it reaches the index mark Clearing an Index Mark 3Locate the index mark you want to clear 4Press the ERASE button while the index number appears for...

Page 29: ...lashes on the display 5Press the REC SET button The alarm playback setup process begins 6Press the FF or REW button to choose between ON and OFF ON Enables alarm playback OFF Disables alarm playback a...

Page 30: ...he preset time pressing any button stops the sound Notes The alarm playback function can be set for only one file at a time The alarm will sound at the scheduled time every day unless the alarm playba...

Page 31: ...urrent character being entered a space is highlighted and blinks 6Press the FF or REW button to choose characters The recorder assigns the following buttons to inputting procedures The 5 folders on th...

Page 32: ...to be input skips ahead by 5 characters Quickly skips ahead in increments of five characters Use the two following methods to quickly find characters 1 When the INDEX button is pressed the displayed...

Page 33: ...arge caps Small caps Numerics Symbols 7When you have finished setting the folder name press and hold the REC SET button for 1 second or longer This completes the folder naming procedure If you wish to...

Page 34: ...se a PC to create or edit file comments in DSS Player and transfer them from the PC to the recorder 6When you have finished setting the file comments press and hold the REC SET button for 1 second or...

Page 35: ...erent recorder settings and file information 1 1 H 5 8 M 1 8 S 0 0 M 0 0 S L E N G T H 0 0 M 0 0 S R E C D A T E 1 2 M 3 1 D 0 3 Y 0 0 M 0 0 S C O M M E N T A M 1 2 5 8 0 0 M 0 0 S R E C T I M E LCD D...

Page 36: ...All files stored in the recorder will be deleted If you have important files that you want to save connect the recorder to a computer and transfer those files from the recorder to the computer before...

Page 37: ...ER MENU button during playback Selection between SP and LP modes P 18 VCVA setting P 16 Switch between ON enabled and OFF disabled Locking files setting P 27 Selection between ON locked and OFF unlock...

Page 38: ...t or speaker Note Do not use the recorder as a USB Microphone Speaker on Windows 98 as computer operation may become unstable Use only with Windows 98SE or later versions of the OS Using DSS Player So...

Page 39: ...als iMac iBook Power Mac G3 G4 PowerBook G3 G4 The computer must support a standard USB port Mac OS 9 0 9 2 2 10 1 10 2 16 MB or more 5 MB or more 2x or faster CD ROM drive 800 x 600 pixels or more 25...

Page 40: ...r Mac OS X on the network you need to log on as an Administrator 5Register user information Register user information Enter your name company name and license ID number serial number The license ID nu...

Page 41: ...your PC then click Finish If you checked on Install Adobe Acrobat Reader at step 10 proceed to step 13 continuously If the Acrobat Reader has already been installed proceed to step 17 13Set up Acroba...

Page 42: ...e terms of the Licensing Agreement You must accept the terms of the Licensing Agreement to install DSS Player for Mac If you accept them click Agree 6Select where to install DSS Player for Mac This le...

Page 43: ...ce the Online Help screen appears click the Contents tab 2Double click the icon of the desired topic heading The title of the topic is displayed 3Double click the icon of the desired topic An explanat...

Page 44: ...s manual for your PC regarding the USB port or USB hub on your PC Be sure that you connect the USB cable either directly to the USB port on your PC or the self power AC adapter connection USB hub Be s...

Page 45: ...it against the cradle until it clicks REMOTE is displayed on recorder if the USB cable is connected Remove the recorder from the cradle 4Make sure that the recorder s record play indicator lamp isn t...

Page 46: ...ick DSS Player Pro The check mark on DSS Player Pro disappears For automatic start select and click DSS Player to reinstate again Windows Manual start 1Start Windows 2Click the Start button select All...

Page 47: ...Macintosh 2Connect the recorder to your PC For cable connection instructions see Connecting to Your PC P 44 3Double click the DSS Player for Mac folder The DSS Player for Mac folder opens 4Double clic...

Page 48: ...VE Windows only and AIFF Macintosh only format files stored on your PC s hard disk 3 Device Manager Window Will display the directory structure of the folders in the recorder 4 Voice File List Box Wil...

Page 49: ...ons of Download Folders and Download All refer to Online Help Download Selected Files 1Select the folder From the Device Manager window select the folder that contains the voice file you would like to...

Page 50: ...SB cable while the record play indicator lamp is flashing If you do the data will be destroyed Depending on the size of the voice file and your PC it may take some time to download the files The downl...

Page 51: ...tension File number A serial number automatically assigned by a Digital Voice Recorder User ID The name that has been set on the Digital Voice Recorder The default name on the Digital Voice Recorder i...

Page 52: ...ROR SYSTEM ERROR Action Replace with new batteries P 8 Unlock the file P 27 Erase index marks that are no longer required P 28 Erase unnecessary files P 22 Erase unnecessary files P 22 Erase unnecessa...

Page 53: ...r is being used Wrong folder Symptom Nothing appears on the display Won t start Unable to record No playback tone heard Unable to erase Noise heard during playback Recording level too low Unable to se...

Page 54: ...roubleshooting Accessories optional PC Transcription kit AS 3000 The AS 3000 transcription kit provides you with a PC footswitch a headset and DSS Player Pro Transcription Module for easy transcriptio...

Page 55: ...or R03 External power supply AC adapter External dimensions 108 x 41 5 x 21 mm without protrusions Weight 75 g including alkaline batteries Specifications and design are subject to change without not...

Page 56: ...y With FCC Standards FOR HOME OR OFFICE USE Canadian RFI This digital apparatus does not exceed the Class B limits for radio noise emissions from digital apparatus as set out in the Radio Interference...

Reviews: