IMPORTANTE - PLEASE READ
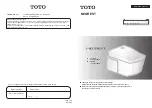
MISURE - MEASURES
ART. 15CL
CLEAR
COMPONENTI - COMPONENTS
2
- Leggere attentamente queste istruzioni prima di iniziare l’istallazione.
- Controllare il prodotto e verificare che non ci siano pezzi mancanti o danneggiati.
- Se ci dovessero essere problemi affidarsi alla garanzia.
- Si raccomanda l’installazione da parte di personale qualificato.
- Nelle nuove abitazioni riempire con acqua il sifone di vasi, lavabi e bidet per evitare il rilascio di gas
corrosivi che possono rovinare la rubinetteria ed il copriwater.
- Fissare i tubi di entrata e scarico acqua prima dell’istallazione.
- Grazie ad un lavaggio periodico si può evitare la formazione di calcare.
- R
esidui di prodotti acidi per il lavaggio possono danneggiare i pezzi metallici dei sanitari e i relativi rubinetti.
• Please read these instructions carefully before starting installation.
• Check the product for missing parts and damages.
• In the unlikely event of product failure, please refer to supplier concerning product guarantee.
• We strongly recommend the use of a qualified plumber.
• In new buildings it is recommended to fill the traps with water to ensure toxic gases do not corrode the surface
of the taps and toilet seats fittings.
• Fix all the outlet and inlet valves before installation.
• Periodic cleaning and maintenance should be used to avoid formation of damaging lime scale deposits.
• Astringent cleaning agents may damage some materials, such as seat hinges and plastic components.
ART. 15TE TUTTOEVO
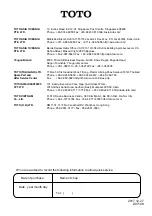
INSTALLAZIONE- INSTALLATION
3
35 mm
180 mm
10 mm
1
2
4
5
1
- Preparare gli scarichi e le viti di fissaggio secondo le misure
riportate nello schema a fianco (disegno 1), tagliare le barre se
necessario.
1
- Prepare the waste and the fixing rods as shown in the picture and
cut if necessary.
2
- Avvitare i due cilindri d’acciaio nelle barre. Inserire il sistema di
fissaggio nella ceramica (disegno 2).
2
- Screw on the two steel sleeves. The fix kit in the ceramic.
3
3
- Predisporre la connessione per lo scarico della cassetta e del
vaso sospeso seguendo le indicazioni illustrate nel dettaglio
ingrandito (ATTENZIONE: per facilitare le connessioni si consiglia
di lubrificare entrambe le parti).
3
- Prepare the connection for the cistern flushing according to the
dimension shown in the picture above (ATTENTION: to make the
connection easier, we suggest to lubrificate both sides).
5
- Sistemare il vaso sospeso nei fissaggi.
5
- Place the WC on the brackets.
M12 threaded bars
Raccordo di scarico
Draining connection
5
- Fissare il vaso sospeso mediante i dadi di fissaggio. Si
consiglia di avvitare alternativamente i dadi in modo da ottenere
un fissaggio migliore del vaso alla parete.
5
- Adjust the WC and secure it with the fixing nuts.
It is recommended to tighten the fixing nuts alternately to secure an
equal fit of the WC against the wall.
*
coppia di serraggio 6 Nm Max.
fixing pair Max 6 Nm
325
160
425
360
255
530
180
185
102
425*
260
35
100
165*
25
330*
100
55