


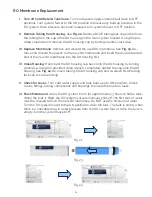


16
Post Filter Replacement
It is recommended to replace the post carbon filter at the same time the RO membrane is
replaced.
I.
Turn off Cold Water & Tank Valve:
Turn cold water supply and tank ball valve to OFF
positions. Turn system faucet to the ON position to release any built up pressure in the
RO system. Once pressure has been released, turn system faucet to OFF position.
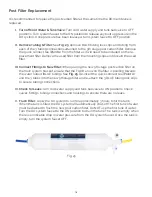
II. Remove Tubing & Filter:
See
Fig. 25
. Remove BLUE tubing lock clips and tubing from
each of the 3 tubing connections attached to the 5th stage post carbon filter. Remove
the quick connect tee (
Point A
) from the filter as it will need to be installed on the re
-
placement filter. Remove the used filter from the mounting clips and discard the used
filter.
III. Connect Fittings to New Filter:
When placing the new 5th stage post carbon filter on
the main system bracket, ensure that the FLOW arrow on the filter is pointing towards
the water output (BLUE tubing).
See
Fig. 25
. Re-insert the quick connect tee (
Point A
)
and the 3 tubes into the new 5th stage filter and re-attach the 3 BLUE tubing lock clips
to secure tubing connections.
IV. Check for Leaks:
Turn cold water supply and tank ball valve to ON positions. Check
valves, fittings, tubing connections and housings to ensure there are no leaks.
V. Flush Filter:
Allow the RO system to run for approximately 3 hours to fill the tank.
When the tank is filled, the RO system will automatically shut-off. The first tank of water
must be drained to flush the new post carbon filter. Do NOT use the first tank of water.
Turn the RO system faucet to the ON position to drain the tank. The tank is empty when
there is a noticable drop in water pressure from the RO system faucet. Once the tank is
empty, turn the system faucet OFF.
Fig. 25
A


