

Page 2 from 6
922504417_09_032
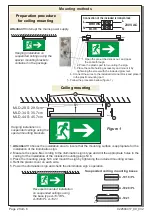
Preparation procedure
for ceiling mounting
Connection of the included terminal block
L
L
N
N
230V AC
BROWN
BLUE
Attention!!!
Interrupt the mains power supply.
Mounting methods
2. Place the plastic part for mounting the sign.
1. Open the pre-etched knock out and pass
the cable through.
3. Place the cable holding accessory and mount it by
tightening the screw with the included grommet.
4. Connect the wires to the included terminal block and place it
in the plastic mounting part
.
5. Follow the procedure bellow (figure 1).
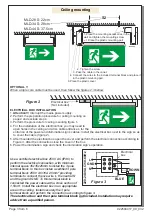
Hanging installation on
suspended ceilings using the
special mounting brackets
contained in the package.
MLD-28 S: 29.5cm
MLD-34 S: 35.7cm
MLD-44 S: 45.7cm
2
S1
4
3
Hanging installation on
suspended ceilings using the
special mounting brackets
Figure 1
1.
Attention!!!
Choose the installation area to insure that the mounting surface is appropriate for the
installation of the illumination sign.
2. Measure the space
S
according to the illumination sign’s type and drill the appropriate holes in the
ceiling for the installation of the included mounting plugs Nr 6.
3. Place the mounting plugs Nr 6 and mount the sign by tightening the included mounting screws.
4. Refit the plastic cover on each side.
5. Power the illumination sign and check the illumination sign’s operation.
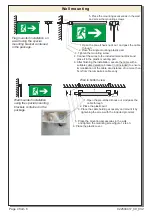
Recessed mounted installation
on suspended ceilings using
the base type Α-1018/PL,
Α-1020/PL, Α-1021.
A-1018/PL
A-1021
440
75
Ø6
Suspended ceiling mounting bases
Ceiling mounting
A-1020/PL


