background image

21 

7.1.4


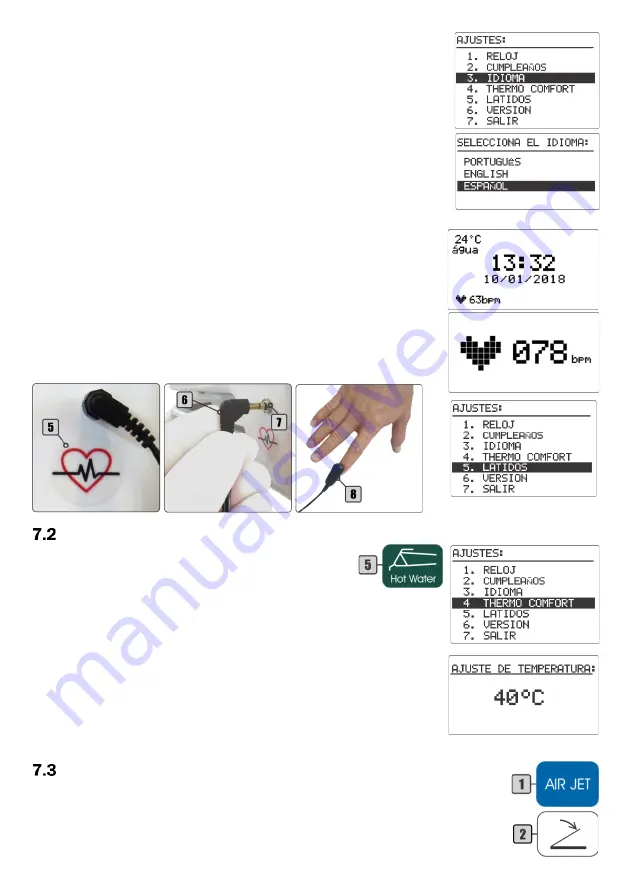
 Idioma 

Para  cambiar  el  idioma:  presione  la  tecla  Ajustar  /  Entrar  (3)  durante  3 

segundos  para  acceder  a  la  pantalla  “CONFIGURACIÓN”.  Utilice  las  teclas  de 

ajuste (1 y 2) para seleccionar la opción 3. IDIOMA. 

Para cambiar el idioma: presione la tecla Ajustar / Entrar (3) para acceder 

la  pantalla  “SELECCIONAR  IDIOMA”.  Utilice  las  teclas  de  ajuste  (

1  y  2)  para 

seleccionar el idioma deseado. 

Para guardar los cambios: presione la tecla Ajustar / Entrar (3) durante 3 

segundos. 

Para cancelar y regresar: presione la tecla Reset / Esc (4). 


7.1.5


Monitor Cardíaco (Opcional) 

Para  activar  el monitor  cardíaco:  identifique  la  conexión  de  entrada (7) 

identificada con el icono (5) y conecte el plug (6). Aplique el sensor (8) en la 
punta de cualquiera de los dedos de la mano del paciente. 

La monitorización cardiaca del paciente aparecerá automáticamente en 

la esquina inferior izquierda de la pantalla después de 8 segundos. 

Para mostrar solamente el monitor cardíaco en la pantalla: toque la tecla 

Adjust

/

Enter

 (3) por 3 segundos para acceder a la pantalla "AJUSTE". Utilice las 

teclas de ajuste (1 y 2

) para seleccionar la opción “4. BATIMENTO”.


Para acceder a la pantalla "BATIMENTO": presione la tecla     

Adjust

/

Enter


(3). 

Para regresar a la pantalla anterior: presione la tecla 

Reset

/

Esc

 (4). 


- Sistema Thermo Comfort 

Para  activar/desactivar  el  sistema  Thermo  Comfort: 

utilice  la  tecla  On/Off  Thermo  Comfort  (5)  en  el  panel  de 
comando (

sección 5.4

 y 

5.7

). 

Para acceder a la función Thermo Confort: presione la tecla 

Adjust

/

Enter

 (3) por 3 

segundos para acceder a la pantalla “AJUSTE”. Utilice las 

teclas de ajuste (1 y 2) para seleccionar la opción                           

3. THERMO 

COMFORT

Para ajustar la temperatura del agua:  presione la tecla 

Adjust

/

Enter

 (3) 

para acceder a la pantall

a “AJUSTE TEMPERATURA”. Utilice las teclas de ajuste 

(1 y 2) para cambiar la temperatura. 

Para guardar la temperatura del agua: presione la tecla        

Adjust

/

Enter


(3). 

Para cancelar y regresar a la pantalla anterior: presione la tecla 

Reset

/

Esc


(4). 

Cuando se inicie el dispositivo, espere aproximadamente 10 minutos para que el agua se caliente. 


- Air Jet


(Opcional) 

Para  activar/desactivar  el  sistema  Air  Jet:  utilice  la  tecla  On/Off  (1)  en  el  panel  de 

comando (

sección 5.4

 y 

5.7

). Cuando el sistema Air Jet es activado y el chorro continuo de 

aire empieza tan solo la pieza de mano sea removida de su soporte. 

Al presionar el pedal progresivo/activación (2), el chorro de aire se interrumpe y la pieza 

de mano opera normalmente. Al liberar el pedal, se activa otra vez el sistema Air Jet hasta 

Summary of Contents for Infinity

Page 1: ...1...

Page 2: ...2...

Page 3: ...7 Before Turning On the Equipment 7 Turning On the Equipment 7 5 2 1 Delivery System 7 5 2 2 Electric Panel 7 5 2 3 Emergency Stop Switch Optional 8 5 2 4 Digital Voltmeter 8 Remote Foot Pedal Command...

Page 4: ...va Ejector 18 High Power V rtice Saliva Ejector 18 Vacuum Pump Adaptor Optional 18 Way Syringe 18 Curing Light Optional 19 Prophylaxis System 19 6 10 1 Bicarbonate Jet 19 6 10 2 Prophy Jet Optional 19...

Page 5: ...tems 1 Dental Chair Infinity 1 Accessories Box Delivery Unit Box Standard Items 1 Delivery Unit Infinity 1 Operation Light 1 Packing Support 1 Dental Stool 1 Infinity Quick Operation Guide Note items...

Page 6: ...isplay Cardiac Monitor Monitor Holder Handpiece Coupling on Assistant Module Vacuum Pump Adaptor Set High Power V rtice Saliva Ejector Quick Coupler for Saliva Ejectors and or Vacuum Pump Prophy Jet S...

Page 7: ...y fill it with drinkable water up to the limit indicated in each tank and reattach them again If you wish to place prophylactic products low concentration 6 Open the pressure valve 1 and check if the...

Page 8: ...ition 2 3 Seat Down Position 3 4 Backrest Down Spit Position 5 Work Position 6 Zero Position 7 Propulsion Pedal 8 Cup Filler 9 On Off V rtice Saliva Ejector 10 On Off Operating Light 11 Spittoon Bowl...

Page 9: ...stem System 1 Electrical Micromotor Speed Control 2 Electrical Micromotor Direction Control 3 Scaler Power Control and General Function Selector Perio Endo 4 Scaler Water Control 5 Brushless Micromoto...

Page 10: ...to the equipment configuration Top Panel Cross Flex 1 Models Command Panel 2 X Ray Viewer 1 X Ray Viewer 2 On Off X Ray Viewer 1 Adjustments 2 Adjust Enter 3 Reset Esc 4 Multifunctional Display Chron...

Page 11: ...ht without disabling the pneumatic brake This may damage the flex arm locking system 1 Speed Adjustment for Electrical Micromotor 2 Electrical Micromotor s Rotation Direction Control 3 Scaler Intensit...

Page 12: ...tion 5 4 and 5 7 or remote foot pedal section 5 3 to enable sensor 3 and control knob 2 To turn On Off the operating light pass the hand in front of the sensor 3 approximately 5 cm away or press the c...

Page 13: ...ve the working position 3 To perform a working position 1 Press the Work Position key The equipment will emit a short beep 2 Press the command for the desired saved working position 1 to 3 The equipme...

Page 14: ...andpiece to the coupling by attaching it to the coupling ring 1 ensuring that it is properly connected and there is no leakage of air or water To activate the rotation press the propulsion activation...

Page 15: ...g the scaler from the holder or extending the rod Cross Flex the multifunctional display 9 screen will identify the scaler the number of its position on the working table 1 to 5 the selected function...

Page 16: ...micromotor the number of its position on the working table 1 to 5 the direction of rotation and will show the speed bar To adjust speed use keys to increase 7 or decrease 6 speed To change the direct...

Page 17: ...r P2 then select the desired gear ration and adjust the speed Press and hold the Program key 8 until the system save your settings To adjust speed use the adjustment keys 13 to increase or decrease sp...

Page 18: ...3 is removable for cleaning Vacuum Pump Adaptor Optional Before starting the operation fit the cannula to the 6 3 9 5 or 11 mm adapter 5 To activate suction remove the vacuum pump suction 2 from its h...

Page 19: ...re in the filter 8 and connect the bicarbonate jet handpiece 3 to its coupling 2 To fill the bicarbonate reservoir open the reservoir 4 by turning the cover 6 anticlockwise and deposit the bicarbonate...

Page 20: ...econds to access the AJUSTE screen Use the adjustment keys 1 and 2 to select the 1 REL GIO option To adjust the clock press the Adjust Enter key 3 to access the AJUSTAR REL GIO screen Use the adjustme...

Page 21: ...tion 4 BATIMENTO To access the BEAT screen press the Adjust Enter key 3 To return to the previous screen press the Reset Esc key 4 Thermo Comfort Optional To activate deactivate the Thermo Comfort sys...

Page 22: ...use the PONTO key 4 to define which massagers should work during the massage Use the AJUSTES key 8 just after the PONTO key 4 to customize the running massages The LED s 2 indicated the motor that wi...

Page 23: ...23 8 Symbology The symbology complies with IEC 60601 1 IEC 60878 ISO 15223 1 ISO 7010...

Page 24: ...en odo br or by phone 55 48 2106 6000 The installation and maintenance of the equipment and its accessories must only be carried out by Olsen Technicians Use Olsen genuine parts only The use of non ge...

Page 25: ...ts f Connection with a wrong voltage power supply 5 This warranty will cease when a The warranty period expires b The user makes any changes to the product or uses inappropriate accessories c The warr...

Page 26: ...and of low maintenance cost These characteristics have been achieved thanks to our competent and dedicated team which make me very proud for many reasons as they are always giving the best of their cr...

Page 27: ...27...

Page 28: ...28 55 48 2106 6000 export3 olsen odo br Registration at Ministry of Health 1028130009 Technician in Charge Eng Cleber da Costa CREA SC S1 116283 5 Cod 5409176 Rev 04 06 04 2021...

Page 29: ...1...

Page 30: ...2...

Page 31: ...del Equipo 7 Antes de Encender el Equipo 7 Encendiendo el Equipo 7 5 2 1 M dulo Odontol gico 7 5 2 2 Panel El ctrico 7 5 2 3 Llave Stop de Emergencia Opcional 8 5 2 4 Volt metro 8 Pedal 8 Mesa Odontol...

Page 32: ...Potencia V rtice 18 Eyector de Bomba de Vac o Opcional 18 Jeringa Triple 18 Fotocurado Opcional 19 Sistema de Profilaxis 19 6 10 1 Chorro de Bicarbonato Opcional 19 6 10 2 Sistema Prophy Jet Opcional...

Page 33: ...aja de Accesorios Opcionales Caja de Conexiones Caja del Equipo Art culos Standard 1 M dulo Infinity 1 L mpara Odontol gica 1 Soporte de Empaque 1 Taburete 1 Gu a R pida de Operaci n Infinity Opcional...

Page 34: ...a Multifunci n Monitor de Ritmo Card aco Soporte de Pantalla Acople Neum tico en el M dulo para Asistente Kit para Bomba de Vac o Eyector de Alta Capacidad V rtice Acoplador R pido para Eyector y o Bo...

Page 35: ...os con agua Si es necesario llenarlos con agua potable filtrada hasta el l mite indicado en cada tanque y ac plelos nuevamente Si desea colocar productos profil cticos baja concentraci n 6 Abra la v l...

Page 36: ...aldo Posici n de Enjuague 5 Posici n de Trabajo 6 Posici n Cero 7 Pedal de Propulsi n Activaci n 8 Comando de Agua del Llena Vasos 9 On Off Eyector V rtice 10 Comando de L mpara On Off 11 Comando de A...

Page 37: ...ema Air Jet 4 Reverse 5 Pantalla Micromotor El ctrico Brushless Opcional 6 Indicadores de Transmisi n 7 Teclas de Ajuste 8 Select 9 Memory 1 Teclas de Ajuste 2 Adjust Enter 3 Reset Esc 4 Pantalla Mult...

Page 38: ...1 Negatoscopio 1 Teclas de Ajuste 2 Adjust Enter 3 Reset Esc 4 Pantalla Multifuncional Sistema ChronoLub y Pantalla Multifunci n 1 Negatoscopio 2 Comando del Negatoscopio On Off 1 Sube Asiento Posici...

Page 39: ...ar el sistema de freno del Brazo Flex 1 Control de Velocidad del Micromotor El ctrico 2 Inversor de Rotaci n del Micromotor El ctrico 3 Control de Potencia del Ultrasonido y Selector de Funciones Gen...

Page 40: ...n el pedal para activar el sensor 3 y el bot n de control 2 Para encender o apagar la l mpara pase la mano delante del sensor 3 a aproximadamente 5 cent metros de distancia o presione el bot n de cont...

Page 41: ...bar la posici n de trabajo 3 Para ejecutar una posici n de trabajo 1 Presione el comando Posici n de Trabajo El equipo emitir 1 beep corto 2 Presione el comando para la posici n de trabajo deseada 1 a...

Page 42: ...re el pedal m s velocidad en la pieza de mano hasta llegar a los l mites de presi n del equipo Para activar desactivar la luz del acople utilice la tecla On Off luz de la fibra ptica 3 en el panel de...

Page 43: ...a por las barras de potencia de vibraci n Para alternar funciones utilice la tecla 12 para alternar entre las funciones PG Perio General y E Endo indicadas en el centro de la pantalla multifunci n 5 N...

Page 44: ...ar la transmisi n utilice la tecla de Select 5 La selecci n es indicada por los LED s 3 20 1 1 1 y 1 5 Para invertir la rotaci n utilice la tecla Reverse 1 Para ajustar la velocidad utilice las teclas...

Page 45: ...ransmisi n seleccionada se presenta en el display 4 Para cambiar la direcci n de rotaci n use la tecla Direction 9 La direcci n selecciona se presenta en el display 3 Para ajuste de agua use el bot n...

Page 46: ...de 6 3 9 5 o 11 mm 5 Para activar la succi n remueva el eyector de bomba de vac o 2 de su soporte 1 La bomba de vac o funcionar autom ticamente Para ajustar el flujo de succi n para disminuir el flujo...

Page 47: ...rbonato en el reservatorio 4 verifique si hay humedad en el filtro 8 y conecte la pieza de mano de chorro de bicarbonato 3 a su acople 2 Para llenar el reservatorio de bicarbonato abra el reservatorio...

Page 48: ...empo Este procedimiento se puede realizar en cualquier momento 7 1 2 Reloj Fecha y Hora Opcional Para acceder a la funci n de reloj presione la tecla Adjust Enter 3 por 3 segundos para acceder a la pa...

Page 49: ...TIMENTO presione la tecla Adjust Enter 3 Para regresar a la pantalla anterior presione la tecla Reset Esc 4 Sistema Thermo Comfort Para activar desactivar el sistema Thermo Comfort utilice la tecla On...

Page 50: ...var los motores de masaje utilice la tecla PONTO 4 para definir cuales motores deben de operar durante el masaje Utilice las teclas AJUSTES 8 y entonces la tecla PONTO 4 para personalizar los masajes...

Page 51: ...23 8 Simbolog a S mbolos en conformidad con las normas IEC 60601 1 IEC 60878 ISO 15223 1 ISO 7010...

Page 52: ...br o por el tel fono 55 48 2106 6000 La instalaci n y mantenimiento del equipo y sus accesorios se deben realizar solamente por t cnicos Olsen Utilice solamente piezas originales Olsen El uso de pieza...

Page 53: ...n a la red el ctrica de energ a con tensi n incorrecta 5 Esta garant a cesar a Por el decurso normal de su plazo de validez b Por alteraciones no autorizadas por Olsen en el producto c Por adulteraci...

Page 54: ...de mantenimiento muy bajo Estas cualidades se alcanzar n a trav s de un equipo competente y dedicado del cual me enorgullezco sobre todos los aspectos dispuesto a llevar a nuestros clientes lo mejor...

Page 55: ...27...

Page 56: ...28 55 48 2106 6000 export3 olsen odo br Registro en el Ministerio de Salud de Brasil 1028130009 Responsable T cnico Ing Cleber da Costa CREA SC S1 116283 5 Cod 5409176 Rev 04 06 04 2021...

Reviews: