background image

11

The combustion air supply fittings must never be 
altered. In particular, it must be ensured that any 
necessary combustion air pies are open while the 
fireplace is being used.

Do not make any changes or modifications to the 
stove

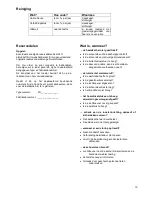
Cleaning

What?

How often?

Using what?

Inside of stove

at least 1x per year

hand brush, 

vacuum cleaner

Connection piece

at least 1x per year

hand brush, 

vacuum cleaner

Glass panel

as required

when cold, 

using glass cleaner for stoves and 

over glass

Replacement parts

Attention:

Please ask your specialist trader for any replacement 
parts required. Always use original spare parts only.

In order to process your order as quickly as possible, 
it is imperative that you send us the type and fabrica-
tion number given on the stove’s rating plate.

The stove identification plate is situated on the left 
hand side in the wood storing compartment.

We recommend the relevant numbers here before 
installing the stove to ensure that you always have 
them to hand:

Type number: 

23/________________

Fabrication number:

__________________

What to do if?

... the stove doesn’t draw properly?

Is the chimney or the stovepipe not tight?

Has the chimney been incorrectly designed?

Is the external temperature too high?

Are the doors of other fireplaces connected to the 

chimney open?

... the room doesn’t get hot?

Is the heating requirement too high?

Is the waste gas pipe blocked?

Is the combustion air supply been closed?

Is the chimney draught too low?

Is the wood used as fuel not dry?

... the stove gives off too much heat?

Is the combustion air supply open too wide?

Is the delivery pressure too high?

... the grate becomes damaged or slags are 
formed?

The stove was overloaded.

The ash pan was not emptied in good time.

... a fault occurs?

Do not add any more fuel.

Do not open the combustion chamber door.

Allow the fire in the chimney to burn itself out in a 

controlled fashion.

... the chimney catches fire?

Minimize the air supply to the stove and call the 

fire department.

Inform the chimney sweep.

Have a professional determine the cause?

Summary of Contents for 23/526

Page 1: ... 526 Anleitung Seite 2 7 Instruction Page 8 11 Instructions Page 12 15 Aanwijzing Pagina 16 19 Manual de instrucciones Página 22 24 DIN EN 13240 DIN EN 18897 raumluftunabhängig DIBT Bauaufsichtliche Zulassung 15a BV G D GB F NL E ...

Page 2: ...gsluft mm 125 Betriebsart Zeitbrand Zu beachtende Vorschriften Örtliche und baurechtliche Vorschriften Der Kaminofen ist von einem Fachmann aufzu stellen und an den Schornstein anzuschließen Die DIN und EN Normen und länderspezifischen Vorschriften sind zur sicheren Installation des Verbindungsstückes zu beachten Der Kaminofen entspricht der DIN EN 13240 und hat die bauaufsichtliche Zulassung für ...

Page 3: ...Seitlich und hinten 10 cm Rohrfutter bauseitig in Schornstein einbauen Die Anschlußhöhe kann bei Ofenrohranschluß oben individuell festgelegt werden sollte aber 1 5m ab Anschlußstutzen nicht übersteigen An schlußhöhe bei Ofenrohranschluß hinten siehe Tabelle Technische Daten Im Umkreis von 20cm um das Ofenrohr darf sich kein brennbares Material befinden Ofenrohr bauseitig auf Anschlußstuzen Ø150mm...

Page 4: ...ler Ihren ei genen Erfahrungen entsprechend verstellt werden Achten Sie darauf daß Sie Ihren Kaminofen nicht mit Luftmangel Schieberstellung zu klein betreiben da so die Emmisionen ansteigen Heizen Nur die Menge Brennstoff auflegen die entspre chend dem Wärmebedarf benötigt wird Für Nennheizleistung 6 kW max ௗ ௗNJ RO VFKHLWH UHQQGDXHU PLQ max ௗ 8ௗNJ RO EULNHWW UHQQGDXHU PLQ Die Feuerraumtür beim N...

Page 5: ...n zur Hand haben wird empfohlen sie vor der Installation hier einzutragen Typnummer 23 ________________ Fabrikationsnummer __________________ Was ist wenn der Kaminofen nicht richtig zieht Ist der Schornstein oder das Ofenrohr undicht Ist der Schornstein nicht richtig bemessen Ist die Außentemperatur zu hoch Ist die Tür anderer an den Schornstein ange schlossener Feuerstätten offen der Raum nicht ...

Page 6: ...berührt Für die Rechte aus dieser Garantie gilt das Recht der Bundesrepublik Deutschland 3 Garantie Vorbehaltlich nachfolgender Einschränkungen über nehmen wir 3 Jahre Garantie für Kaminöfen der Marke Olsberg auf a einwandfreie dem Zweck entsprechende Werkstoffbeschaffenheit und verarbeitung b einwandfreie Funktion des Produktes Dies gilt jedoch nur bei Einhaltung der auf dem Geräteschild angegebe...

Page 7: ...ür absolute Gleichheit der Verkleidungen ste hen nur künstliche Produkte zur Verfügung d h Ke ramik oder Blech Die vorgenannten Abweichungen bei Keramik und Natursteinverkleidungen führen nicht zu Garantieleis tungen 7 Rechte aus der Garantie Innerhalb der Garantiezeit beseitigen wir alle Sachmän gel die nachweislich auf Produktions und oder Materi alfehler zurückzuführen sind Die Mangelbeseitigun...

Page 8: ...ht to middle of the connector pipe with the connection is at the back mm 1175 Height to top edge of connector pipe with the connection at the top mm 1304 Connection pipe mm 150 max Weight kg 240 Heigt to middle of combustion air connection mm 235 Connection combustion air mm 125 Operating Mode Intermitting burning Regulations to be observed Local and building law regulations The stove must be inst...

Page 9: ...se off the hole in the top cover with the enclosed insertable cap Decide where the stove is to be installed There must be no objects made of combustible materi als within a distance of 80 cm of the stove s ra diation area measured from the combustion chamber s inspection glass nor may any be placed within this area subsequently Minimum distance from combustible or load bearing walls Lateral and re...

Page 10: ...d according to your own ex perience Please note that you should not use your stove if there is not an adequate air supply slide valve setting too low as this causes the emissions to increase Heating Only place the quantity of fuel required to achieve the heating requirement For a nominal heating output 6 kW max 1 5ௗNJ ELOOHW ZRRG EXUQLQJ WLPH PLQ max 1 8ௗNJ ZRRG EULTXHWWHV burning time 45 min Open...

Page 11: ...efore installing the stove to ensure that you always have them to hand Type number 23 ________________ Fabrication number __________________ What to do if the stove doesn t draw properly Is the chimney or the stovepipe not tight Has the chimney been incorrectly designed Is the external temperature too high Are the doors of other fireplaces connected to the chimney open the room doesn t get hot Is ...

Page 12: ...ue nominal kW 6 0 Puissance nominal à l air kW 6 0 Hauteur jusqu au milieu du manchon de raccord pour raccord arrière mm 1175 Hauteur jusqu au bord supérieur du manchon de raccord pour raccord en haut mm 1304 Manchons de raccord mm 150 max Poids kg 240 Hauteur jusqu au milieu du manchon de raccord mm 235 Manchon de Raccord air de combustion mm 125 Type de service Combustion temporisée Directives à...

Page 13: ... ne se dé vissent pas en même temps Dévisser le manchon de raccord au travers du trou arrière Après avoir remplacé le couvercle de ferme ture raccord de manchon par le couvercle d insertion refermer le trou dans le capot Déterminer l emplacement aucun objet confec tionné à partir de matériaux combustibles ne doit se trouver ou être installé dans la zone de rayon nement du poêle donc à une distance...

Page 14: ...ndement calorifique nominal avec des bûches ouvert Rendement calorifique nominal avec des briquettes de bois fermé Maintien de la braise Puisque l air secondaire contribue également à pré server les vitres propres il faut toujours placer le vérin à air secondaire dans le sens d ouverture du rant la combustion Puisque le rendement de votre poêle dépend forte ment du tirage de votre cheminée vous de...

Page 15: ... dement possible nous avons impérativement besoin des numéros de série et de fabrication indiqués sur la plaque signalétique La plaque signalétique se trouve sur le côté gauche dans le compartiment de stockage du bois Afin que vous ayez les numéros qui se trouvent sur la plaque signalétique à disposition nous vous conseil lons de les inscrire ici avant l installation Numéro de série 23 ___________...

Page 16: ...ansluitstomp verbrandingslucht mm 235 Aansluitstomp verbrandingslucht mm Ø 125 Model haard met korte stooktijd Voorschriften in acht te nemen Plaatselijke en bouwgerechtelijke voorschriften De haard moet door een vakman gemonteerd en aan de schoorsteen aangesloten worden De specifieke voorschriften van het land moeten voor een veilige installatie van het verbindingsstuk in acht genomen worden De h...

Page 17: ...nde muren Zijdelings en achteraan 10 cm Pijpvoering bouwzijdig in de schoorsteen inbouwen De aansluithoogte kan bij de kachelpijpaansluiting boven individueel worden vastgelegd mag echter niet meer dan 1 5 m vanaf de aanluitstomp bedragen Aansluithoogte bij kachelpijpaansluiting zie tabel Technische gegevens Er mag zich binnen een radius van 20cm rond de kachelpijp geen brandbaar materiaal bevinde...

Page 18: ...oor nominaal verwarmingsvermogen 6 kW max 1 5ௗNJ NORRIKRXW EUDQGGXXU PLQ max 1 8ௗNJ KRXWEULNHWWHQ brandduur 45 min De verbrandingsruimtedeur bij het toevoegen langzaam openen omdat anders kookgas kan uitstromen Aslade of verbrandingsruimte tijdig ledigen Anders belemmering van de verbranding sluchttoevoer of beschadiging van de roosterinrichting mogelijk Aslade slechts voor het ledigen eruitnemen ...

Page 19: ...___________ Wat is wanneer de haardkachel niet goed trekt Is de schoorsteen of de kachelpijp ondicht Is de schoorsteen niet juist gedimensioneerd Is de buitentemperatuur te hoog Is de deur van andere aan de schoorsteen aangesloten vuurhaarden open de ruimte niet warm wordt Is de warmtebehoefte te groot Is de gasafvoerbuis verstopt Is de luchttoevoer afgesloten Is de schoorsteentrek te laag Is het ...

Page 20: ...kW 6 0 Altura hasta el centro de la tubuladura de empalme con empalme detrás mm 1175 Altura hasta el borde superior de la tubula dura de empalme con empalme arriba mm 1304 Tubuladura de empalme mm Ø 150 max Peso kg 240 Altura hasta el centro de la tubuladurea de empalme aire de combustión mm 235 tubuladura de empalme aire de combustión mm Ø 125 Clase de funcionamiento Combustión temporal Prescripc...

Page 21: ...palme de forma que no giren al mismo tiem po Desenroscar la tubuladura de empalme por el agujero trasero Realizado el cambio tapa de cierre tubuladura de empalme cerrar el agujero en la cubierta con la tapa de inserción que se adjunta Hay que determinar el lugar para instalar la estu fa En el área de irradiación de la estufa de chi menea no deben existir ni ponerse objetos algu nos hechos de mater...

Page 22: ...carga Registro hacia fuera Abierto Registro hacia dentro Cerrado Cómo ajustar el aire de combustión Regulador del aire primario ABIERTO Posición de encendido Potencia de caldeo máxima ABIERTO Potencia de caldeo nominal con leña ABIERTO Potencia de caldeo nominal con briquetas de madera CERRADO Mantener las brasas Debido a que el aire secundario contribuye también a la limpieza del cristal al produ...

Page 23: ...garantía del fabricante La estufa de chimenea debe usarse sólo estando cerradas las puertas del hogar No saque ceniza caliente Guarde la ceniza sólo en recipientes a prueba de fuego incombusti bles Atención Se calientan las superficies Para el manejo hay que ponerse siempre el guante que se adjunta Para encender no debe usarse jamás alcohol de quemar gasolina ni otras sustancias inflamables No deb...

Page 24: ...Está abierta la puerta de otros hogares unidos a la chimenea no se calienta el recinto Se necesita demasiado calor Está obstruido el tubo de escape del gas Está cerrada la entrada de aire de combustión Es insuficiente el tiro de la chimenea No está seca la maderas a quemar ofrece demasiada potencia calorífica la chimenea Está demasiado abierta la entrada de aire de combustión Es demasiado alta la ...

Reviews: