


9
ENGLISH
V
V
V
V
Voiding Err
oiding Err
oiding Err
oiding Err
oiding Error
or
or
or
orsssss
Once an entry is printed, the [Clear] key cannot be used to clear an
error. Press the [Void] key to correct an error already registered.
V
V
V
V
Voiding the Entr
oiding the Entr
oiding the Entr
oiding the Entr
oiding the Entry Just Completed
y Just Completed
y Just Completed
y Just Completed
y Just Completed
Simply press the [Void] key. The entry is reprinted with a "-" symbol
followed by the amount and erased from the transaction.
V
V
V
V
Voiding an Ear
oiding an Ear
oiding an Ear
oiding an Ear
oiding an Earlier Entr
lier Entr
lier Entr
lier Entr
lier Entry
y
y
y
y
To void an earlier entry, register it again and then cancel it using the
[Void] key. When a transaction including the error is completed,
proceed with the following steps to void the error.
1. Retype the incorrect information, exactly as originally entered, and
press the [Void] key.
2. Enter the correct amount.
3. Total the transaction by pressing the [Amt Tend/TOTAL] key.
Bac
Bac
Bac
Bac
Back-up Ba
k-up Ba
k-up Ba
k-up Ba
k-up Batter
tter
tter
tter
ttery System
y System
y System
y System
y System
During cash register operations, all transaction data for the manage-
ment report is stored in the register's memory. This memory also holds
all optional programming information. The memory back-up system
keeps this information stored in memory when the cash register is
turned off.
The memory is protected by four "AA" batteries that come with your
cash register. In order to guarantee continuous back-up protection,
insert the batteries before beginning to program the cash register.
Inser
Inser
Inser
Inser
Inserting/Replacing Ba
ting/Replacing Ba
ting/Replacing Ba
ting/Replacing Ba
ting/Replacing Batter
tter
tter
tter
tteries
ies
ies
ies
ies
NOTE: Before inserting the batteries, make sure that the cash register
is plugged into the power socket and that the control key is
switched to the OFF position.
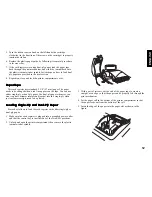
Proceed as follows to insert or replace the batteries:
1. Unlock the printer compartment cover, grip the left side of the
compartment cover, gently pull it back and then lift it off the cash
register.
2. Lift the paper journal winder spindle out of the printer compart-
ment.


