background image

Printer Driver Settings 

1-15

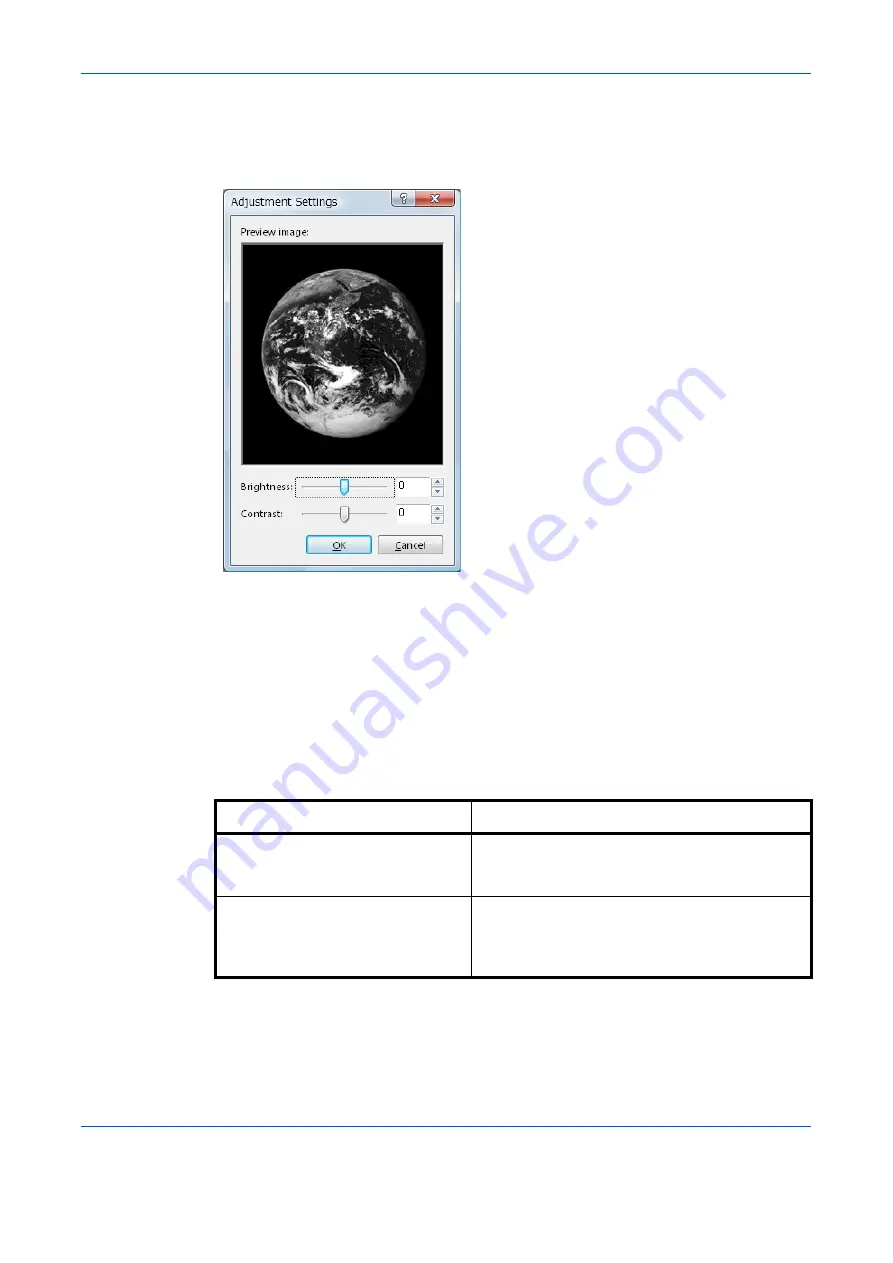
Grayscale Adjustment

The Grayscale Adjustment setting is used for adjusting the brightness and contrast of 
graphics produced by monochrome printers. Text remains unchanged.

1

From the application’s 

Print

 dialog box, access the 

Properties

 dialog box. (Select 

Print


from the 

File

 menu and select 

Properties

.)

2

Click the 

Imaging

 tab.

3

Select 

Custom

 from the 

Select watermark

 drop-down list. The 

Adjustment Settings


dialog box is displayed.

4

Use the mouse to drag the slider horizontally toward Right (+) or Left (-) for 

Brightness

 and 

Contrast

. Alternatively, click the arrows at the right to increase or decrease the values in 

the spin boxes.

Grayscale Adjustment Options

Descriptions

Brightness

Adjusts the brightness of graphics. The darkest 
setting is -100 and the brightest is +100. Choose 
0 (zero) for a regular level of brightness.

Contrast

Adjusts the contrast (the proportion of light to 
dark) of graphics. The faintest contrast setting is -
100 and the strongest is +100. Choose 0 (zero) 
for a regular level of contrast.

Summary of Contents for d-Copia 1800

Page 1: ...OPERATION GUIDE 551706en GB PRINTING SYSTEM Z d Copia 1800 d Copia 2200...

Page 2: ...which could compromise the conformity attested to above as well as the characteristics of the product incorrect electrical power supply incorrect installation incorrect or improper use or use not in...

Page 3: ...rinting on Both Sides 1 10 Printing Watermarks 1 11 Print Quality 1 14 Grayscale Adjustment 1 15 Advanced Graphics Settings 1 16 Detailed Graphics Settings 1 17 Useful Functions 1 18 Cover Mode Page I...

Page 4: ...ii...

Page 5: ...ntained in this Operation Guide are trademarks or registered trademarks of their respective companies The designations and will not be used in this Operation Guide All rights reserved No part of this...

Page 6: ...face Used for references to additional information and other publications For details refer to Custom Installation on page 2 5 Courier Typeface Used to denote messages or names displayed on the operat...

Page 7: ...ut menu is displayed 3 Click Properties in the shortcut menu The Properties dialog box is displayed Installing Optional Devices If you use optional devices such as a paper feeder or duplex unit specif...

Page 8: ...earest dealer 1 On the Device Settings tab click Compatibility The Compatibility Settings dialog box is displayed 2 From the list in the Media source enumeration group box select the paper supply meth...

Page 9: ...zes dialog box is displayed 3 Select the original paper size Click OK to return to the Properties dialog box 4 Click the Print Size drop down list and select the preferred output paper size 5 Confirm...

Page 10: ...2 Select the Multiple pages per sheet to enable the feature 3 Specify the number of pages in the Pages per sheet drop down list You can select the horizontal direction for the page layout using Layou...

Page 11: ...margins in a range from 0 20 to 1 00in 5 0 to 25 4mm For outside margins to the left of the page enter a number into the Left Long edge combo box For outside margins to the top of the page enter a num...

Page 12: ...log box and click the Basic tab 3 Click Page Sizes 4 Select the original paper size Click OK to return the Properties dialog box 5 From the Source menu select the paper source 6 From the Media type me...

Page 13: ...r to match the specified page size paper source and media type NOTE If the paper loaded does not match the size type or both a message displays requesting you to load paper into the MP tray If you wis...

Page 14: ...r into the printer 2 Click the Start button on the taskbar and then click Control Panel Click to open Printers in that order from the successive menus to access the Printers dialog box 3 Right click t...

Page 15: ...ange of sizes for custom paper 9 Click OK to save the page size and return to the Page Sizes dialog box Confirm the name of page size you just added 10 Click OK Repeat the steps above if you want to a...

Page 16: ...on explains how to enable the duplex printing option In order to activate this printing option the Duplex unit must be configured on the Device Settings tab In the table below the paper sizes and medi...

Page 17: ...o Adding Watermarks on page 1 11 5 Click OK Adding Watermarks You can enter the text for a new watermark The text font color size and style can be adjusted 1 From the application s Print dialog box ac...

Page 18: ...laces the watermark text in the center of the page NOTE Manual Adjustment Hold the left mouse button while dragging the watermark image to the desired position 12 Specify the text angle Select Diagona...

Page 19: ...ings as desired For further details refer to Adding Watermarks on page 1 11 Watermark Page Settings 1 In the Page selection group box of the Watermark dialog box choose from All pages First page only...

Page 20: ...increase print speed 1 From the application s Print dialog box access the Properties dialog box Select Print from the File menu and select Properties 2 Click the Imaging tab 3 Click to select the prin...

Page 21: ...he Adjustment Settings dialog box is displayed 4 Use the mouse to drag the slider horizontally toward Right or Left for Brightness and Contrast Alternatively click the arrows at the right to increase...

Page 22: ...OK to save the settings Options Descriptions Print text as black Prints color and gray characters in black There is no effect on white text color images or graphics Print graphics as black Prints colo...

Page 23: ...nted patterns and files do not match the on screen appearance use this feature to select a different print density Auto default setting In most cases this option prints patterns and files to match the...

Page 24: ...nt color than the paper for the body of the document You can also specify cover printing when completing booklet printing settings The paper used for printing the document body is specified in the Med...

Page 25: ...de surface of the front cover Front Front inside Duplex Printing page 1 10 Prints on the inside surface of the front cover Front Print onto Front outside Print onto Front inside Duplex Printing page 1...

Page 26: ...of the front cover and inserts a blank back cover Front and back Print onto Front outside Print onto Front inside Duplex Printing page 1 10 Prints on both sides of the front cover and inserts a blank...

Page 27: ...lick OK to start printing Front and Back Print onto Back outside Duplex Printing page 1 10 Insert a blank front cover and prints on the outside of the back cover Front and back Print onto Back inside...

Page 28: ...ies dialog box Select Print from the File menu and select Properties 2 Click the Publishing tab 3 Select the Page insert check box Select the check box corresponding to your desired page arrangement a...

Page 29: ...tray 6 Click OK to return to the Print dialog box 7 Load the paper for insertion in the paper cassette 8 Click OK and begin printing Transparency Interleaving By inserting a page between each sheet o...

Page 30: ...t Printing Using the Booklet option you can print a two page layout on both sides of a single sheet of paper then bind it in the center Booklet printing is available with printers equipped with a Dupl...

Page 31: ...4 Select the number of complete sets in the Number of copies combo box When printing using the Collate option specify the number of copies The document page length must not exceed the tray capacity f...

Page 32: ...box is displayed 4 Click Save to access the Save Profile dialog box 5 Enter a name into the Name field and select the Icon The name can be up to 31 characters 6 Enter comments about the settings into...

Page 33: ...deleted from the Select profile and click Delete 3 Click OK Importing and Exporting Profiles You can save a profile on your personal computer and have it read by other printers The profiles on severa...

Page 34: ...ing Some profile settings are not applicable to this model Do you want to continue there are unusable functions in this profile Click OK to return to the Profile dialog box The profile read by the pri...

Page 35: ...point to Show the status monitor The Preferences window is displayed 3 Click any tabs described below as required NOTE If you do not wish to display the Status Monitor select Hide the status monitor...

Page 36: ...ring the events in Available events Text to Speech A sound file can be selected if you require an audible notification Click Browse to search for the sound file Use Text to speech Select this check bo...

Page 37: ...configured with the following items Enlarge window Displays a larger sized window for the Status Monitor Always on top Enables the Status Monitor to display in front of other active windows Transparen...

Page 38: ...Status Monitor 2 4...

Page 39: ...ssing the Configuration Tool Follow these steps to display the Configuration Tool on the desktop 1 Right click on the Configuration Tool icon in the Windows task bar 2 Select the machine model and poi...

Page 40: ...Configuration Tool 3 2 Status Tab The Status tab displays current information about this machine such as the driver name the model name system firmware engine firmware serial number and printed pages...

Page 41: ...lays information about the paper feeder attached to the machine such as the media size the paper capacity and the maximum paper capacity Depending on the optional devices installed the detailed settin...

Page 42: ...Configuration Tool 3 4 Media Tab The Media tab displays the weight for each media type It also displays whether each media type is available for duplex printing...

Page 43: ...he Printer tab allows you to adjusts the form feed timeout time If the printer receives no data for a certain period it will time out and release the current interface It prints whatever data it has i...

Page 44: ...Configuration Tool 3 6...

Page 45: ......

Page 46: ...you need and the instructions for handling the waste correctly for example location and times of the waste collection centres etc b When you purchase a new device of ours give a used device similar t...

Reviews: