background image

Troubleshooting 

OPERATION GUIDE

10-7

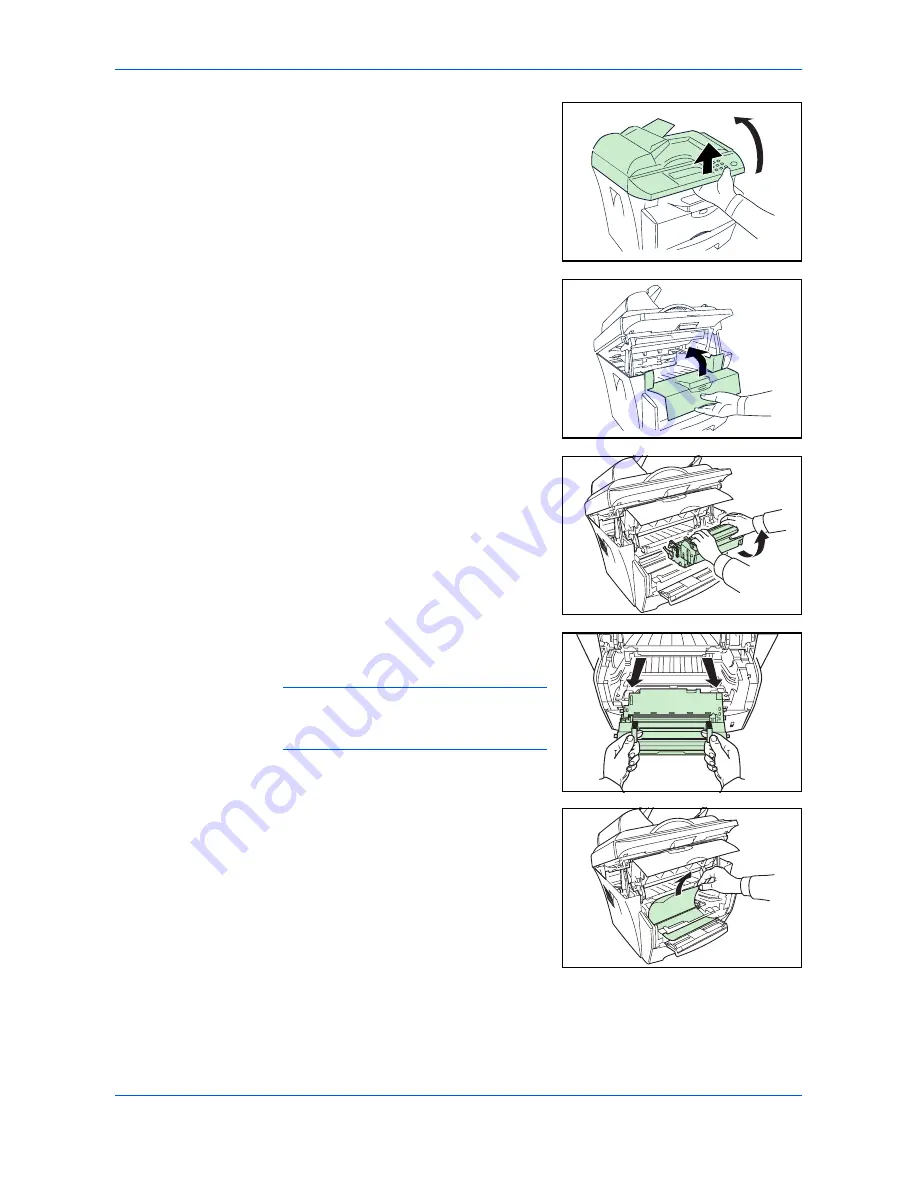
2

Open the 

Scan Unit

.

3

Open the 

Front Cover.

4

Lift the 

Developer Unit 

together with the 

Toner Container

 out of the printer.

5

Using the green handles lift the 

Drum Unit


out of the machine.

NOTE: 

The 

Drum Unit

 is sensitive to light. 

Never expose the 

Drum Unit

 to light for 

more than five minutes.

6

If the jammed paper appears to be pinched 
by rollers, pull it along the normal running 
direction of the paper.

Summary of Contents for d-Copia 164MF

Page 1: ...G RSLD 0 G RSLD 0 EN Operation Guide...

Page 2: ...velopment and utilization of more energy efficient office equipment ENERGY STAR is a U S registered mark The mark affixed to the product certifies that the product satisfies the basic quality requirem...

Page 3: ...Machine On 3 2 Loading Software 3 2 4 Copy Functions Basic Copying Procedure 4 1 Placing Originals in the Document Processor 4 2 Placing a Thick Original on the Platen 4 4 Zoom Copies 4 4 Standard Zo...

Page 4: ...5 9 Maintenance Toner Container Replacement 9 1 Cleaning the Charger and Registration Roller 9 3 Cleaning the Machine 9 6 Cleaning the Document Processor 9 6 Replacing the Document Processor Pad 9 7 S...

Page 5: ...2 Copy Mode selection Making clear reproductions of photographs 3 EcoPrint mode Saving on toner use 4 Combine modes Making one copy from either two or four originals 5 Collate mode Collating automatic...

Page 6: ...iv OPERATION GUIDE...

Page 7: ...machine are protected by copyright All rights are reserved Copying or other reproduction of all or part of this guide and any copyrightable subject matters without the prior written consent of Olivett...

Page 8: ...nters Low Power Mode when 7 5 minutes have passed since the device was last used The amount of time of no activity that must pass before Low Power Mode is activated may be lengthened For further infor...

Page 9: ...formed Specifics of the required action are indicated inside the symbol Please contact your service representative to order a replacement if the safety warnings in this Operation Guide are illegible o...

Page 10: ...ful to avoid fire or electric shock when removing a paper jam or when replacing toner NOTE Do not remove these labels Label 1 High temperature inside Do not touch parts in this area because there is a...

Page 11: ...To keep the machine cool and facilitate changing of parts and maintenance allow access space as shown below Leave adequate space especially around the vents to allow air to be properly ventilated out...

Page 12: ...r of fire or electrical shock Plug the power cord securely into the outlet If metallic objects come in contact with the prongs on the plug it may cause a fire or electric shock Always connect the mach...

Page 13: ...as there is a danger of fire electrical shock or damage to the laser If the laser beam escapes there is a danger of it causing blindness If the machine becomes excessively hot smoke appears from the m...

Page 14: ...achine For safety purposes always remove the power plug from the outlet when performing cleaning operations If dust accumulates within the machine there is a danger of fire or other trouble It is ther...

Page 15: ...resh air and gargle thoroughly with a large amount of water If coughing develops contact a physician If you do happen to ingest toner rinse your mouth out with water and drink 1 or 2 cups of water to...

Page 16: ...ective housing and external cover In the normal operation of the product by user no radiation can leak from the machine This machine is classified as Class 1 laser product under IEC 60825 CAUTION Perf...

Page 17: ...der our sole responsibility that the product to which this declaration relates is in conformity with the following specifications Limits and methods of measurement for immunity characteristics of info...

Page 18: ...as implemented on Aug 2 1976 by the Center for Devices and Radiological Health CDRH of the U S Food and Drug Administration FDA This act prohibits the sale of laser products in the U S without certifi...

Page 19: ...frequency energy and if not installed and used in accordance with the instructions may cause harmful interference to radio communications However there is no guarantee that interference will not occur...

Page 20: ...ons on loading paper and attaching the manual feed tray 3 Preparations contains information on setting the machine up ready for use 4 Copy Functions explains how to make copies 5 Scanning Functions ex...

Page 21: ...ld Typeface Used to emphasize buttons or items to be selected in dialog boxes and titles displayed in dialog boxes Click Next Notes Used to provide additional or useful information about a function or...

Page 22: ...s guide tells you to access the menu item and provides a route map to direct you to that item An example of a route map and its significance is shown below Menu This represents the operation panel but...

Page 23: ...nit 5 Toner Container 2 Front Cover 6 Developer Unit 3 Cassette 7 Drum Unit 4 Manual Feed Tray 5 2 1 3 4 6 7 9 8 10 11 12 13 14 8 Shipping Lock 12 Platen 9 Original Size Indicator Plate 13 Output Tray...

Page 24: ...sor 15 16 17 18 19 15 USB Interface Connector 18 Power Switch 16 5V DC Output for Print Server IB 110 19 Power Cord Receptacle 17 Rear Cover 1 Original Table 4 Ejection Extension 2 Original Insert Gui...

Page 25: ...ing normal operation Error codes when the printer requires the operator s attention For further information refer to Maintenance and Error Messages on page 10 3 1 2 3 4 5 9 8 6 7 10 11 12 13 15 17 18...

Page 26: ...ready screen in the copy mode Sleeping The machine is in Auto Sleep The machine wakes from Auto Sleep whenever a key on the operation panel or a print job is received The machine then warms up and goe...

Page 27: ...A4 B5 JIS A5 Letter Legal Folio and Oficio II Manual Feed Tray 1 sheet 60 to 163g m2 A4 B5 JIS A5 Letter Legal Folio Oficio II Statement Executive A6 B6 B5 ISO Envelope 10 Envelope 9 Envelope Monarch...

Page 28: ...When using paper that has been run through a copier before check it to make sure that all staples and paper clips have been removed Attempting to copy paper that has fasteners attached may result in...

Page 29: ...guide towards the rear until it stops 4 Load the paper in the cassette IMPORTANT Always adjust the paper length and width guides before loading paper to avoid skewed paper feed and or a paper jam Do n...

Page 30: ...Feed Tray up and out 3 Pull out the front of the Manual Feed Tray 4 Push the cassette back into the printer 5 Adjust the paper width guides and slide the paper into the tray as far as it will go The...

Page 31: ...he Manual Feed Tray 6 After use move the width guides fully outwards and close the Manual Feed Tray NOTE For further information about the sizes and types of media that can be used refer to Specificat...

Page 32: ...per size The paper size that can be used are A4 Letter Legal A5 B5 OfficioII Executive Statement Folio B6 A6 ISO B5 Envelope C5 Envelope 10 Envelope DL Envelope 9 Monarch Envelope 6 16K 1 Access 12 Pa...

Page 33: ...ECYCLED VELLUM ROUGH LETTERHD COLOR PREPUNCH ENVELOPE CARDSTOCK COATED THICK HIGH QLT CUSTOM 1 Access 15 Media Type If you are unsure how to use this route map refer to Accessing Menu Items on page xx...

Page 34: ...Loading Paper 2 8 OPERATION GUIDE...

Page 35: ...Turn the machine off remove the power cord from the outlet and turn the computer off 2 Connect the USB cable to the USB interface connector located at the rear side of the machine 3 Connect the other...

Page 36: ...s 98SE Me 2000 XP Examples of the operations given in this guide are for the Windows XP Essentially the same operations are used for Windows 98SE Me 2000 environments 1 Switch on the PC and activate W...

Page 37: ...stall Software The Installation Wizard starts 8 Click Next 9 For the simple default installation select Express Mode and click Next NOTE If you selected Custom Mode select Universal serial bus USB to...

Page 38: ...and can be customized the install options 1 Follow steps 1 to 8 of Loading Software on page 3 2 2 Select Custom Mode and click Next 3 Select Universal serial bus USB and click NEXT 4 Select the softw...

Page 39: ...Preparations OPERATION GUIDE 3 5 4 Click Next 5 Click Finish to leave the install program and return to the disc main menu...

Page 40: ...Preparations 3 6 OPERATION GUIDE...

Page 41: ...s various functions 3 Press Copy Mode to select the desired mode 4 Adjusting Copy Exposure The Copy Exposure density is adjusted manually To make the copy darker press Darker To make the copy lighter...

Page 42: ...cancel copying press Stop Clear Completed copies are delivered to the output tray Placing Originals in the Document Processor The document processor automatically feeds and scans multiple sheet origi...

Page 43: ...mmed Originals with cut out sections or that have a slippery surface on either side Originals on which any correction fluid is still wet Folded originals smooth out the folds before setting them in th...

Page 44: ...ers and illustrations in a full form is copied The blank part of the print is calculated and original is reduced and copied It is not a function to enlarge or reduce by the automatic operation accordi...

Page 45: ...g numeric keys 4 Press OK The message display returns to the ready screen The new zoom ratio is registered To start copying place the original on the platen and press Start Collate Mode Multiple origi...

Page 46: ...esired mode 2 Enter the desired number of copies 3 Place the original on the platen and press Start Scanning will start 4 Replace the first original with the next one and press Start Scanning will sta...

Page 47: ...AIN scanning application 2 Pull down the File menu and choose Select Source If the Select Source command is not available on the File menu see your application s user s guide to determine how the TWAI...

Page 48: ...d and applied the Preview image is updated for a real time view of the change You can define the area to be scanned by dragging the cursor lines with the mouse Zoom Click Zoom to preview a selected ar...

Page 49: ...ping area for all of the scanned documents Original Size Select a size on the Original Size list of frequently used scan sizes including business card 5 x 3 in 6 x 4 in Letter B5 A5 A4 or your current...

Page 50: ...the Highlight Shadow button to access Highlight Shadow Levels dialog box You can type values in the text boxes or you can place the mouse cursor over the line click the right mouse button and drag the...

Page 51: ...strength NOTE These options are available only when the Color Adjustment button is enabled Color Drop out This feature is available when Black and White or 8 Bit Gray is selected on the Image Type dro...

Page 52: ...tion about the scanner and driver Using a scan settings file You can use an existing settings file Right click the file name for the settings you want to use and click Load The settings in the file wi...

Page 53: ...equired select Collate Using Reverse Order prints in a reversed order Imaging Use to select the Print Quality required Adjusts the Brightness of a output The darkest setting is 7 and the brightest is...

Page 54: ...ct OK to start printing NOTE If a paper jam occurs or the paper runs out the Status Monitor is displayed This enables you to monitor and manage printer activity You can exit the Status Monitor by clic...

Page 55: ...ction Scan directly to a file or email User defined buttons allow you to configure a button to meet your own application requirements Two of the three sections in the above QLINK figure have a number...

Page 56: ...own on the platen 2 Press Scan to PC on the operation panel 3 Press W or X to select an application item in the message display 4 Press OK to confirm your selected application item 5 Press Start to st...

Page 57: ...n your computer by clicking Browse Program name Your application s original name is shown here Program name on MFP LCD Set a name for your application which will appear on the message display Scan Adj...

Page 58: ...anner Setting Prints 1 original image reduced to fit onto one sheet of paper Prints 2 original images reduced to fit onto one sheet of paper Prints 4 original images reduced to fit onto one sheet of p...

Page 59: ...se of this Scan preference dialog box to adjust all other preferred scan settings including Original Size Resolution Brightness and Contrast Copies Selects the number of copies Scale Increase or decre...

Page 60: ...he QLINK click Send to file User define Buttons There are up to three user defined buttons on the QLINK You can set your own preferences and configuration to fit your required application To configure...

Page 61: ...ing Menu Items on page xx 2 Press W or X to select the language to be used in the display and press OK The display changes to the selected language and returns to the ready screen Sleep Mode The machi...

Page 62: ...returns to the ready screen Buzzer The Buzzer can be set to sound when a key on the operation panel is pressed or in cases when errors occur etc 1 Access 16 Buzzer If you are unsure how to use this ro...

Page 63: ...r Off Press OK The display returns to the ready screen Drum Control The drum control is cleaning the drum surface automatically when the machine is turned on You can adjust the cleaning time from 0 90...

Page 64: ...t settings are shown with an asterisk 1 Access 2 Copy Setup If you are unsure how to use this route map refer to Accessing Menu Items on page xx 2 Press W or X to select the default setting that you w...

Page 65: ...sing Menu Items on page xx 2 Press W or X to select 31 Configuration 32 Menu map or 33 Usage report and press OK Printing of the report will begin The display returns to the ready screen Item Descript...

Page 66: ...System Settings 8 6 OPERATION GUIDE...

Page 67: ...machine displays the message Toner Low as the first caution Note the replacement is not always necessary at this stage If you ignore the above message and continue printing the machine displays the me...

Page 68: ...ic bag provided for disposal 4 Remove the packaging from the new Toner Container Shake the container horizontally to distribute the toner evenly 5 Remove the label from the Toner Container 6 Install t...

Page 69: ...IMPORTANT Take care not to place your fingers between the scan unit and the main body when the scan unit is closed Cleaning the Charger and Registration Roller To avoid print quality problems the inte...

Page 70: ...machine NOTE The Drum Unit is sensitive to light Never expose the Drum Unit to light for more than five minutes 5 Place the Drum Unit flat on a clean level surface IMPORTANT Do not place the Drum Unit...

Page 71: ...then return it to its original position 8 When cleaning is complete return the Drum Unit to its position aligning the guides at both ends with the slots in the machine 9 Insert the Developer Unit tog...

Page 72: ...ration If copies appear soiled while using the document processor the slit glass is dirty Cleaning the Document Processor From time to time the document processor pad and feeding rollers may become co...

Page 73: ...ecommended that you replace the pad with a new one Consult your nearest service representative or authorized service center to order a document processor pad and follow the procedure below to replace...

Page 74: ...Maintenance 9 8 OPERATION GUIDE Shipping Lock Always slide shipping lock to Lock position before moving this machine from one location to another And slide to Unlock position before using it...

Page 75: ...ten place them face down page 4 1 When setting originals in the document processor place them face up Light copies Is the copier in either the Photo Text Photo or Text mode Adjust the exposure to the...

Page 76: ...the appropriate procedure to remove the paper page 10 4 Does the registered paper size match the size you are actually using Be sure the registered paper size matches the size you are actually using...

Page 77: ...e sure the cassette is closed securely page 2 1 Paper Mismatch There is no paper Load the correct size paper page 2 1 Please Replace Toner Toner has run out so further copying or printing is impossibl...

Page 78: ...arger section Take sufficient care when working in this area as there is a danger of electrical shock CAUTION The fuser unit is extremely hot Take care when working in this area Output Tray and Rear C...

Page 79: ...TANT Take care not to place your fingers between the scan unit and the main body when the scan unit is closed Paper Cassette 1 Pull out the cassette 2 Remove any partially fed paper Check to see if pa...

Page 80: ...pushing the Lever The error is cleared IMPORTANT Take care not to place your fingers between the scan unit and the main body when the scan unit is closed Manual Feed Tray 1 Remove the paper from the M...

Page 81: ...h the Toner Container out of the printer 5 Using the green handles lift the Drum Unit out of the machine NOTE The Drum Unit is sensitive to light Never expose the Drum Unit to light for more than five...

Page 82: ...remove the paper from the Manual Feed Tray side 7 Return the Drum Unit to its position aligning the guides at both ends with the slots in the printer 8 Insert the Developer Unit together with the Tone...

Page 83: ...to place your fingers between the scan unit and the main body when the scan unit is closed 11 Reload the Manual Feed Tray Inside Machine 1 Open the Scan Unit 2 Open the Front Cover 3 Lift the Develop...

Page 84: ...more than five minutes 5 Remove the paper from the machine NOTE If the jammed paper appears to be pinched by rollers pull it along the normal running direction of the paper 6 Return the Drum Unit to i...

Page 85: ...fingers between the scan unit and the main body when the scan unit is closed Document Processor 1 Remove all of the originals from the Original Table 2 Open the Left Cover of the document processor 3...

Page 86: ...Troubleshooting 10 12 OPERATION GUIDE 4 Remove the jammed original 5 Close the Left Cover 6 Place the originals...

Page 87: ...6 Envelope C5 Envelope DL 16K Paper Types Cassette Plain paper recycled paper thick paper 60 to 105g m2 Manual Feed Tray Plain paper recycled paper thick paper 60 to 163g m2 Transparency envelopes an...

Page 88: ...A5 10copies min B5 14copies min Letter 13copies min Legal 11copies min First copy 1 1 Letter A4 Platen 12 0 5 seconds Document Processor 14 0 5 seconds Resolution Scanning and Printing 600 600dpi Con...

Page 89: ...h color Grayscale 8bit dot Monochrome 1bit dot File format PDF TIFF JPEG 8 Bit Gray mode 24 Bit Color mode BMP Host Interface USB TWAIN 1 port Hi speed USB Item Specification Original feed system Auto...

Page 90: ...or Olivetti printers and copiers so that all users on the network can take advantage of them The included utility Virtual Link enables you to utilize the MFP s scanning function The print server s USB...

Page 91: ...Document Processor Pad Replacement 9 7 Drum Control 8 3 Drum Refresh 8 3 Drum Reset 8 2 E Eco Fuser 8 3 EcoPrint 4 6 Error Messages 10 3 G General Guidelines 10 1 I Installation Precautions ix L Langu...

Page 92: ...1 Q QLINK 7 1 Copy Function Section 7 4 MFP Button Setting Section 7 2 Scan Function Section 7 6 Start the QLINK 7 1 R Report Pages 8 5 S Scanning Functions 5 1 Image Type 5 2 Resolution 5 2 Scan Met...

Page 93: ...For best results and machine performance we recommend that you use only our original supplies for your products E1...

Page 94: ...you need and the instructions for handling the waste correctly for example location and times of the waste collection centres etc b When you purchase a new device of ours give a used device similar t...

Page 95: ......

Page 96: ......

Page 97: ...Code 523622en...

Reviews: