


ENGLISH
EN - 17
1.3 - INSTALLATION OF THE APPLIANCE
• After removing the packaging, check that the appliance is in perfect condition; in case of doubts do not use it and
refer to professionally qualified personnel.
• Install the appliance on a rigid and levelled floor while keeping the room ventilated.
• Place the appliance in a suitable environment.
Make sure that curtains or other objects don-t obstruct the air flow (Fig. 5).
• Leave at least 20cm of free space on both sides and behind the appliance and leave at least 30cm of free space
above it (Fig. 1).
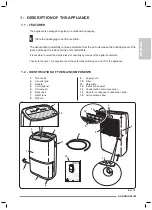
• Remove the tank (7) and uncoil the supply cord (9).
•
Correctly
reposition the tank (7) in the appliance body.
• Insert the plug in the power socket; the appliance emits a “beep”.
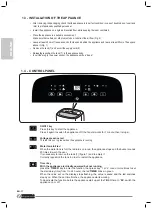
1.4 - CONTROL PANEL
ON/OFF key
Press this key to start the appliance.
Press it again to switch the appliance off (the fan still works for 1 minute, then it stops).
Voltage presence led
This led turns on in green when the appliance is running.
Water tank full led
When the water tank is full, the led turns on in red, the appliance stops and the buzzer sounds
20 times to warn the user.
It is necessary to remove the tank (7) (figure 7) and to empty it.
Correctly reposition the tank in order to restart the appliance.
Timer key
With the appliance electrically powered but not running
press the “
TIMER
” key to enter the function, then press key “
-
” or “
+
” once or more times to set
the start delay time (from 1 to 24 hours), the led
TIMER
blinks in green.
When the value set on the display stops flashing, the value is saved and the led switches
steady on. When the set time finishes, the appliance starts working.
To deactivate the function before the appliance start up,set the TIMER time to “
00
”, switch the
appliance on or off.
Summary of Contents for AQUARIA 18 P
Page 5: ...min 30cm min 20cm min 20cm min 70cm 1 5 3 2 4 min 2m min 2m 6 11...
Page 6: ...Click 9 10 7 7 7 7b 8 T 14 5 13 11 10 10 5 10 5 15...
Page 124: ...AQUARIA SLIM GR 2 0 0 1 0 2 0 2 1 Service SERVICE GR 1...
Page 125: ...GR 3...
Page 126: ...AQUARIA SLIM GR 4 0 3 1 OL PIA SPLENDID 2 3 4 5 6 7 8 9...
Page 127: ...GR 5 10 11 OLIMPIA SPLENDID 12 13 14 15 16 17 18 19 11 2 20 21 22...
Page 128: ...AQUARIA SLIM GR 6 A 23 24 25 26 27 28 29 3 30 3 31 5 32 33 20 30 1 34 4 35 36 37 38 39...
Page 129: ...GR 7 40 41 41a 42 43 44 45 2 dvd player 6 46 47 48 49 50 51 52 5 C 35 C 53...
Page 130: ...AQUARIA SLIM GR 8 54 55 56 AT 3 15A 0 4 X OLIMPIA SPLENDID 0 5...
Page 131: ...GR 9 0 6 R290 1 R290 A3 2 3 4m2 4 R290 5 6 7 8 R290 9 10 11 12 13 14 15 16...
Page 132: ...AQUARIA SLIM GR 10 17 18 19 20 21 22 a b c d e CO2 f...
Page 133: ...GR 11 g h I...
Page 134: ...AQUARIA SLIM GR 12 23 a b 24 25 26 27...
Page 135: ...GR 13 25 OFN 28 OFN OFN OFN OFN 29 OFN...
Page 136: ...AQUARIA SLIM GR 14 30 a b c d e f g h 80 i j k 31...
Page 137: ...GR 15 32...
Page 141: ...GR 19 1 5 BLACKOUT blackout 2 2 1 3 1 a SS 2 2 a b c 5 d 20 30 cm 1 e f g h i...
Page 143: ...GR 21 4 4 1 4 1 a 50 C 4 2 5 10 15 10 5 10 11 15 15 6 12 10 15 5 10 5 10 15 5 10 5 10 15...
Page 145: ...GR 23 7 led 1 CL 5 C 41 F CH 35 C 95 F LO 20 HI 95 led POWER...
Page 146: ......
Page 147: ...261823B...


