Installation
23
Engl
is
h
3.
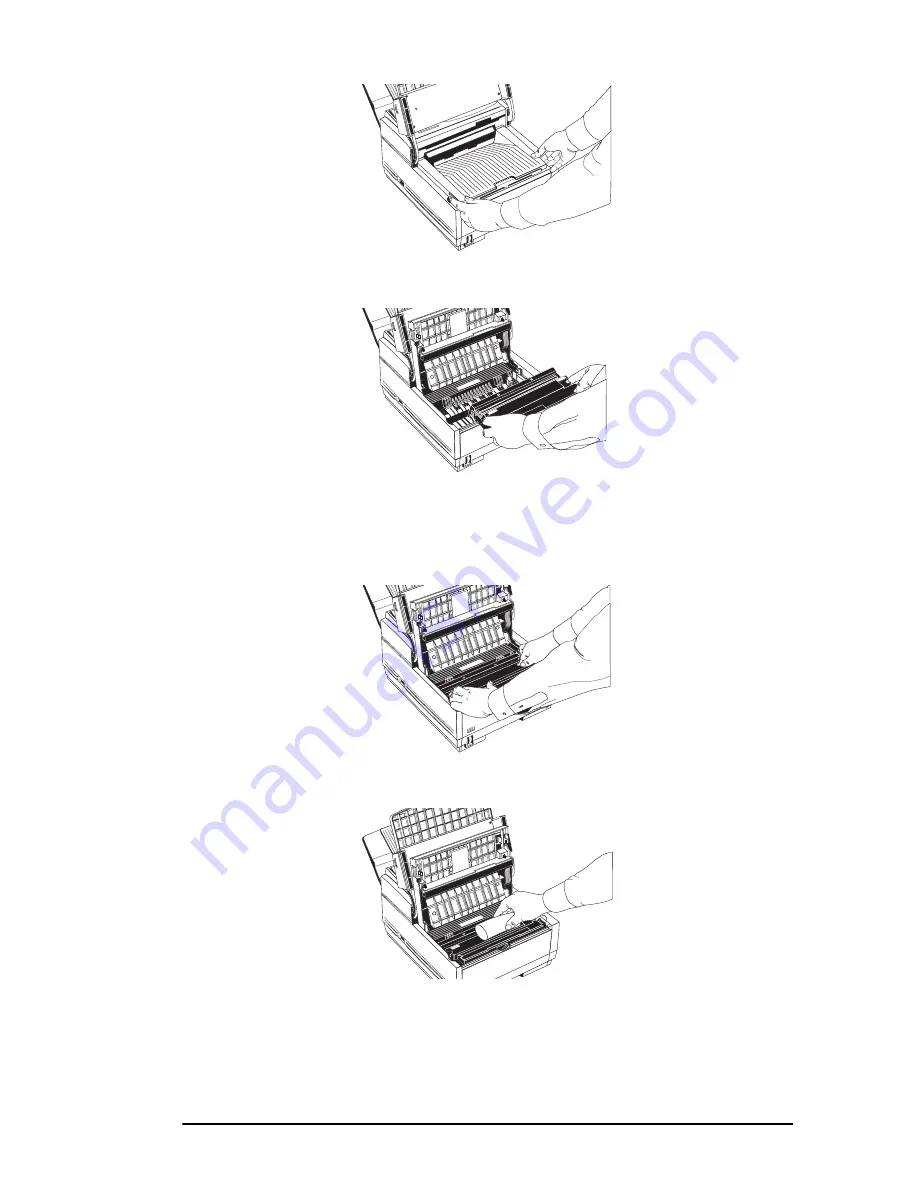
Lift the image drum unit out and keeping the image drum unit out
of direct sunlight. DO NOT touch the green surface of the drum.
4.
Carefully remove the protective sheet from the image drum unit.
5.
Place the image drum unit back into your fax machine. To ensure
that the image drum is positioned correctly, press down firmly on
both of the locations on the image drum marked “PUSH”.
6.
Remove the protective foam cylinder from the toner well in the
image drum unit.
1
ABC
2
DEF
3
GHI
4
JKL
5
MN
6
PRS
7
TUV
8
WXY
9
*
OQZ
0
#
AU
TO
REC
SEARCH
SELECT
FUNCTION
AU
TO
DIAL
HYPHEN
REDIAL
COPY
HOOK
V. REQ
UEST
PH
OTO
EX FINE
FINE
STD
LIGHT
NORMAL
DARK
ALARM
STOP
ST
ART
1
ABC
2
DEF
3
GHI
4
JKL
5
MN
6
PRS
7
TUV
8
WXY
9
*
OQZ
0
#
AU
TO
REC
SEARCH
SELECT
FUNCTION
AU
TO
DIAL
HYPHEN
REDIAL
COPY
HOOK
V. REQ
UEST
PH
OTO
EX FINE
FINE
STD
LIGHT
NORMAL
DARK
ALARM
STOP
STAR
T
PUSH
PUSH
1
ABC
2
DEF
3
GHI
4
JKL
5
MN
6
PRS
7
TUV
8
WXY
9
*
OQZ
0
#
AU
TO
REC
SEARCH
SELECT
FUNCTION
AU
TO
DIAL
HYPHEN
REDIAL
COPY
HOOK
V. REQ
UEST
PH
OTO
EX FINE
FINE
STD
LIGHT
NORMAL
DARK
ALARM
STOP
STAR
T
1
ABC
2
DEF
3
GHI
4
JKL
5
MN
6
PRS
7
TUV
8
WXY
9
*
OQZ
0
#
AU
TO
REC
SEARCH
SELECT
FUNCTION
AU
TO
DIAL
HYPHEN
REDIAL
COPY
HOOK
V. REQ
UEST
PH
OTO
EX FINE
FINE
STD
LIGHT
NORMAL
DARK
ALARM
STOP
STAR
T
Summary of Contents for OKIFAX 5400
Page 1: ...English User s Guide ...
Page 10: ...4 User s Guide ...
Page 14: ...8 User s Guide ...
Page 19: ...Component Identification 13 English ...
Page 26: ...20 User s Guide ...
Page 44: ...38 User s Guide ...
Page 62: ...56 User s Guide ...
Page 90: ...84 User s Guide ...
Page 104: ...98 User s Guide ...
Page 106: ...100 User s Guide ...
Page 110: ...104 User s Guide ...


