Oki Microline 320 Turbo D1 Handbook Download Page 23

16

Loading Paper

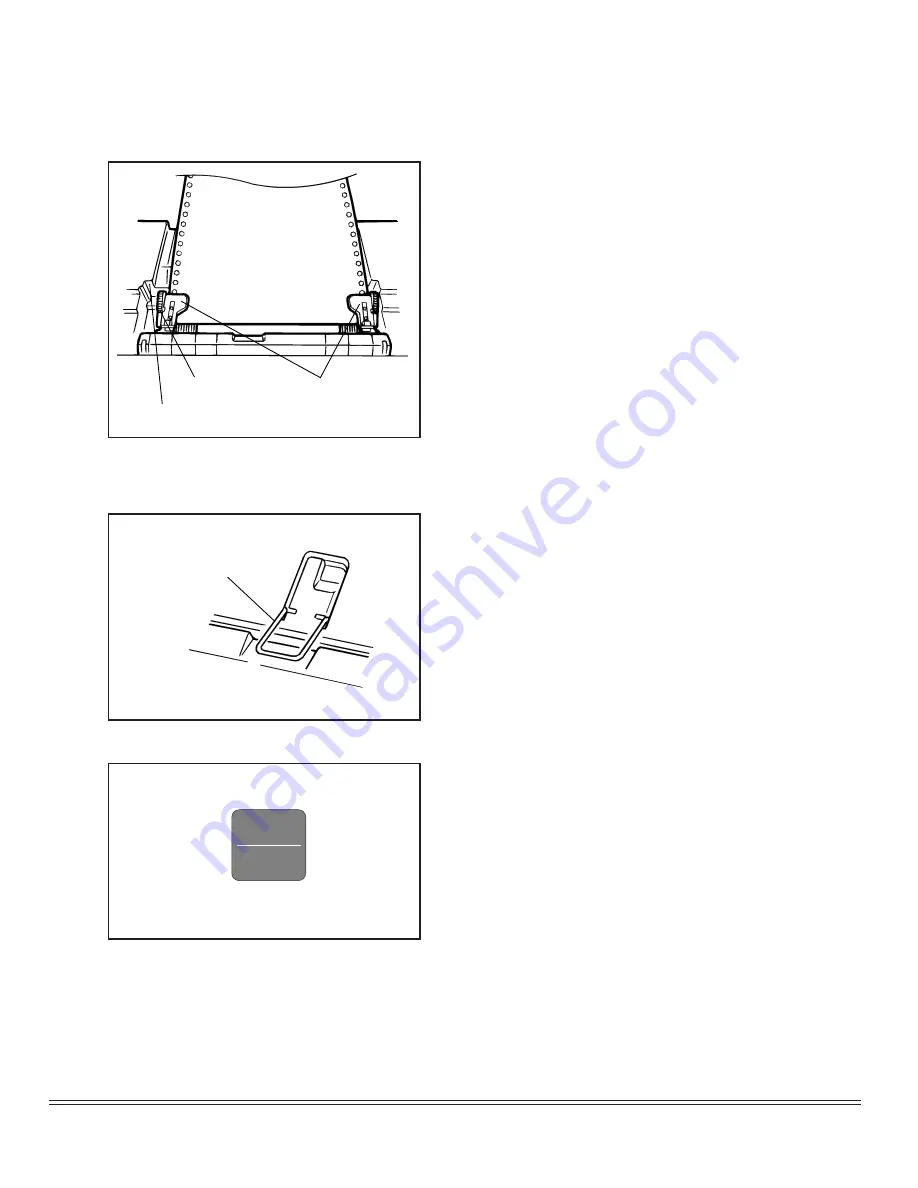
7. Close tractor covers and adjust left trac-

tor to position edge of paper: reference
marks on printer indicate left edge po-
sition for the two most common paper
sizes. When paper is properly aligned,
lock left tractor in place by pushing back
on lock lever.

8. Adjust right tractor so that paper holes

are centered on pins(careful – if paper
is stretched too tight or left too loose, it
can jam and cause problems), then lock
right tractor in place by pushing back
on lock lever.

9. Set Paper separator and swing wire feed

guide over to rest on pull-up roller as-
sembly to prevent from curling back
into printer.

10.Push FF/LOAD button. Paper will au-

tomatically feed into printer and
ALARM light will go out.

Tractor covers

Lock lever

Reference marks

Wire feed guide

FF/LOAD

Micro Feed

Up

ITEM

Summary of Contents for Microline 320 Turbo D1

Page 1: ...MICROLINE 320 321 TURBO Printer Handbook...

Page 2: ...anual Mention of software products manu factured by other companies does not necessarily constitute endorsement by OKI OKI and MICROLINE are registered trademarks of OKI Electric Industry Company Ltd...

Page 3: ...er on or near a heat source such as a radiator or heat register If you put the printer in any kind of enclosure make sure it is well ventilated Do not put anything into the ventilation slots on the si...

Page 4: ...service the printer yourself opening the cover may expose you to shocks or other hazards Don t make any adjustments other than those outlined in the manual you might cause damage requiring extensive...

Page 5: ...ding Paper 9 Loading Single Sheet Paper 11 Loading Rear Feed Paper 14 Paper Handling 19 Tear Feature 19 Forms Tear off Feature 20 Paper Park Feature 20 Switching Paper Paths 21 Chapter 3 Operation 23...

Page 6: ...s 48 Compatible Printer Drivers 49 Chapter 5 Ploblem Solving Maintenance Service 51 Problem Solving 51 Maintenance 54 Replacing the Ribbon Cartridge 54 Clearing Paper Jams 57 Cleaning the Housing 61 A...

Page 7: ...Character Substitutions 99 IBM International Character Substitutions 100 MICROLINE International Character Substitutions 101 Code Page Character Sets 102 Appendix E Interfacing 107 Pin Assignments for...

Page 8: ...paper feed Chapter 3 Operation describes how to control your printer from the front panel It also explains how to change the defaults how to test your printer and how to use bar codes Chapter 4 Workin...

Page 9: ...2 Introduction...

Page 10: ...npack your printer and make sure you have the following items If you are missing any of these items contact your dealer immediately for a replacement Chapter 1 Installation Printer Ribbon cartridge AC...

Page 11: ...tallation Removing Shipping Retainers 1 Open access cover by grasping tabs at either end and lifting 2 Remove printhead shipping retainer leave cover open for installation of rib bon Tab Shipping reta...

Page 12: ...tective material from the pull up roller assembly Installing Ribbon Cartridge 1 With access cover open grasp print head and slide it until it is centered on platen 2 Remove ribbon cartridge from its p...

Page 13: ...best print quality Note When the setting is set at 2 5 the printer automatically slows down for better print quality with thicker multipart forms Important Be sure to use only ribbons specifically for...

Page 14: ...ces are listed in appendix E You must supply the cable for connecting your printer to your computer 1 Make sure both printer and computer are OFF 2 Locate interface port on back of printer 3 Plug para...

Page 15: ...rounded outlet 3 Turn printer on Printhead will cross back and forth along platen and POWER light will come on ALARM light will also come on but don t be concerned it s just telling you that there is...

Page 16: ...ck or multi part forms from the bottom See Chapter 5 for more information on these options Top Feed Single sheets basis weight 14 to 24 lbs Single envelopes 24 lb maximum 6 5 to 9 5 wide Transparencie...

Page 17: ...t forms Original plus 4 copies 9 to 11 lb Minimum 3 wide Interleaf multi part forms with carbon paper Original plus 4 copies 10 to 12 lb paper with 9 lb carbon Minimum 3 wide Continuous feed envelopes...

Page 18: ...r To load in single sheets of paper If you have any continuous form paper in the paper path you must press the PARK button on the front panel to remove it from the path before lading single sheets 1 M...

Page 19: ...aper and drop sheet of paper into separator Paper will automatically feed into printer If the sheet of paper doesn t feed in properly the 15 light in the Char acter Pitch section at the bottom right o...

Page 20: ...g FF LOAD button this will advance paper up in micro increments to move TOF further up on page hold SHIFT button while pressing LF button this will advance paper down in micro increments 7 Press SEL b...

Page 21: ...path To load continuous form paper from the rear 1 If you have paper in paper path be sure to remove it before installing rear feed paper To remove single sheet press FF LOAD button To remove bottom f...

Page 22: ...you re loading The movement of the left tractor is limited to ensure that the paper will always contact the paper sen sor when loaded 6 Pull paper and place first two holes on each side over tractor p...

Page 23: ...hat paper holes are centered on pins careful if paper is stretched too tight or left too loose it can jam and cause problems then lock right tractor in place by pushing back on lock lever 9 Set Paper...

Page 24: ...ld SHIFT button while pressing FF LOAD button this will advance paper up in micro increments to move TOF further up on page hold SHIFT button while pressing LF button this will advance paper down in m...

Page 25: ...rarily change the Top of Form setting for a particular print job deselect the printer and press the LF button until you reach the TOF position you want to use The printer will retain this setting un t...

Page 26: ...om feed push tractor you can use this feature to advance the forms up to the tear position so you can easily tear off a printed sheet without wasting paper or readjusting the printer To do this simply...

Page 27: ...high resolution graphics packages pause occasion ally while sending data to the printer If the pause lasts more than the selected interval the paper will advance to the rear off position until more d...

Page 28: ...tion 4 Move paper lever to position marked TOP 5 Load single sheet paper into paper separator To switch from top feed to continuous form tear or bottom optional push or pull tractor installed feed 1 M...

Page 29: ...22 Loading Paper...

Page 30: ...ur printer and reset ting Top of Form to the factory default Control Panel Your printer s front panel lets you control paper feeding customize your printer s defaults to your particular needs and sele...

Page 31: ...e PRINT QUALITY and CHARACTER PITCH sections at the right on the front panel are used to select the quality and size of the printing See Performing Basic Tasks later in this chapter for information on...

Page 32: ...Glows when error condition exists such as out of paper or paper jam Also glows when paper lever is set to wrong position Important If the ALARM light is blinking an unrecoverable error condition exis...

Page 33: ...be accessed by means of the SHIFT button Each button can have several functions depending on the mode in use Print Mode or Menu Mode on whether or not the printer is selected and on whether or not the...

Page 34: ...With printer deselected moves Top of Form set ting down paper moves up on page in micro in crements Moves continuous feed paper up for tear off or back down for printing select deselect states Activa...

Page 35: ...tes Roll ing ASCII Test Activates Roll ing ASCII Test N A N A N A N A Resets Menu and Top of Form to factory default Button Print Mode Help on Power Up Move the print head to Reverse Ejects paper Move...

Page 36: ...LF QUIET PARK SEL FF LOAD N A Not applicable N A N A N A Resets Menu to factory default Resets Top of Form to factory default Activates hex dump mode Button Print Mode Help on Power Up N A N A N A Wi...

Page 37: ...ngth to 14 inches if you re printing on legal size documents or to 3 inches if you re printing on labels or small cards To place your printer in the Menu Mode hold the SHIFT button while pressing the...

Page 38: ...e Menu The menu is made up of groups of parameters Within each group is a list of items and each of those items has several possible settings Here s a sample Menu printout The first column lists the g...

Page 39: ...cpi 12 cpi 15 cpi 17 1 cpi 20 cpi No Yes Normal Italics Single Double Set I Set II EPSON IBM mode Standard Line Graphics Block Graphics ML mode American French German Britishi Dan ish I Swedish Italia...

Page 40: ...ited Operation No Yes Yes No No Yes No Yes No Yes 17 1 CPI 15 CPI 20 CPI 12 CPI Valid Invalid No Yes DEFAULT MODE 1 MODE 2 Wide Narrow 17 1 CPI 20 CPI Line Spacing Form Tear Off Skip Over Perforation...

Page 41: ...34 Operation Parallel I F Buffer Print Buffer Clear Invalid 5V Open Invalid Valid I Prime Pin 18 Auto Feed XT 3 Group Item Setting 3 EPSON mode Only...

Page 42: ...Glows when printer is in Menu Mode Menu Mode Buttons EXIT POWER SEL SEL ALARM FF LOAD PARK SET TEAR LF MENU PRINT QUALITY SSD NLQ CHARACTER PITCH 10 12 15 17 20 PROP Micro Feed Down Micro Feed Up GRO...

Page 43: ...3 SET button Press to change setting for the items Each time you press the SET button a line will print across the page showing the next setting for that item Keep pressing the button until the setti...

Page 44: ...ENU setting gives you sharp crisp characters for correspondence and important final documents that require a polished appearance HSD and SSD printing in Gothic gives the fastest printing but with the...

Page 45: ...e MICROLINE emulation the choices are 10cpi 12cpi 15cpi 17cpi or 20 cpi either non proportional or proportional proportional is se lected when both the light under the desired cpi and the light under...

Page 46: ...tout containing samples of available typefaces Here s a portion of a Font Test printout NLQ Courier NLQ Letter Gothic Utility Gothic High Speed Draft Gothic Bar Code Super Speed Draft Gothic 10 cpi 12...

Page 47: ...rinter on IF printer simply turns on without starting to print you didn t hold down LF button long enough Rolling ASCII Test The Rolling ASCII Test produces a continuous printout of all ASCII characte...

Page 48: ...down QUIET button long enough Hexadecimal Dump Test If you want to test the data your computer is sending to the printer you can place the printer in the Hexadecimal Dump Mode When the printer is in t...

Page 49: ...to the printer while it is in the Hexadecimal Dump Mode When you re done you can exit the Hexadecimal Dump Mode by either pressing the SEL button or by turning the printer off then on again Resetting...

Page 50: ...available bar codes along with a sample printout for each one UPC A Bar Code UPC Universal Product Code bar coding is used in the supermarket industry UPC A coding contains ten digits the first five...

Page 51: ...d contains the same number of bars as UPC A The thir teenth digit combined with the twelfth digit provides a code representing a country Code 39 Also known as 3 of 9 Code code 39 is used in non retail...

Page 52: ...three shift codes are also available for use within the bar code to indicate a change in the code set engaged as required Interleaved2 of 5 Inerleaved2 of 5 bar coding is used mainly in the distribut...

Page 53: ...46 Operation...

Page 54: ...the printer which guide and control its operation Printer commands tell the printer what character pitch to use what font to use what margins to use whether to use single or double spacing when to en...

Page 55: ...inter to perform various functions at the request of the software producing docu ments with the correct format The availability of different drivers makes it possible for a program to function roughly...

Page 56: ...those supplied when you purchased your software Software manufacturers are constantly updating their lists of drivers to keep up with the printer market and they may very well have one which will give...

Page 57: ...50 Working with Software...

Page 58: ...if nothing happens when I turn on the printer The printer may not be plugged in Check the power cord connection to the outlet and to your printer If you re using a power strip make sure it s turned o...

Page 59: ...o the top of the list the more compatible it will be with your printer If your software doesn t have any of the indi cated drivers available check with the software manufacturer to see if they have ad...

Page 60: ...SET Character Pitch button I need to load paper but the Alarm light is not on If the Alarm light is off the printer thinks it has paper loaded To correct this problem press and release the SEL button...

Page 61: ...ed this option to make sure the printer is always set properly static electricity causes the paper to stick In cold dry weather static charges can build up on continuous form paper This can make the p...

Page 62: ...to remove 4 Swing front end of cartridge up off printhead then lift cartridge out and discard it 5 Remove new ribbon cartridge from its packaging do NOT remove clear plastic ribbon shield 6 Hold ribbo...

Page 63: ...56 Ploblem Solving Maintenance Service 7 Lower front end of cartridge over printhead until it snaps into place Turn knob in direction of arrow clock wise to take up any slack in ribbon 1 2 3 Knob...

Page 64: ...Turn platen knob to back paper out of printer Remove any ripped pieces of paper 3 Reload paper turn printer back on and press FF LOAD button If your paper keeps jamming the chances are excellent that...

Page 65: ...tate 6 Fold some single sheet continuous feed paper over three times to produce page four sheets thick Tractor covers Remove pull up roller assembly Quadruple thick paper 7 Load this quadruple thick s...

Page 66: ...ift the paper lever in agreement with the Rear mark before the installation 11 Reload regular paper open tractor cov ers place paper on pins close tractor covers 12 Swing access cover and paper separa...

Page 67: ...l up roller assembly to provide access to remove any ripped pieces from around carriage Button Feed Jams If bottom feed paper jams 1 Turn off printer and use platen knob to back paper out carefully 2...

Page 68: ...any loose particles of paper Note The built up of dust or paper powder in the printer which may be occurred by some environmental settings or media used may cause a mulfunction so execute cleaning ac...

Page 69: ...d up to 100 sheets of standard 20 lb paper With cable for connection to printer Push Tractor Bottom Feed Converts printer for feeding continuous form paper from the bottom Use of bot tom feed eliminat...

Page 70: ...of access cover Roll Paper Stand Adapts ML 320 Turbo printer for use with roll type paper not supplied Not usable on ML 321 Turbo Includes stand and support With cable for connection to printer Seria...

Page 71: ...intenance Service Replacement Parts Replacement Part Access Cover ML 320 Turbo Access Cover ML 321 Turbo AC Cord Poll up Roller Assembly ML 320 Turbo Poll up Roller Assembly ML 321 Turbo Platen Knob P...

Page 72: ...urbo ML321 Turbo 10 cpi 80 cpl 136 cpl 12 cpi 96 cpl 163 cpl 15 cpi 120 cpl 204 cpl 17 1 cpi 137 cpl 233 cpl 20 cpi 160 cpl 272 cpl Emulations EpsonFX IBMProprinter OKIMicrolineco resident Interface S...

Page 73: ...E EAN 8 EAN 13 Inter leaved 2 of 5 Code 128 Postnet Receive Buffer Size MAX 28K Reliability Mean Time Between 10000 hours at 25 duty cycle and 35 Failures MTBR Page density Mean Time to Repair MTTR 1...

Page 74: ...urbo 3 to 16 ML320Turbo 3 to 10 ML321Turbo 3 to 16 ML320Turbo 3 to 10 ML321Turbo 3 to 16 ML320Turbo 3 to 10 ML321Turbo 3 to 16 6 5 to 9 5 6 5 to 9 5 N A 8 5 x 11 Top only Rear Bottom Rear Bottom Rear...

Page 75: ...345 x 116 mm Weight ML 320 Turbo 14 lb 6 5Kg ML 321 Turbo 19 lb 8 5Kg Environmental Requirements Operating Temperature 41 to 95 F 5 to 35 C Storage Temperature 14 to 122 F 10 to 50 C Operating Humidit...

Page 76: ...Q Gothic DRAFT HSD SSD 10 cpi 12 cpi 15 cpi 17 1 cpi 20 cpi No Yes Normal Italics Single Double Set I Set II EPSON IBM mode Standard Line Graphics Block Graphics ML mode American French German British...

Page 77: ...eration Limited Operation No Yes Yes No No Yes No Yes Bin 1 Bin 2 No Yes 17 1 CPI 15 CPI 20 CPI 12 CPI Valid Invalid No Yes DEFAULT MODE 1 MODE 2 Wide Narrow 17 1 CPI 20 CPI Line Spacing Form Tear Off...

Page 78: ...2 3 12 14 17 3 3 5 4 5 5 6 7 8 8 5 I Prime Pin 18 Auto Feed XT 3 Parity Serial Data 7 8 Bits Protocol Diagnostic Test Busy Line Baud Rate DSR Signal DTR Signal Busy Time Line Spacing Bottom Margin Pag...

Page 79: ...fault No en gaged the printer will be deselected so that you can set the Top of Form If you al ways use the same Top of Form setting change this setting to Yes so that you don t have to press the SEL...

Page 80: ...RASCII Abicomp CSF Bin Select Appears only if optional Dual Bin Cut Sheet Feeder is installed Choose Bin 1 factory default or Bin 2 CSF Type Select Wide default or Narrow for CSF type Diagnostic Test...

Page 81: ...r before resetting Change the setting to Buffer Clear if you wish the printer to dump the contents of its buffer immediately upon receiving the I Prime signal Change to Invalid if you want the printer...

Page 82: ...Be careful if you use this feature it lets the printer continue printing when there s no more paper which can cause loss of data and may damage the printhead Parity Appears only if optional Serial Int...

Page 83: ...changing the settings you have made through the front panel con trols or through printer commands If you engage this feature don t forget that it will also prevent your software from clearing out exis...

Page 84: ...rtions of data to the printer you should change the setting to Invalid to keep your printer from inadvertently dumping the received data while it s waiting for more Wait Tine 500 ms 1 sec factory defa...

Page 85: ...78 Appendix B Menu Selections...

Page 86: ...ize Spacing Select 10 cpi Pitch Select 12 cpi Pitch Select 15 cpi Pitch Select 20 cpi Pitch Set Compressed Pitch Superscript Printing On Subscript Printing On Super script Subscript Printing Off ESC D...

Page 87: ...s Copy ROM Character Set to RAM Character Set Cut Sheet Feeder Control Insert Eject Paper SO DC4 ESC W 1 ESC W 0 ESC Ln Hn m1 mk ESC P1 ESC P0 ESC Vn ESC 0 ESC I n ESC G ESC H ESC E ESC F ESC G ESC H...

Page 88: ...ing to 1 8 ESC K Ln Hn data ESC L Ln Hn data ESC Y Ln Hn data ESC Z Ln Hn data BS CR ESC X n m HT ESC D n1 n2 nk 0 ESC D 0 0 ESC B n1 n2 n3 n4 ESC DLE Pn A1 A2 P1 P2 P3 P4 ESC Ln Hn ESC U 1 ESC U 0 ES...

Page 89: ...tial Conditions Incremental print mode On Off Software I Prime Stop Printing ESC 3 n ESC 9 n ESC A n ESC DLE H Pno A1 A2 P1 P2 P3 ESC 2 VT ESC B n1 n2 nk 0 ESC R CAN ESC n ESC 8 ESC 9 ESC Q STX ESC Q...

Page 90: ...n Double Width Printing Line by Line End Double Width Printing Line by Line Double Width Printing On Double Width Printing Off ESC DLE A m n1 n8 ESC DLE B m n data ESC DLE C n data ESC R n ESC t n ESC...

Page 91: ...ouble Density Graphics Quadruple Density Graphics ESC w n ESC p 1 ESC p 0 ESC SP n ESC n ESC x 0 ESC X Pn Lp Hp ESC k n ESC n ESC 4 ESC 5 ESC E ESC F ESC G ESC H ESC 1 ESC 0 ESC 0 n1 n2 a data ESC 0 n...

Page 92: ...2 Set Line Spacing to n 72 SetLineSpacington 144 ESC m Ln Hn data ESC m n ESC m Ln Hn data BS CR ESC l n ESC Q n HT ESC D n1 n2 nk 0 ESC D 0 0 ESC DLE Pn A1 A2 P1 P2 P3 P4 ESC Ln Hn ESC Ln Hn ESC U 1...

Page 93: ...n Left Justification Center Justification Right Justification Within Line Justification ESC 3 n VT ESC B n1 n2 nk 0 ESC DLE H Pno A1 A2 P1 P2 P3 ESC B 0 ESC b m n1 n2 nk 0 ESC n CAN ESC n DEL ESC ESC...

Page 94: ...le Height Printing Off Select Print Mode Proportional Spacing On Proportional Spacing Off SetIntercharacterSpacing ESC DLE A m n1 n8 ESC DLE B n data ESC DLE C n data ESC 0 ESC 2 ESC 1 ESC n ESC T Ln...

Page 95: ...t Eject Cut Sheet Feeder Bin 1 or Bin 2 Selection Graphics Single Density Graphics DoubleDensityGraphics DoubleSpeed Quadruple Density Graphics ESC 0 ESC 0 ESC 1 ESC 3 ESC DLE F Pn0 Pn Lp Hp ESC ESC E...

Page 96: ...and ESC n1 n2 ETX BS CR HT ESC C n1 n2 n3 ESC R n1 n2 n3 n4 ESC F n1 n2 n3 n4 ESC E n1 n2 n3 n4 ESC B n1 n2 n3 n4 ESC DEL Pn a1 a2 P1 P2 P3 P4 ESC HT x y z CR ESC HTX x y z w CR ESC HT CR ESC ESC ESC...

Page 97: ...ode On Print Suppress Mode Off Software I Prime Incremental print mode On Off ESC 5 n ESC LF ESC 8 ESC 6 ESC 9 n VT VT n DC4 SP SP n SP SP ESC DLE H Pno A1 A2 P1 P2 P3 CAN ESC CAN ESC ESC ESC n ESC E...

Page 98: ...ML320 321 Turbo Printer Handbook 91 Lower ASCII Character Sets Lower ASCII Character Sets 1 4 Appendix D ASCII Character Codes...

Page 99: ...92 Appendix D ASCII Character Codes Lower ASCII Character Sets 2 4...

Page 100: ...ML320 321 Turbo Printer Handbook 93 Lower ASCII Character Sets 3 4...

Page 101: ...94 Appendix D ASCII Character Codes Lower ASCII Character Sets 4 4...

Page 102: ...ML320 321 Turbo Printer Handbook 95 Upper ASCII Character Sets Upper ASCII Character Sets 1 4...

Page 103: ...96 Appendix D ASCII Character Codes Upper ASCII Character Sets 2 4...

Page 104: ...ML320 321 Turbo Printer Handbook 97 Upper ASCII Character Sets 3 4...

Page 105: ...98 Appendix D ASCII Character Codes Upper ASCII Character Sets 4 4...

Page 106: ...ML320 321 Turbo Printer Handbook 99 Epson International Character Substitutions...

Page 107: ...100 Appendix D ASCII Character Codes IBM International Character Substitutions...

Page 108: ...ML320 321 Turbo Printer Handbook 101 MICROLINE International Character Substitutions...

Page 109: ...Code Page Character Sets The characters in the lowerASCII range hexadecimal 00 through 7F decimal 0 through 127 are the same as IBM Set 3 The characters for the upper ASCII range are given in the tabl...

Page 110: ...ML320 321 Turbo Printer Handbook 103 Code Page Character Sets 2 4...

Page 111: ...104 Appendix D ASCII Character Codes Code Page Character Sets 3 4...

Page 112: ...ML320 321 Turbo Printer Handbook 105 Code Page Character Sets 4 4...

Page 113: ...106 Appendix D ASCII Character Codes...

Page 114: ...33 34 35 36 To Printer To Printer To Printer To Printer To Printer To Printer To Printer To Printer To Printer From Printer From Printer From Printer From Printer To Printer Signal Ground Frame Ground...

Page 115: ...ged before you install the board 2 Holding board by cable connector with components facing away from parallel interface gently slide it into opening against guides at top and bottom Press firmly into...

Page 116: ...f your com puter Be sure to tighten screws on both ends of cable to keep it in place Important Make sure that you do not have a parallel cable connected to the printer when you re using the serial int...

Page 117: ...rinter From Printer From Printer Protective Ground Transmitted Data Received Data Request to Send Not used Data Set Ready Signal Ground Not Used Supervisory Send Data Not Used Data Terminal Ready Not...

Page 118: ...el 65 221 3722 Singapore Pte Ltd Singapore 079120 Fax 65 221 9282 Oki Electronics Suite 1901 9 Tower 3 Tel 852 2736 2336 Hong Kong Ltd China Hong Kong City Fax 852 2736 2395 33 Chanton Road Tsim Sha T...

Page 119: ...Oki Data Corporation 4 11 22 Shibaura Minato ku Tokyo 108 8551 Japan Tel 81 3 5445 6158 Fax 81 3 5445 6189 Printed in Thailand 40018701EE...

Reviews: