Replacing Consumables / Maintenance Units
- 57 -
2
1
3
4
5
6
7
Recommended Schedule for Replacing the
Image Drum Cartridge
When the image drum cartridge nears the end of its lifespan,
the message [*Image Drum Near Life] (* represents the
specific color) will appear on the control panel to notify you that
it is time to prepare a new image drum cartridge. You can
continue printing until the message [Install new * Image Drum]
(* represents the specific color) appears, then printing will stop.
Memo
• After the message [Image Drum Near Life] appears, you can
continue to print before the message [Install new Image
Drum] appears.
• When the toner is almost gone, you may not be able to
resume printing, even by opening and closing the top cover.
Note
• Use new image drum cartridges. Print quality may
deteriorate if more than a year has passed since the
cartridge was opened.
• Even after the message [Please open/close top cover]
appears, you can continue to print if there is still toner, by
opening and closing the top cover.
• If toner runs low after the message [Please open/close top
cover] appears, the same message will appear again if you
continue to print. Depending on your settings, the toner
might run low before the message [Please open/close top
cover] is displayed.
• Envelopes, post cards, labels and thick paper may use the
color drum, even when the grayscale setting is used.
• If the [ADMIN] > [GENERAL] > [STATUS MESSAGE] >
[SUPPLIES NEAR LIFE MESSAGE] from the Management
Setting menu is set to [Disable], the message [Image Drum
Near Life] will not appear.
• To get the best performance from your machine, please
genuine Okidata consumables.
• For best results, use genuine Okidata consumables. If you
use 3rd party consumables, you may experience problems
or unsatisfactory print quality. Service for problems caused
by use of 3rd party consumables is not covered by the
warranty or the maintenance contract. (Use of 3rd party
consumables does not always cause problems, but please
exhibit caution when using them.)
Replacing the Image Drum Cartridge
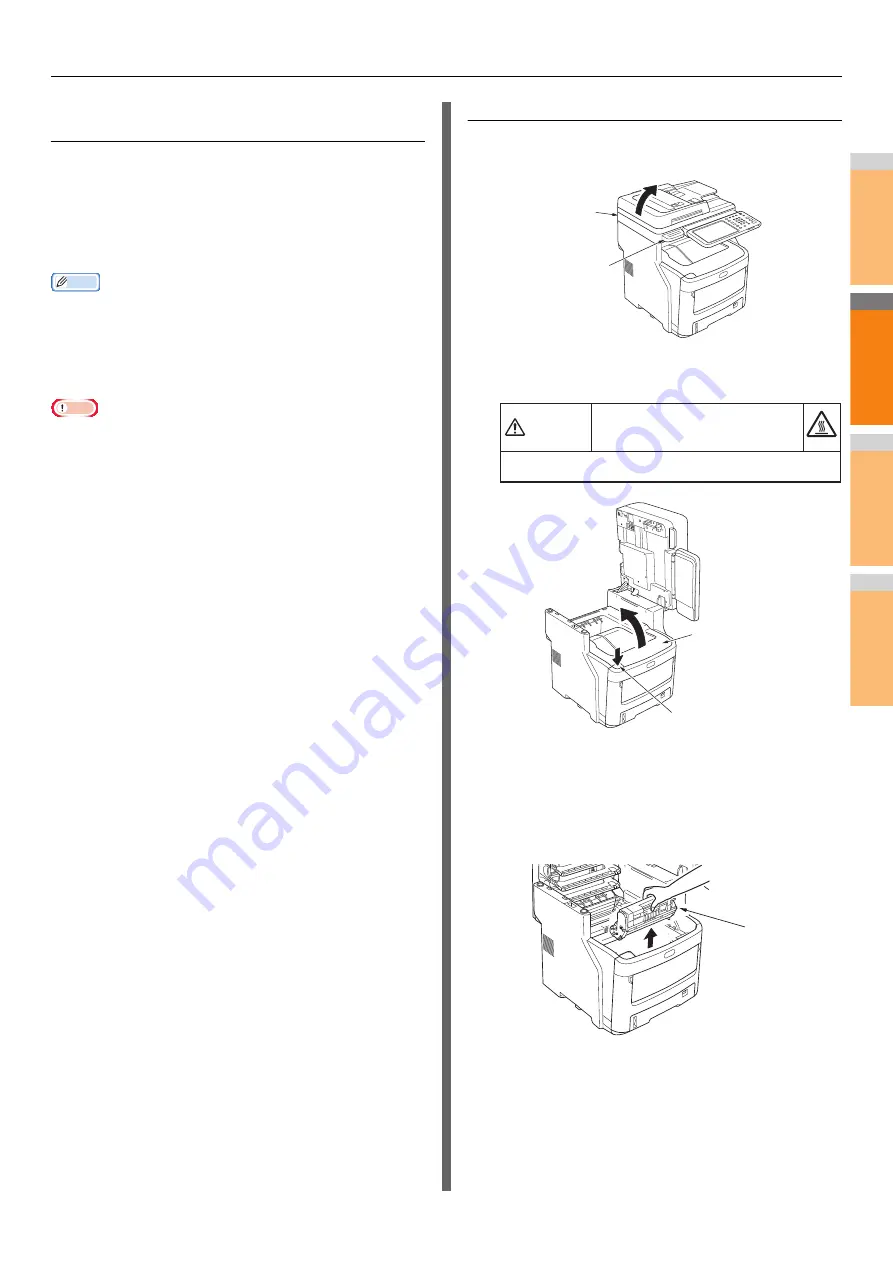
1
Hold the handle and lift the scanner part.
2
Press the top cover open button to open
the top cover.
3
Remove the old image drum cartridge.
(1)
Identify the old image drum cartridge by its
label color.
(2)
Remove the image drum cartridge (with
the toner cartridge attached).
Scanner part
Handle
There is a risk of getting burned.
Do not touch the fuser unit. It can be extremely hot.
Caution
Top cover
Top cover open button
Image drum
cartridge
Summary of Contents for ES7470x MFP
Page 1: ...User s Manual Troubleshooting Guide...
Page 74: ...2 1 3 4 3 Appendix Battery Disposal P 75...
Page 76: ...2 1 3 4 4 Index...
Page 78: ...July 2014 45510802EE Rev3...


