background image

Troubleshooting 97

TROUBLESHOOTING

The network addresses used in this manual are shown for example
only. Network addresses used in your installation must be generated
from your own network.

Self-diagnostic test

Printer does not print.

Ensure the printer emulation is set to 

PS

 or 

Automati

c.

NG

 is printed in the Self-diagnostic test.

Flash ROM Check registers

 NG.

Confirm that the network interface card (NIC) is installed correctly and
turn the printer off and on again.

Initialize the NIC.

Summary of Contents for C7500 V2

Page 1: ...C7300 C7500 V2 C9300 C9500 V2 network guide...

Page 2: ...we make no warranty of any kind expressed or implied as to the accuracy or completeness of the information contained herein Copyright 2003 All rights reserved Document Number 07049401 First Edition D...

Page 3: ...NetWare Object 28 IP Address Setup 28 Option Menu 29 Help Menu 29 Using a Web browser 30 Microsoft Internet Explorer 30 Netscape Navigator 30 Default user name and password 30 Adjusting printer setti...

Page 4: ...upported Versions and Modes 69 Remote Printer Mode 69 Print Server Mode Recommended 69 Setup Utilities 70 Oki NDPS Gateway 71 iPrint 75 UNIX 77 Overview 77 Configuration 77 Operating system configurat...

Page 5: ...ts is provided via an interface panel at the rear of the printer This network interface supports IEEE802 2 IEEE802 3 Ethernet II and SNAP and can detect those frame types automatically Also the interf...

Page 6: ...TTP IPP BOOTP DHCP SNMP DNS SMTP POP3 SLP Rendezvous IPX SPX NetWare Remote printer mode up to eight file servers and 32 queues Print server mode over IPX SPX up to eight print servers Encrypted passw...

Page 7: ...f the printer for more than three seconds and release The self diagnostic test results and configuration settings are printed On the first page of the Network Information that is printed out under the...

Page 8: ...e NetWare Client 32 or IntranetWare Client should be installed in your system AdminManager Configure the NIC in detail Windows95 98 Me NT4 0 2000 XP TCP IP protocol or IPX SPX protocol should be insta...

Page 9: ...and create Queue Print Server Printer objects Zone name and Port name for EtherTalk Configuration requires a PC with Windows 95 98 Me Windows 2000 Advanced Server Professional or Windows NT Server 4...

Page 10: ...are correct click Execute The new settings are transmitted to the network card but the network card is still operating with pre transmission settings 7 Click Finish to validate the new settings Depen...

Page 11: ...automatically If it does not start double click autorun exe in the root directory on the CD ROM 2 Select Network Card Setup 3 Select Network Card Standard Setup 4 Select the appropriate language 5 Fo...

Page 12: ...e selected Item Function Search Search printers in your network and list all printers that have the OkiLAN 7100e 7100e 7200e 7300e and 8100e installed Item Function Printer Status Current printer stat...

Page 13: ...s web page Setup by TELNET Launch TELNET application in your environment to access the selected printer s TELNET port Note The TELNET application is not included as part of the NIC package Install th...

Page 14: ...them as upper case Oki Device Setup contains details for the following selectable tabs General SNMP TCP IP POP NetWare SMTP NetBEUI Maintenance EtherTalk The following section explains each tab s fun...

Page 15: ...ubnet Mask Set the subnet mask of the selected network interface card Default Gateway Set the default gateway of the selected network interface card Use FTP LPD Banner Check this item if you want to a...

Page 16: ...Configure items related to Bindery mode In this dialogue box the following items can be configured Available File Server and Selected File Server Select file servers to connect Up to eight file server...

Page 17: ...mode or Bindery mode Available print server and Selected print server Select file servers to connect Up to eight fileservers can be selected Select a server from Available file server list and click b...

Page 18: ...et the zone name to which the printer belongs Location Comments Use NetBEUI Protocol Set NetBEUI protocol to enabled disabled Computer Name Set a computer name for the printer Workgroup Set a work gro...

Page 19: ...sons TRAP Community This community name is assigned to outgoing system traps such as cold start authentication failure etc TRAP Address Set a destination IP address of a Trap packet If 0 0 0 0 is set...

Page 20: ...sent You can set up to five IP addresses Detail By selecting the button the following dialogue box is displayed In the dialogue box the following items can be configured Trap Enable Set sending a Trap...

Page 21: ...Set sending a Trap enabled or disabled when any errors occur IPX Set node address and network address to which a Trap packet will be sent Detail By selecting the button the following dialogue box is...

Page 22: ...bled or disabled when the printer turns to OFF LINE Paper Out Set sending a Trap enabled or disabled when paper is out Paper Jam Set sending a Trap enabled or disabled when a paper jam occurs Cover Op...

Page 23: ...ort this function Location Comments Use POP3 Protocol Set retrieving E Mail via POP3 enabled or disabled POP3 Server Address Name Set IP address or host name of POP3 server POP3 Port Number Set port n...

Page 24: ...E Mail Address Set the E Mail address that is used in the From field in the mail header 1 5 By selecting each button the following dialogue box is displayed In the dialogue box the following items ca...

Page 25: ...er checks specified event s An E Mail is sent when specified event s occurs when DISABLE is selected Advanced By selecting the button the following dialogue box is displayed In the dialogue box the fo...

Page 26: ...ge should be configured to access NetWare NDS network or bindery network You should login to NetWare servers as a user who can create objects on the servers If you want to create a queue with the remo...

Page 27: ...er Queue Printer NDS Context should be specified PSERVER mode Current Print Server name is used Set queue name and its volume for the queue creation Current Printer name is used RPRINTER mode Select e...

Page 28: ...servers 1 Select Delete NetWare Object from Setup menu 2 Select an object you want to delete and click Delete button 3 To exit from this dialogue box select Quit IP Address Setup If you only use TCP I...

Page 29: ...ocol If Use TCP IP protocol is unchecked the search will not be carried out using TCP IP NetWare Tab Set network addresses that are used to search Oki printers via NetWare protocol If there any many N...

Page 30: ...t files c Select Every visit to the page in Check for newer versions of stored programs Netscape Navigator a Select Settings in the Edit menu b Click Cache in Details c Select Once per session in Docu...

Page 31: ...dresses used in your installation must be generated from your own network 1 Configure the IP Address Subnet Mask and Gateway for the network card Launch the Web browser enter the IP Address of the net...

Page 32: ...ration 2 Set a temporary IP Address on the NIC using the ARP command Example for IP address 192 168 20 127 and network card address 00 80 87 01 00 D2 arp s 192 168 20 127 00 80 87 01 00 D2 temp The Et...

Page 33: ...in password User root logged in No Message Value level 1 1 Setup TCP IP 2 Setup SNMP 3 Setup NetWare 4 Setup EtherTalk 5 Setup NetBEUI 6 Setup printer trap 7 Setup SMTP E Mail 8 Setup POP E Mail 9 Mai...

Page 34: ...3 Subnet Mask 4 Default Gateway 5 RARP protocol 6 DHCP BOOTP protocol 7 Auto IP Address 8 DNS server Pri 9 DNS server Sec 10 Root password 11 Auto Discovery Setup 1 Network PnP 2 Rendezvous 3 Printer...

Page 35: ...ssword 5 Job Polling Time 6 Bindery mode 7 File Server 1 14 File Server 8 99 Back to prior menu 8 Setup RPRINTER IPX 1 Print Server 1 8 Print Server 8 9 Job Timeout 99 Back to prior menu 99 Back to pr...

Page 36: ...Illegal Trap 4 Online Trap 5 Offline Trap 6 Paper Out Trap 7 Paper Jam Trap 8 Cover Open Trap 9 Printer Error Trap 10 IPX Trap Address 11 IPX Trap Net 99 Back to prior menu 99 Back to prior menu 7 Se...

Page 37: ...Location 7 IP Address 8 Ethernet Address 9 Computer Name 10 Printer URL 99 Back to prior menu 13 Comment line 1 16 Comment line 4 99 Back to prior menu 9 Maintenance 1 Web Service 2 Web IPP Port No 3...

Page 38: ...pre transmission settings until the printer is turned off and back on again 11 Display status 1 prn1 2 Network 3 Version 99 Back to prior menu 12 IP Filtering Setup 1 IP Filtering 2 IP Address range 1...

Page 39: ...Oki Data Private MIB needs to be added to that management station Please refer to the SNMP manager documentation for information on how to do this The Oki Data Private MIB file can be found in the MIB...

Page 40: ...t runs The supplied installer will install this if necessary PrintSuperVision s main functions are Maintaining the list of printing devices and organising them in logical groups Initially discovering...

Page 41: ...ly Operating System Service Pack IIS1 1 An Embedded Web Server option is provided which does not require IIS MDAC and Net Framework Windows 2003 Server 1 Web Edition 2 Standard Edition 3 Enterprise Ed...

Page 42: ...splayed in PrintSuperVision only a few of the printer settings can be set For setting any other printer settings a hyperlink to the printer s web page is provided in PrintSuperVision C9200 OKIPAGE 12i...

Page 43: ...0 C7500 OkiLAN 7200e C9200 C9400 C7200 C7400 OkiLAN 7120e ML3320 ML3321 ML3390 ML3391 ML5520 ML5521 ML5590 ML5591 OkiLAN 3100e OKIPAGE 14i 14ex OkiLAN 320e OKIPAGE 14i OkiLAN 7100e OKIPAGE 8c OKIPAGE...

Page 44: ...the Edit Data screen you can specify a port number for PrintSuperVision default 80 5 When installation ends the Setup complete screen is displayed Click Finish 6 Now you should select Start Programs P...

Page 45: ...n Uninstall PrintSuperVision or from Control Panel select Add Remove Programs select PrintSuperVision from the index window and click Add Remove When the uninstallation is completed close Add Remove P...

Page 46: ...the lpr port of the specified IP address System Requirement Windows XP 2000 Me 98 95 NT4 0 Windows Server 2003 with TCP IP support and the following Oki printers that support TCP IP C9200 OKIPAGE 12i...

Page 47: ...starts automatically If it does not start double click setup exe on the CD ROM 3 Select Software Utilities 4 Select Install OkiLPR 5 Follow the on screen instructions 6 Click Next when the Welcome sc...

Page 48: ...lick OK A printer is added to the main window Refer to the On line Help for information on how to use the utility Uninstallation 1 Stop the Oki LPR Utility 2 Select Start Programs Okidata Oki LPR Util...

Page 49: ...versions of Windows which can be configured as either a client server or both Although there are many variants of Windows the principles of network printing are the same Microsoft provides on line hel...

Page 50: ...TCP IP has not been installed refer to the section below Installation of TCP IP protocol 2 If not already configured a suitable IP address Subnet Mask and Gateway address should be configured Please...

Page 51: ...alogue box select Microsoft from the list of manufacturers then select TCP IP from the list of network protocols then click OK 7 The Windows installation CD ROM may be required Follow the remaining di...

Page 52: ...button 5 In the Select Network Protocol dialogue box select TCP IP Protocol and click the OK button 6 Click the Close button in the Local Area Connection Properties dialogue box 7 Click the Close but...

Page 53: ...etwork protocols installed 1 Connect the printer to the network and turn on 2 Place the Network Software Utilities disk in the CD ROM drive The set up utility starts automatically If the set up utilit...

Page 54: ...t without a DHCP server please assign the IP address manually If you are assigning an IP address you need to enter An IP address Submit mask Gateway address 8 Click Next Do you use the NetWare protoco...

Page 55: ...s to configure Windows to print to the network printer Windows 95 98 Me When printing using TCP IP the OkiLPR utility is the only option to use The following procedure should be used When installing t...

Page 56: ...OkiLPR Please follow the procedure described in the Windows 95 98 Me section on page 55 Microsoft LPR To install this port the following needs to be carried out 1 Select Start Settings Control Panel...

Page 57: ...hen double click the Network icon 2 In the Network dialogue box click the Services tab 3 If the Microsoft TCP IP Printing is not listed click the Add button 4 In the Select Network Service dialogue bo...

Page 58: ...rt and then LPR Port 6 Select Next and then provide the following information In Name or address of server providing LPD enter the host name or Internet Protocol IP address of the host for the printer...

Page 59: ...Device Type select Custom then Settings 11 Ensure Protocol is set to Raw 12 Ensure Port Number is 9100 and SNMP Status Enabled is deselected 13 Select OK 14 Select Follow the instructions on the scre...

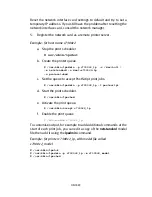
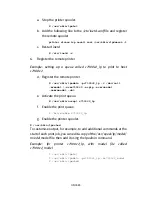
Page 60: ...ction on page 55 Microsoft LPR To install this port the following needs to be carried out 1 Select Start Settings Control Panel and Printers and Other Hardware 2 Select Printers and Faxes 3 Click Add...

Page 61: ...is lp and SNMP Status Enabled is deselected 13 Select OK 14 Follow the instructions on the screen to finish installing the printer Port 9100 1 Select Start Settings Control Panel and Printers and Othe...

Page 62: ...12 Ensure Port Number is 9100 and SNMP Status Enabled is deselected 13 Select OK 14 Follow the instructions on the screen to finish installing the printer IPP 1 Select Start Settings Control Panel and...

Page 63: ...Printer Settings There are three configurable items under NetBEUI within the printer These can be configured using the standard set up utility described in Chapter 1 1Although the workgroup name can b...

Page 64: ...Select Network Protocol dialogue box select Microsoft from the list of manufacturers then select NetBEUI from the list of Network Protocols and then click OK 7 The Windows installation CD ROM may be...

Page 65: ...otocol dialogue box select NetBEUI Protocol and click the OK button 6 Click the Close button in the Local Area Connection Properties dialogue box 7 Click the Close button in the Local Area Connection...

Page 66: ...nters 3 Select the relevant printer driver then Properties 4 Click on the Details tab in the printer driver 5 Select Add Port Select Network and click Browse 6 Double click Entire Network PrintServer...

Page 67: ...name is put into another Workgroup the network card will not be able to find it on the network A maximum of eight Ethernets can be managed by the Master Browser function Printing cannot be carried ou...

Page 68: ...Novell Netware IPX 68...

Page 69: ...ning Pserver Print jobs are received from the file server via the NetWare print server The network interface card emulates the workstation on which the NetWare Rprinter operates Remote Printer Mode ad...

Page 70: ...of the Ethernet address are the same for all OkiLAN 8100e network interfaces The last six characters of the Ethernet address are unique to each card This is all the information that is required to set...

Page 71: ...ware that is printers that are not equipped with embedded NDPS Printer Agents You select and configure a printer gateway when you create a new Printer Agent Gateways translate NDPS queries or commands...

Page 72: ...that you are installing to During installation all files are copied to the SYS SYSTEM and SYS PUBLIC WIN32 directories on the NetWare server 1 To set up the printer to work with the Oki NDPS Gateway...

Page 73: ...and select Printer Interface Type either TCP IP LPR or NetWare IPX and select Next to continue TCP IP configuration illustrated You will then be requested to enter either the TCP IP or IPX ad dress de...

Page 74: ...s you will be prompted with a Results and then a Summary screen 3 Press the Finish button on the Summary screen so the NDPS Printer object has now been created and is configured to use the Oki NDPS Ga...

Page 75: ...nter is physically located or whether they know the printer s network address iPrint runs on top of Novell Distributed Print Services NDPS and provides the following functionality Global access to pri...

Page 76: ...Novell NetWare 76...

Page 77: ...your own network Login as root to change the configuration of the printer If an incorrect IP address Subnet Mask or Gateway is entered the network may go down or other damage may occur Check the addr...

Page 78: ...default and try to set a temporary IP address If you still have the problem after resetting the network interface card consult the network manager 4 Login to the network interface card using TELNET E...

Page 79: ...ABLE 2 IP address 192 168 20 127 3 Subnet Mask 255 255 255 0 4 Gateway address 192 168 20 1 5 RARP protocol DISABLE 6 DHCP BOOTP protocol DISABLE 7 Auto IP Address DISABLE 8 DNS Server Pri 0 0 0 0 9 D...

Page 80: ...d confirm that the IP address of the printer has been set 1 Login as root to the workstation If you do not have Superuser rights the network manager should conduct the configuration 2 Register the IP...

Page 81: ...e of the host of the remote printer This should be the same as the name added to the etc hosts file rp The name of the printer on the remote printer It should be lp sd The spool directory Give the abs...

Page 82: ...ollowing explanation uses Sun Solaris 2 8 known as Solaris 8 and a C7300V2 printer as examples The absolute path and method of configuring commands may differ in other versions of the OS Refer to the...

Page 83: ...tandard o dest c7300v2 lp o protocol bsd c Set the queue to accept PostScript print jobs usr sbin lpadmin p c7300v2_lp I postscript d Start the print scheduler usr sbin lpsched e Activate the print qu...

Page 84: ...rights the network manager should conduct the configuration 3 Register the IP Address of the network card and the host name in the etc hosts file Example for IP Address 192 168 20 127 and host name c7...

Page 85: ...n pc7300v2_lp v dev null mrmodel ormc7300v2 orplp ocmrcmodel osmrsmodel ob3 e Activate the print queue usr sbin accept c7300v2_lp f Enable the print queue bin enable c7300v2_lp g Enable the printer sp...

Page 86: ...29 127 and host name c7300v2 192 168 20 127 c7300v2 3 Use the ping command to confirm connection with the network card Example for host name c7300v2 ping c7300v2 If there is no reply there is a probl...

Page 87: ...of the remote server BSD Description of printer name of the remote server Optional comment LPD Printing Line Printer Daemon LPD is the most common protocol for printing with TCP IP to a network printe...

Page 88: ...specification While the short format of lpq is a UNIX compatible format the long format is unique to this network interface Example of the short format lpq Pc7300v2_lp Example of the long format lpq l...

Page 89: ...or the printing a text file of the EUC Kanji code jis and euc function only as PostScript printers You can not send data to the root directory 1 Login to the network interface card When printing with...

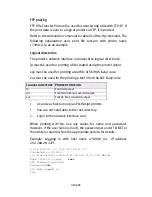
Page 90: ...nd ASCII mode which converts the LF code to the CR LF code If a binary file converted by the printer driver is transferred the transfer mode has to be BINARY mode Example changing transfer mode to bin...

Page 91: ...g the directory after the stat lp sjis euc Example displaying network card status ftp quote stat 211 FTP server status Connected to 192 168 20 10 000 00 User logged in root Transfer type BINARY Data c...

Page 92: ...UNIX 92...

Page 93: ...operating systems from OS 8 1 are supported Printing the Network Interface Card Configuration Sheet The printer s configuration page reports information that is required for Macintosh configuration To...

Page 94: ...col Please check the Use EtherTalk Protocol checkbox 2 Printer Name Give the Printer Name as you would like it to appear in the Chooser 3 Zone Name If your network uses Zones please enter the Zone Nam...

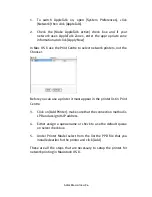
Page 95: ...nstall your printer driver Please enter your driver CD run the installer and follow the on screen instructions Macintosh OS X The OkiLAN 8100e NIC is also supported in the Macintosh OS X environment R...

Page 96: ...printers not the Chooser Before you can use a printer it must appear in the printer list in Print Centre 3 Click on Add Printer make sure that the connection method is LPR and assign its IP address 4...

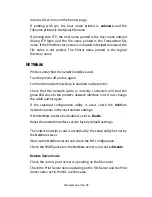
Page 97: ...lation must be generated from your own network Self diagnostic test Printer does not print Ensure the printer emulation is set to PS or Automatic NG is printed in the Self diagnostic test Flash ROM Ch...

Page 98: ...d Gateway are correct Check that the TCP IP protocol is set to Enable Reset the network interface card to factory default settings If DHCP BOOTP and RARP are not used ensure they have been set to Disa...

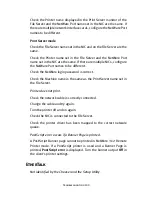
Page 99: ...eck that the network cable is correctly connected and that the green LED close to the printer s network interface is lit If not change the cable and try again If the standard configuration utility is...

Page 100: ...Check the NetWare login password is correct Check the Machine name is the same as the Print Server name set in the File Server Printer does not print Check the network cable is correctly connected Cha...

Page 101: ...AppleTalk In some OS versions Network is used instead of AppleTalk Check the print driver is selected in the Chooser Check the EtherTalk protocol is set to Enable Print the NIC settings and confirm t...

Page 102: ...Troubleshooting 102 Check the computer name of the NIC is different from the computer name on the network...

Page 103: ...icating the paper has run out add more paper and cancel the error Check whether another user is printing Print after the other user has finished Glossary NIC Network Interface Card NDS Novell Director...

Page 104: ...Troubleshooting 104...

Page 105: ...number of SMTP 5 E mail Address Set the E Mail address used for From field in the mail header 6 Reply To Address Set the E Mail address used for Reply To field in the mail header 7 Destination Address...

Page 106: ...g 7 Maintenance Error 8 Paper Warning 9 Paper Error 10 Printing Warning 11 Printing Error 12 HDD Flash Memory 13 Print Result Warning 14 Print Result Error 15 Other Error 16 Interface Warning 17 Inter...

Page 107: ...central house balfour road hounslow tw3 1hy united kingdom tel 44 0 20 8219 2190 Fax 44 0 20 8219 2199 C7300 C7500 C9300 C9500 07049401 Iss 01...

Reviews: