background image

15

Configuring Your MFP

This section is specifically for persons who are responsible for 
the administration of this MFP. There are three methods to 
configure your machine.

•  From the OKI MFP Network Setup Tool

•  From the MFP’s web page

•  From the control panel

Configuring from the OKI Management Utility (OKI 
MFP Network Setup Tool)

This tool provides a convenient way to remotely configure all 
OKI MFP on the network.

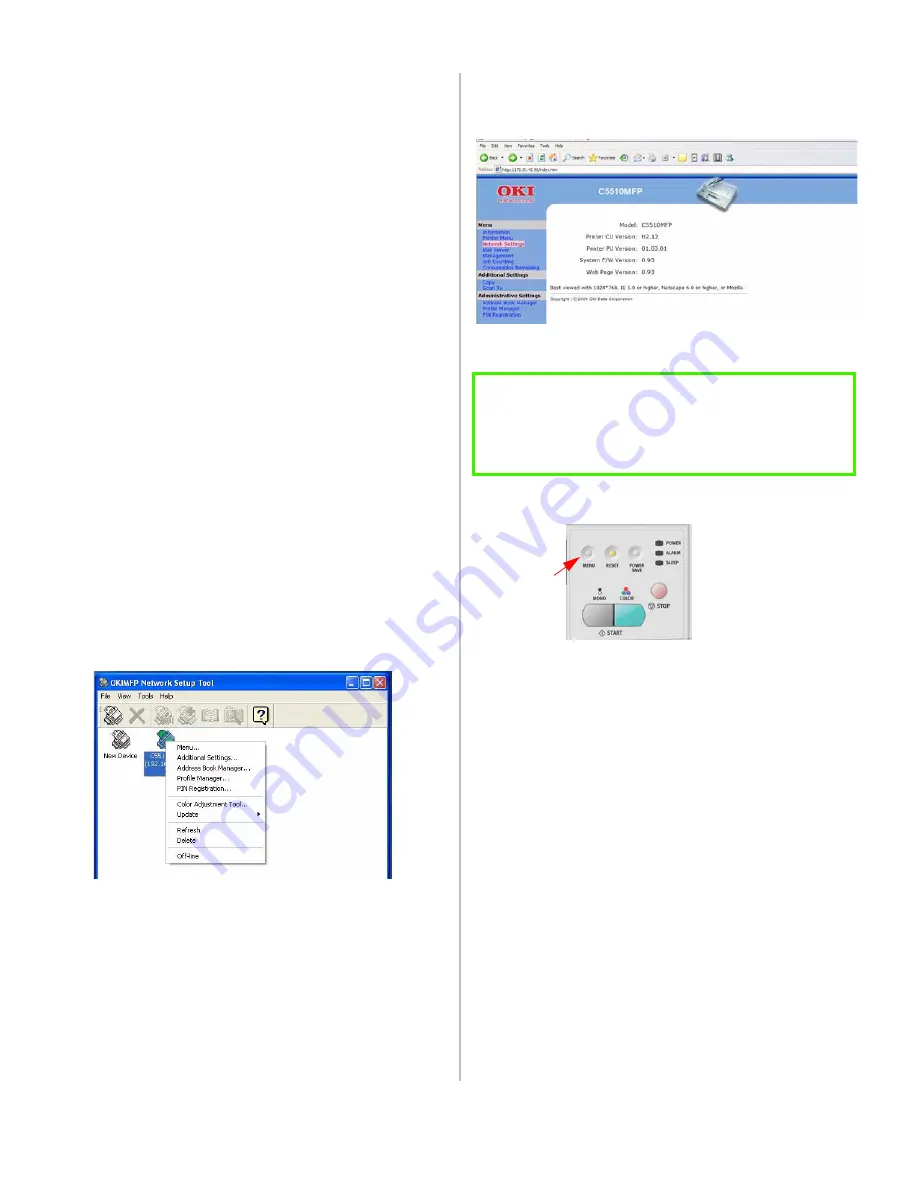
 1.  Click Start > Setting >  OKI MFP Network Setup Tool > 

OKI MFP Network Setup Tool

 2.  Double click on the 

New Device

 icon.

 3.  Enter the IP Address. 

 4.  Right-click the 

C5510 MFP 

icon when it appears to open 

the program.

 5.  Use the OKI Management Utility (OKIMFP Network Setup 

Tool) to define parameters for TCP/IP, SMTP and POP3 
protocols. Then use it to manage your network connected 
MFP, including the address book, profiles, color adjustment 
and LDAP Management tools.  Click on the utility’s HELP 
tool for more information.

Configurating From the Web Page

 1.  Type the IP address of the MFP in the URL field of your 

browser and then press 

Enter

. The MFP web page appears. 

.

 2.  Click 

Network Settings

 and enter the relevant values.

Configurating From the Control Panel

 1.  Press 

Menu

 on the Control panel. This prompts the 

following menu items on the LCD display.

•  Printing Unit Menu

•  Network Settings

•  Mail Server

•  Report Print

•  Management (

This selection will be blocked by an 

administrator password

.

 The machine is shipped without 

a specific password. It is recommended that the 
administrator create a new password to ensure security.

)

 2.  Use the 

Down

 key to scroll to each item. The setup 

parameters are located in the Network Settings and Mail 
Server items. Use the 

Select 

key to select your desired item.

Note: for additional menu information and a description of 
each menu item, see the on-line User’s Guide.

NOTE!

Administrative Settings are blocked by a password. We 
recommend that the system administrator create a 
password since the machine is shipped without one.

Summary of Contents for C5510n MFP

Page 1: ......

Page 2: ......

Page 3: ...ws Minimum Configuration Requirements 13 Pre Installation Information 13 Internet Communication Features 13 Setting the IP Address 13 Installing Drivers and Network Software 14 Configuring Your MFP Configuring from the OKI Management Utility OKI MFP Network Setup Tool 15 Configurating from the Web Page 15 Configurating from the Control Panel 15 Additional Network Software 16 Faxing 16 Profiles 16 ...

Page 4: ...omponents are included If any item is missing contact your dealer immediately NOTE A note provides important information to supplement the main text CAUTION A caution provides additional information which if ignored may result in equipment malfunction or damage WARNING A warning provides additional information which if ignored may result in a risk of personal injury NOTE In order to send faxes on ...

Page 5: ...r the MFP when the scanning unit is attached 3 Make sure the printing unit and the support bracket are aligned and firmly in place 4 Remove the orange transport restraints from the scanning unit mounts To do this first release the tape Then turn the locking knob counterclockwise to release the restraint and pull it out NOTE Do not remove the orange paper band extending from inside the printing uni...

Page 6: ...tion the scanning unit on the mounting posts on top of the printing unit 5 Turn the locking knobs clockwise to lock the scanning unit in place Unlock the Scan Mechanism 6 Locate the scan lock switch on the left side of the machine 7 Lower the cover and move the lock switch to the unlocked position Close the cover 1 2 CAUTION The scan mechanism is locked during transport to prevent damage Be sure t...

Page 7: ... the computer cable Connect one end of the USB cable long cable to the USB port on the scanning unit DO NOT connect the other end to your computer Complete the connection only after installing the driver Connect the scanning unit power adapter 1 To mount the power adapter box to the back of the scanning unit position the clip on the back of the box on the scanning unit frame as shown then slide th...

Page 8: ...EPARING THE IMAGE DRUM TONER CARTRIDGES 1 Press the cover release button and lift the top cover 2 Carefully lift the black toner drum cartridge out of the printing unit 3 Unwrap the protective sheet and place the cartridge on a flat work surface IMPORTANT NOTE Do not turn power on scanning unit or printing unit CAUTION The green image drum surface at the base of the cartridge is very delicate and ...

Page 9: ...ow 5 Carefully place the toner drum cartridge back into the printing unit 6 Push the blue lock lever towards the back of the unit as far as it will go This unlocks the toner cartridge to release toner into the image drum 7 Repeat steps 2 to 6 with remaining toner drum cartridges C M Y ...

Page 10: ...ctions printed on the orange band 2 Remove the orange band Press firmly on the blue lock 1 to release the orange transport restraint 2 Pull the restraint out in the direction of the arrow 3 Press firmly on both sides of the cover to close it 1 2 ...

Page 11: ...Pull out the paper tray 2 Remove the transport restraint by pulling downward then out 3 Adjust the rear 1 stopper and paper guides 2 to the size of paper being used Do not overload 4 Load the paper 5 Close the paper tray ...

Page 12: ...urn scanning unit power on Wait until the Power Ready LED illuminates solid green on the printing unit status panel Turn scanning unit power to the position IMPORTANT NOTE Do not turn the scanning unit power on until the Power Ready LED is illuminated on the printing unit status panel ...

Page 13: ... format then transmitted to remote recipients simultaneously as an e mail attachment Scan to FTP Deliver your scanned document via the intranet The MFP allows you to save scanned documents directly to a designated server or a personal computer on the network Setting the IP Address An IP address is required to install the drivers If you are using DHCP the IP address will automatically be detected I...

Page 14: ...stalled connect the USB cable to your computer Choose Custom Install if you want to select and install each software tool These main selections include the the core software plus additional software to support key MFP applications Move the cursor over each main choice button to see a list of the software tools included 1 Check to be sure the USB cable is not connected to your computer 2 Click Cust...

Page 15: ...on the utility s HELP tool for more information Configurating From the Web Page 1 Type the IP address of the MFP in the URL field of your browser and then press Enter The MFP web page appears 2 Click Network Settings and enter the relevant values Configurating From the Control Panel 1 Press Menu on the Control panel This prompts the following menu items on the LCD display Printing Unit Menu Networ...

Page 16: ...ows the client to monitor the selected MFP s status Faxing To fax documents scanned from your MFP you must have a fax modem installed in your computer You can use your favorite program to set up and send faxes Or if you are using Windows 2000 or Windows XP you can set up the Microsoft Fax utility To do this Click Start Printers Faxes Setup Faxing Follow the setup instructions Profiles Before sendi...

Page 17: ... the glass 1 Open the document s cover to reveal the glass 2 Place your document s with the text FACE DOWN on the glass and align the document s in the upper left corner 3 Close the document cover Loading the Paper Cassette Tray Recommended Paper weight 17 to 32 lb 1 Remove the paper tray from the printer 2 Fanthepapertobeloadedtoensureallsheetsareseparated 3 Load the paper into the paper cassette...

Page 18: ... Press Scan to Mode key Choose your e mail address from the Address Book i e Press to send your document in B W Press to send your document in color Press Scan to Mode key Choose your desired destination from the FTP Address i e Press to file your document in B W Press to file your document in color Quick Operation ...

Page 19: ...de s on the supplied CD for expanded information on using your MFP The Handy Reference Guide The HELP files available with the utility programs For Assistance If you need further assistance or have questions See our web site www okidata com U S Canada Call 1 800 654 3282 1 800 OKI DATA 24 hours a day 7 days a week ...

Page 20: ...ta com Oki Data Americas Inc 2735 Matheson Blvd East Unit 1 Mississauga Ontario L4W 4M8 Canada Télép 1 800 654 3282 Téléc 1 905 238 4421 www okidata com Oki is a registered trademark of Oki Electric Industry Company Ltd Microsoft and Windows are registered trademarks of Microsoft Corporation 59371402 2005 Oki Data Americas Inc ...

Reviews: