


OKAYO® C 7191 DVD CD USB MP3 Playback Module
OKAYO® C 7191 DVD CD USB MP3 Playback Module
Page 7
Page 6
16. GOTO: Press to activate the track status bar (same as pressing DIS button). Using the cursor controls to
move along the bar, set the track number and the starting time in the track at which point you wish to com-
mence playback. Then press ENTER to confirm, and the player will immediate skip to that point in the
chosen track to start playing.
17. DVD MENU NAVIGATION CONTROLS: Allows up, down, left, right navigation of DVD menus, plus confirmation
of selection via ENTER button.
18. TITLE: Only works with a DVD inserted in the player. Press this button to display the DVD title content or to
play from the first title on the disc.
19. SETUP: While not playing any media (i.e. in STOP condition), press this button and the screen will display the
SETUP menu. Use the cursor controls to move between the different submenus and parameters, and use
the numbers to enter data. Follow the prompts to exit or press SETUP button again. See SETUP MENU
instructions below.
20. KEY: Use these buttons to adjust the pitch of the audio output - LO – reduce pitch by steps, HI – raise pitch
by steps, NOR – returns pitch to normal.
21. MENU: Press this button to recall the main menu screen of a DVD. From here, use the cursor to select
options for playback.
22. ZOOM: When playing a DVD or VCD, press this key to enlarge a picture in a cycle as follows: 2×
→
3×
→
4×
→
1/2×
→
1/3×
→
1/4×
→
zoom off.
Important Notes:
1. ‘Invalid Key’ error message can appear on the TV screen when certain buttons are pressed during play-
back, in which instance those functions are not available. The same buttons may work when pressed in
different modes of operation.
2. The C7191 module does not turn itself off. If left with no media to play, it will simply shift into screen
saver mode. Screen Saver engages when no media is inserted while the device is switched on. There is
no power on/off button on the remote control, only on the front panel of the device.
PROGRAM OPERATION
This function will operate with ordinary music tracks
(WAV or MP3 files) or photos from a CD, USB or
SD/SDHC card.
• Press PROG and the TV screen displays this
menu, as below in Fig. 5.
• Choose a track number to enter into the ‘1.[ ]’
field, and then another track for the ‘2.[ ]’ field
and so on until you have chosen all your songs or
slides to play in the order you prefer
(i.e. 1, 2, …16 as per the menu).
• Then select ‘PLAY’ to start playing the programmed
tracks/photos, select ‘CLEAR’ to cancel the entire program playlist.
1. [ 09 ]
2. [ 16 ]
3. [ 02 ]
4. [ 08 ]
5. [ -- ]
6. [ -- ]
7. [ -- ]
8. [ -- ]
9. [ -- ]
10. [ -- ]
11. [ -- ]
12. [ -- ]
13. [ -- ]
14. [ -- ]
15. [ -- ]
16. [ -- ]
PLAY
CLEAR
FIGURE 5. TRACK PROGRAMMING SCREEN
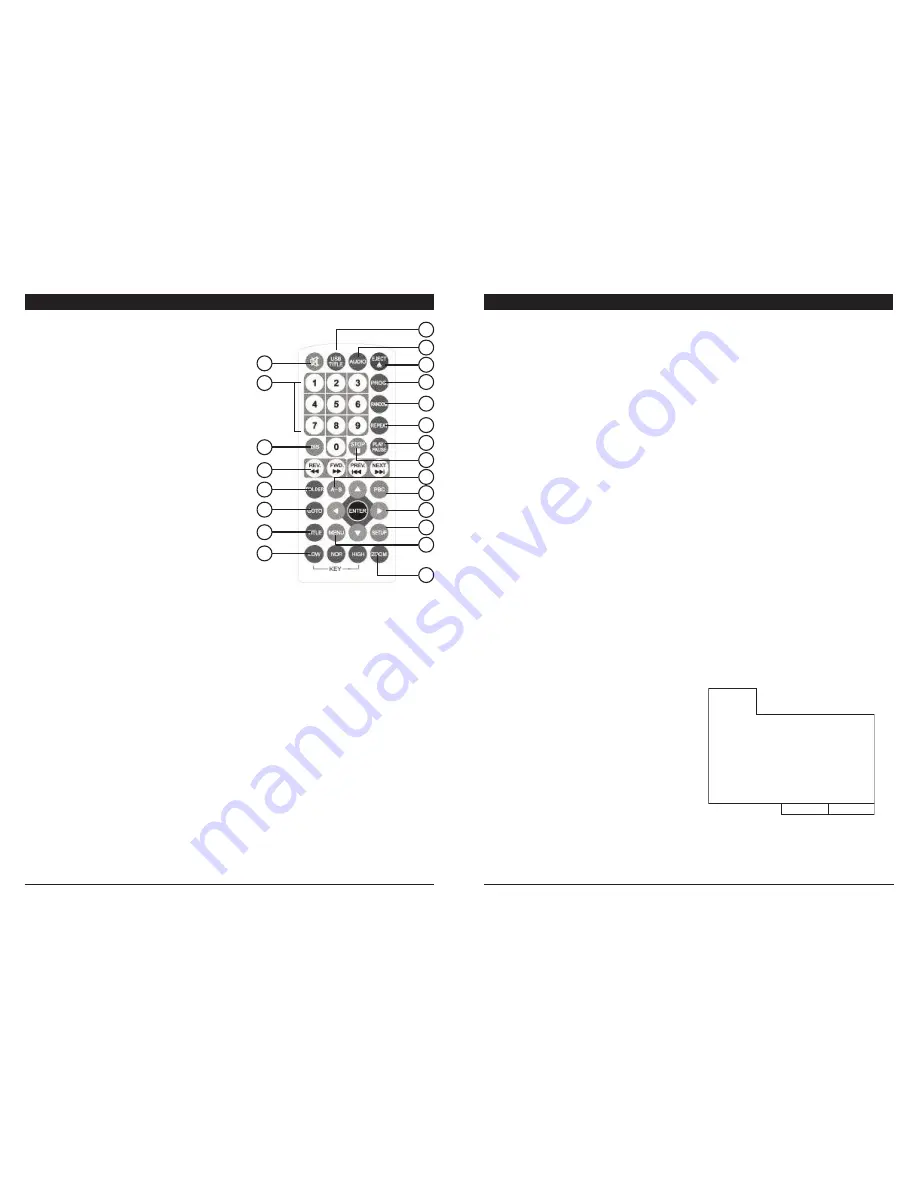
REMOTE CONTROL FUNCTIONS
1. MUTE: Press to turn the audio volume off or on.
2. SUBTITLE: Press this button to select and display the
subtitles in DVD or VCD where available.
3. AUDIO: Stereo, Left-Mono, Right-Mono, Mix-Mono settings
for audio output.
4. 0~9 NUMBERS: These keys are used to input time,
track, and chapter numbers.
5. EJECT: Press to stop playing and eject the disc from the
player. This function will also stop playback from SD card
or USB & return to DISC mode.
6. PROG: Press to activate the On-Screen-Display (OSD)
menu from which to choose tracks to play in a set order.
(see program operation - page 7)
7. RANDOM: A random selection is played from available
tracks. RANDOM can also work in conjunction with
REPEAT (i.e. you can repeat a playlist in a different ran-
dom order, over and over again). RANDOM will appear
on screen briefly when pressed.
8. REPEAT: Repeat mode. Not available in VCD mode. See
repeat operation, page 8.
9. PLAY / PAUSE: When playing a song, press once to
pause and press again to resume playback. ‘PLAY’ or
‘PAUSE’ will appeare on the TV screen briefly when pressed.
10. DIS: Displays a bar on the top of the screen showing the status of the track playing – source input, track num-
ber, mute on/off, repeat setting, time counter. Press once to display the track playback time elapsed (T).
Press again to display the time remaining for that track (C). Press again to display the playback time elapsed
for the entire CD (if playing a CD). Press a fourth time to display the time remaining on the CD. Press a fifth
time to cancel the DIS function. NOTE: A USB or SD Card is given the status source name of ‘CD ROM’ on
screen, DIS function will cycle through two stages in this mode.
11. STOP: Press the button to stop playback. See full description of STOP function on page 8.
12. TRANSPORT CONTROL BUTTONS:
REV/FWD: Press once to activate fast rewind/forward at 2x speed. Press again to activate increase speed
– 4x, 8x, 20x. Then press PLAY/PAUSE to resume playback at normal speed.
PREV/NEXT: Skip to previous/next track or chapter.
13. A-B: This button sets the section playback memory function. While playing a track, press A-B once to set
point A. Press A-B again to memorize point B point. The track will now play in a loop between those to
marked points. ‘A-B’ will appear on TV screen when pressed. Press A-B again to cancel.
14. FOLDER: When playing tracks from a CD/USB/SD Card containing MP3s, press this button to select a folder
on that media. This function will only work if there are folders other than the root directory on that media.
15. PBC: To choose whether to play the optional catalog of VCD. When PBC is OFF, the REPEAT function will
operate.
4
1
2
3
5
6
7
8
9
11
10
12
14
16
18
20
22
19
21
17
13
15
FIGURE 4. REMOTE CONTROL


