background image

4

ofs.com

imagine a place®

800.521.5381

Assembly instructions

E5 BOA assembly

Materials

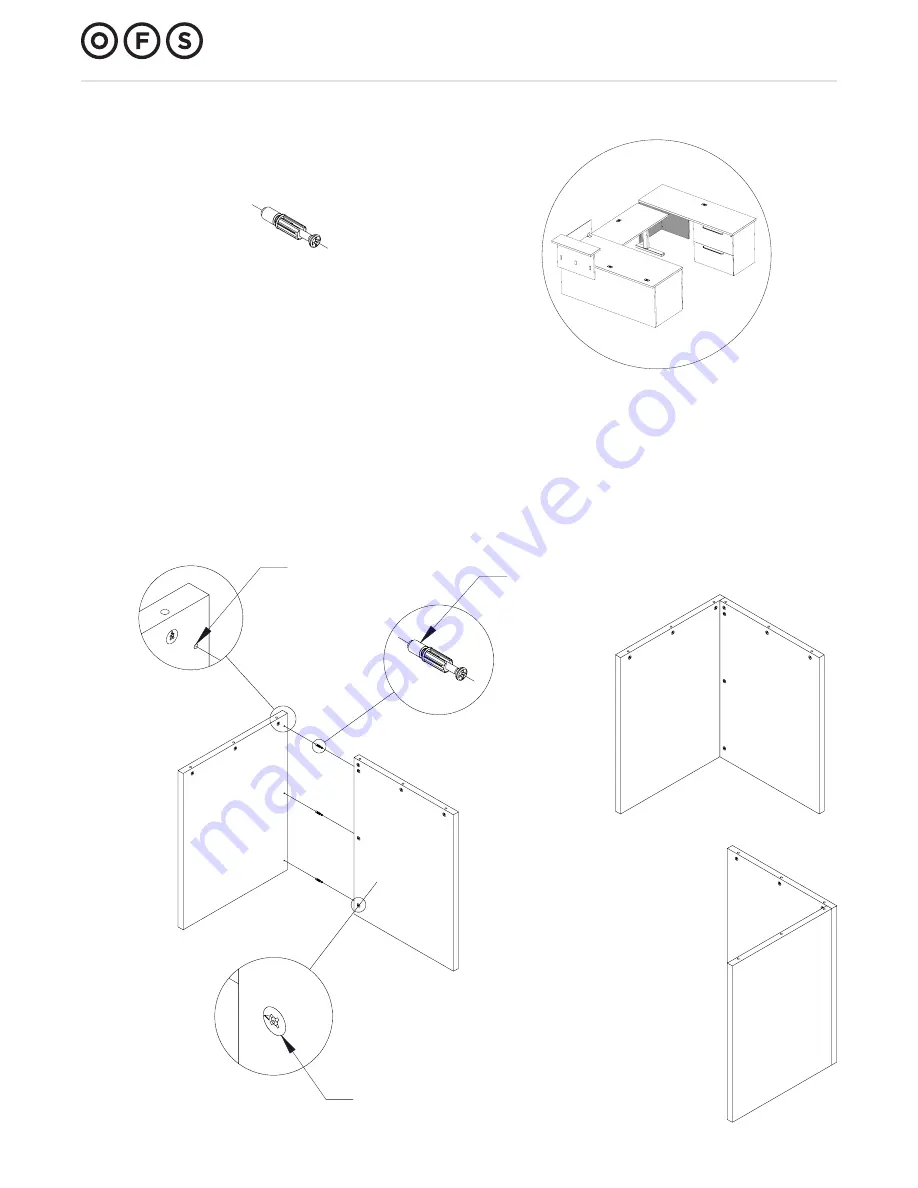
Wing end assembly

Unpack both panels of wing end (E5-7224CR). 

Note: Wing end panels are to be used together, not as individual end panels.

1. 

Locate HK-108, will have three of these kits. Only need one of them for the panels.

2.  Install mini-fix bolt into pre-drilled locations.

3.  Slide panel together and rotate mini-fix cam clockwise to tighten the panels together.

HK-108

Mini-fix bolts
Quantity: 1 of 3

Pre-drilled hole 
for mini-fix bolt

HK-108, Qty: 3  
of mini-fix bolt

Detail B

Detail C

Detail D

Mini-fix cam. Triangle on cam must be pointing 
towards the mini-fix bolt to put together.

Assembled wing end  

for the user right side

Assembled wing end  

for the user left side

Summary of Contents for Edward Jones BOA

Page 1: ...Edward Jones BOA assembly...

Page 2: ...embly 3 Wing end assembly 4 Worksurface assembly 5 Credenza assembly 6 Assembled credenza view 7 Height adjustable bridge assembly 8 Main worksurface assembly 9 Back and end panel assembly 10 Desk ass...

Page 3: ...ach worksurface 4 Re install drawer front pulls facing outward 5 Level the pedestal INSTRUCTIONS DETAIL A SCALE 1 2 SHIPPING KEY HK 15 QTY 8 OF 8 X 1 5 QUAD PAN HEAD SCREWS UNPACK POSITION LATERAL FIL...

Page 4: ...eed one of them for the panels 2 Install mini fix bolt into pre drilled locations 3 Slide panel together and rotate mini fix cam clockwise to tighten the panels together HK 108 Mini fix bolts Quantity...

Page 5: ...will need two of them 2 Install mini fix bolts into pre drilled holes The worksurface has holes for a left or right configuration so be sure the bolts are in the right set of holes HK 108 Mini fix bol...

Page 6: ...2 SHIPPING KEY HK 15 QTY 8 OF 8 X 1 5 QUAD PAN HEAD SCREWS UNPACK POSITION LATERAL FILE PEDESTAL E5 3022MFC NEAR FINAL LOCATION REMOVE RED SHIPPING KEY INSTALL CORE KEY LOCATED INSIDE THE PEDESTAL LO...

Page 7: ...fs com imagine a place 800 521 5381 Assembly instructions E5 BOA assembly Assembled credenza view Right pedestal credenza assembled Left pedestal credenza assembled 2 0625 Overhang from back of pedest...

Page 8: ...orksurface by aligning the holes on the control box to the pre drilled holes on the worksurface Use screws from HK 11 8 x 625 quad flat M6 x 12mm Bolts Quantity 12 M6 1 0 x 16mm Bolts Quantity 8 HK 71...

Page 9: ...e into the mini fix cams on wing end Rotate mini fix cam CLOCKWISE to tighten the worksurface to wing end 3 Secure worksurface to pedestal with screws HK 15 Screws start from the underside of the case...

Page 10: ...l MOD EZ bolt into the pre drilled holes on the back panel There are two different sets of holes only use one set 3 Slide end panel onto back panel The MOD EZ bolt will slide into the MOD EZ clips on...

Page 11: ...et with screws to the back panel Pre drilled holes are on the back panel to locate the L brackets You will only use 4 sets of the holes not all 5 9 Save the left over screws of the HK 10 to attach the...

Page 12: ...ver any mini fix cams once everything is complete INSTRUCTIONS DETAIL A SCALE 1 2 SHIPPING KEY HK 15 QTY 8 OF 8 X 1 5 QUAD PAN HEAD SCREWS UNPACK POSITION LATERAL FILE PEDESTAL E5 3022MFC NEAR FINAL L...

Page 13: ...assembly Transaction counter assembly Step 1 Step 2 E5 TC Bracket on transaction counter slides onto the worksurface Once transaction counter is in desired location tighten the set screw to attach it...

Page 14: ...ions E5 BOA assembly Privacy panel assembly E5 PVPA 30 9 5 Must remove film that is over the suction cup tape before placing it on the worksurface Make sure the worksurface is clean before placing the...

Reviews: