


6
Operating Instructions and Parts Manual
24843
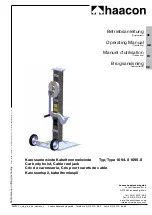
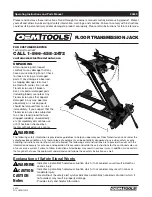
FLOOR TRANSMISSION JACK
Figure
Description
Quantity
24843-1 Saddle
1
24843-2 Bracket
1
24843-3 Handle
1
24843-4 Underframe
1
24843-5 Clamp Spring
1
24843-6 Pin
1
24843-7 Screw
3
24843-8 Spring Washer
2
24843-9 Drag Hook
1
24843-10 Bolt
2
24843-11 Wheel
4
24843-12 Nut
4
24843-13 Spring Washer
6
24843-14 Washer
4
24843-15 Pump
1
24843-16 Split Pin
1
24843-17 Bolt
6
24843-18 Spring Washer
8
24843-19 Screw
2
24843-20 Screw Base for Hook
2
24843-21 Hook
2
24843-22 Chain
2
24843-23 Screw
6
24843-24 Nut
2
24843-25 Washer
6
24843-26 Ring
2
24843-27 Angle Bracket
1
24843-28 Support
1
24843-29 Washer
3
08/14
2014 ©OEM-TOOLS
Note: Not all components of the Transmission Jack are
replacement items, but are illustrated as a convenient reference for
location and position in the assembly sequence.
Use caution when troubleshooting a malfunctioning jack. Stay
well clear of the supported load. Completely resolve all problems
before use. If the jack is malfunctioning, have a qualified technician
inspect and repair the jack before use. After the jack is repaired:
Test it carefully without a load by raising it and lowering it fully,
checking for proper operation.
ASSEMBLY
1. Connect an Angle Bracket (27) to each side of the Saddle (1)
using a Bolt (17) and Washer (18), and Nut (23).
2. Connect a Support (28) to each end of the Angle Bracket using
Bolt using a Bolt (17) and Washer (18), and Nut (23) on two of
the Supports and Hook Base (20) and Washer (18), and Nut
(23) on the remaining two.
3. Attach Chain (22) to Hook Base (20) using Hook (21) and Wing
Nut (19). Repeat for other Chain.