background image

50

Notes

Summary of Contents for TY-6300SD

Page 1: ...TY 6300SD 6 5 TOUCH SCREEN DISPLAY OPERATION MANUAL DVD MULTIMEDIA RECEIVER MULTIZONE P R E O U T S RCA 4V 3 A V iPod 3 5mm NAVIGATION READY...

Page 2: ...s 22 DVD Search Function 23 DVD Setup Menu Language 24 DVD Setup Menu Video 25 DVD Setup Menu Ratings 26 DVD Setup Menu Audio 27 DVD Setup Menu Speakers 28 DVD Setup Menu Surround I and II 29 CD DVD M...

Page 3: ...not remove the top or bottom covers of the unit Do not subject the unit to excessive shock Do not touch the liquid crystal fluid if the LCD is damaged or broken The liquid crystal fluid may be hazardo...

Page 4: ...protective circuit automatically stops play of the disc If this occurs allow the unit to cool before operating the player again If the temperature inside the vehicle is extremely hot or cold the CD p...

Page 5: ...on properly NEED HELP Call our Technical Service Hotline 1 877 305 8972 Wiring Diagram Optional A V Connections Installation Additional hardware and accessories may be required for installation such a...

Page 6: ...ss T to select desired parameter within each different mode Press to SEEK TUNE in Tuner Mode PIC Press and hold to adjust BRIGHTNESS and other picture parameters Press T or S to select desired paramet...

Page 7: ...usic iPod Selects iPod music mode Video iPod Selects iPod video mode Zoom Zoom in out on DVD image Audio Change audio language for DVD disc playback Chapter Track Down Previous chapter track Chapter T...

Page 8: ...de Fast Rewind Fast rewind DISC content Fast Forward Fast forward DISC content STOP Stop playback on other mode Previous Select the previous chapter track for playback Search an available radio statio...

Page 9: ...pen is set to OFF press to open or close the monitor or press OPEN on the remote Be careful not to not touch the monitor during the open close sequence If TFT Auto Open is ON when the unit is turned o...

Page 10: ...nitor to access main menu Press SCREEN Setup Touch to DIM TFT Touch to brighten TFT 0 to 20 is possible Touch ARROW to exit Default is 10 CVBS Screen Controls To access SHARPNESS CONTRAST COLOR TINT y...

Page 11: ...djust your audio system to meet the acoustical characteristics of your vehicle which vary on the type and size of vehicle To get the best sound quality be sure to adjust the settings of your speakers...

Page 12: ...Y A V INPUT mode Touch to access BLUETOOTH mode BLUETOOTH must be activated first Touch to STANDBY screen Rear Zone Touch to access the rear zone source menu Exit Rear Zone Touch the STANDBY button on...

Page 13: ...st AM HH MM See adjusting the clock for more details Clock Mode 12Hr 12Hr PM 6 00 24Hr 18 00 Camera Image Normal Normal Normal Image Reverse Mirror camera input image 180 Video Format Auto AUTO System...

Page 14: ...correct hour Touch arrow to EXIT setup If you desire 24Hr format select 24Hr from CLOCK MODE Touch OK Touch 00 00 area Enter correct minutes Adjusting the Clock Screen Setup Menu Press the SCREEN Setu...

Page 15: ...uch and hold point D Touch arrow to EXIT Settings De fault Options Function Brightness 10 0 to 20 Press the buttons on the remote or touch the or buttons on the screen or rotate the SMART DIAL to adju...

Page 16: ...ction Bass Freq 60 Hz 60Hz 80Hz 100Hz 130Hz 150Hz 200Hz Select the desired frequency to obtain the best bass effect Treble Freq 15KHz 10KHz 12 5KHz 15KHz 17KHz Select the desired frequency to obtain t...

Page 17: ...Page up PRESET Selection for LOCAL DISTANCE Page down PRESET Auto station SCAN button Up for MANUAL TUNE Down for MANUAL TUNE 1 2 3 4 5 6 7 8 9 10 Up for SEEK TUNE Down for SEEK TUNE Press AS PS Auto...

Page 18: ...current band pausing for 5 seconds at each station Press SCAN again to cancel LOC DX Radio Station Touch LOC button on the TFT to activate LOC DX when the LOCAL function is on LOC will appear only rad...

Page 19: ...South Pacific Ocean Islands Oceania Region 5 Russia Mongolia India Middle Asia Eastern Europe North Korea North Africa North West Asia DVD Region Management Some DVD discs can be played only in certa...

Page 20: ...rking Brake Scenario 1 First situation is while driving Stop vehicle put in Park make sure PARKING BRAKE is off released Depress PARKING BRAKE for 2 to 3 seconds Release PARKING BRAKE for 2 to 3 secon...

Page 21: ...e disc will eject and normal operation should resume Hidden Touch Screen area while in DVD mode Areas A F can be used in DVD mode to access A MAIN menu access B Displays DVD track information C Select...

Page 22: ...ea of disc to repeat Press the Repeat A B button to set a start point of the A selection Press the A B button again once you reach the desired end point B of the repeated section the selected portion...

Page 23: ...disc recorded in multiple languages press the AUDIO button on the IR remote to choose your desired language You can also touch AREA E and use the button to change languages Changing Subtitle Language...

Page 24: ...select desired disc menu language ENGLISH DEFAULT Indicates current source playing Indicates that the fourth of sixteen title on the DVD is currently playing Indicates that the first of twenty chapte...

Page 25: ...r Press DVD Setup to access the DVD setup menu Press VIDEO icon to select from the following menus TV Shape Press to select desired TV Shape Angle Mark Press to select desired Angle Mark Video Mode Pr...

Page 26: ...ATING icon to select from the following menus Enable Parental Lock Password Press to enter a your desired password Setting Parental Lock Password Enter a 4 digit code Write the code down Save in a saf...

Page 27: ...ult On DVD Setup Menu Audio Audio Setup Menu With the unit in DVD mode press Area A to display the MAIN menu Press DVD Setup to access the DVD setup menu Press the AUDIO button to access the following...

Page 28: ...od bass output None Use when rear speakers are not present Subwoofer None Present Use when subwoofer is present None Use when subwoofer is not present Center None Large Use when center speaker has goo...

Page 29: ...djust the sound stage either towards the front or towards the rear Panorama Mode Off Default On Panorama ON extends the front stereo image to include the surround speakers for a wrap around effect Cen...

Page 30: ...folder Valid characters for folder file names are letters A Z all caps numbers 0 9 and _ underscore Some characters may not be displayed correctly depending on the character type This device can play...

Page 31: ...e Touch to activate deactivate RANDOM mode Touch to access the DIRECT TRACK access keypad Touch to SCAN CD tracks for 5 sec each track touch again to deactivate 1 2 3 4 5 6 7 8 Touch to FAST FORWARD c...

Page 32: ...c playback Touch to STOP disc playback Touch to PAGE down Touch to PAGE up Touch to PREVIOUS FOLDER Touch to NEXT FOLDER 1 2 3 4 5 6 7 8 9 10 Touch to FAST FORWARD MP3 tracks touch PLAY to deactivate...

Page 33: ...c playback Turn to previous page Turn to next page Display previous folder 1 2 3 4 5 6 7 8 9 Display next folder Fast forward current track Activate deactivate Repeat Single Mode Activate deactivate R...

Page 34: ...FORWARD current song Touch to SCAN SONGS for 5sec each SONG touch again to deactivate 1 2 3 4 5 6 7 8 9 10 11 Touch to wait for iPod VIDEO or PHOTO Touch to activate deactivate REPEAT Single mode Touc...

Page 35: ...d Make sure the following options through the iPod video settings menu are set to TV Out ON Signal NTSC and Widescreen ON Touch VIDEO icon Press PLAY on your iPod video should now appear on the Monito...

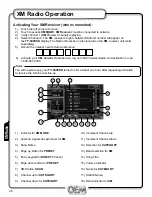
Page 36: ...tivation or call 1 800 967 2346 1 2 3 4 5 17 1 3 15 16 9 10 13 12 11 8 7 18 2 6 4 5 14 You will need to keep your TY 6300SD turned on for at least one hour after requesting activation to receive the f...

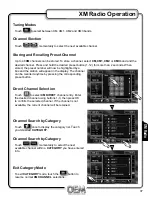
Page 37: ...tation will appear in the display The channel can be recalled anytime by pressing the corresponding preset button Direct Channel Selection Touch to select XM DIRECT channel entry Enter the desired cha...

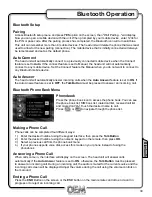
Page 38: ...ator is blue 1 2 3 4 Press 0 9 and to enter phone number on the Keypad Interface Press C to clear the last digit Press to transfer audio between the head unit and mobile phone Press to END a call in p...

Page 39: ...the Talk Button must be pressed to answer an incoming call Bluetooth Phone Book Menu Phonebook Press the phone book icon to access the phone book You can see the phone book list SIM book list dialed c...

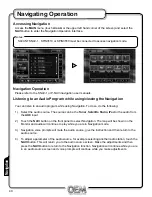
Page 40: ...e NAVI button on the front panel to select Navigation The map will be shown on the Monitor and audio will continue to play while you are in Navigation mode Navigation voice prompts will mute the audio...

Page 41: ...ight driving press STANDBY The monitor screen will black out however all other operations continue to operate Press any button except VOLUME or touch the screen again to return to normal viewing 1 2 3...

Page 42: ...OWN icon will tune the radio to a lower frequency by one frequency step 1 2 3 4 5 6 7 8 Touching the PRESET SCAN AUTO STATION STORE button will scan through all presets in the current band Holding thi...

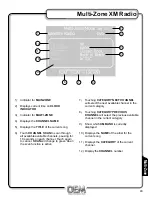
Page 43: ...seconds on each channel Touch again to cancel SCAN will change to green when the scan function is active 1 2 3 4 5 6 Touching CATEGORY NEXT CHANNEL will select the next available channel in the curren...

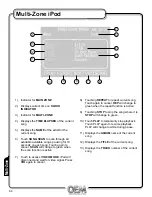
Page 44: ...n function is active Touch to access VIDEO MODE iPod will disconnect and wait for video signal Press VID again to cancel 1 2 3 4 5 6 7 Touching REPEAT to repeat current song Touch again to cancel REP...

Page 45: ...ry serial number bar code label s or markings Service performed by an unauthorized person company or association Any product which has been adjusted altered or modified without SAVANT MOBILE AUDIO S c...

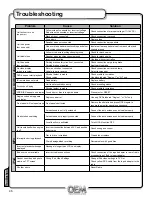
Page 46: ...mounted correctly Check mounting sleeve Physical defect in media Check media for scratches ERR DISC appears on display Focus error or disc is in upside down Press eject or RESET Region code error appe...

Page 47: ...only be connected to one device at a time Disconnect current mobile device first then connect the desired mobile device ERROR Connect Timeout appears on display The time limit for the pairing mobile...

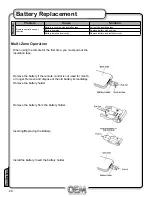
Page 48: ...incorrectly Remove battery and install correctly Remote Multi Zone Operation When using the remote for the first time you must pull out the insulation tape Remove the battery if the remote control is...

Page 49: ...49 Notes...

Page 50: ...50 Notes...

Page 51: ...channels at 4 ohms and 1 THD N Signal to Noise Ratio 80dBA reference 1 watt into 4 ohms Printed in China Copyright Notes This product incorporates copyright protection technology that is protected by...

Page 52: ...OE RADIO Toll Free 1 877 305 8972 www oeradio com 2007 PRIORITY AUDIO All rights reserved...

Page 53: ...OBluetooth 3 o m r m z o z m n o 3 J m r OBluetooth 3 o m r m z o z m n o 3 J m r...

Page 54: ...ok Received v v v v v v v v v v v v v v v v x x v V x Missed call v v v v v v v v v v v v v v v v v Sony Ericsson NOKIA K610i K618i K800i W880i M600i K700i Z800i S700i W550i Z600 T68 T68i T610 5300 N7...

Page 55: ...patibility list or your cell phone s user manual to make sure the cell phone supports this function Motorola Panasonic Sharp Siemens Dopod Samsung LG V600 V501 V3 K1 V3x A1200 E398 X88 GX T15 WX T71 S...

Page 56: ...Pod NOT INCLUDED o D I I I 01I iPodCABlE INCLUDeD L XMCables INCLUDeD VIDEO GAME NOT INCLUDED iNPOR TADAPTER INCLUDED AM FM ANTENNA OPTIONAL t I BACKUP CAMERA RED RED YELLOW WHITE YELLOW YELLOW I WHIT...

Page 57: ...ION CARD This form or online form must be completed by an Authorized OEM RADIO Dealer PLEASE PRINT Name Address City _ Daytime Phone State Zipcode _ Radio Model Serial Purchased Where Purchase Date Ve...

Page 58: ...service please contact us at 1 877 305 8972 or email atinfo oeradio com Register Online at WWW OERADIO COM Click on Product Registration under T er n ef m b lJPI d Y n r r 09 D r nnaire TEAR APART HE...

Reviews: