P
Q
Cut Your
Tube
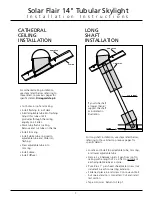
• Measure distance from
the top of flashing to ceiling.
(Diagram O)
to determine
proper trimming of tubes.
Refer to “Cut Your Tube
Chart” for cutting
recommendations.
• Slide wide end of
extension tube over the
outside of lower adjustable
tube. Slide the narrow end
of the extension tube up
into upper adjustable tube.
• Tape ALL seams securely
with foil tape to keep
dust, moisture, and insects
out of the tube.
(Diagram P)
• Install the flat ceiling
diffuser. Align the
diffuser with the three
tabs on the trim ring and
turn clockwise until snug
in place.
(Diagram Q)
chart:
installation
complete
10
IN
THE
ATTIC
11
INSIDE
THE
ROOM
Solar Flair 14" Tubular Skylight
I n s t a l l a t i o n I n s t r u c t i o n s
TUBE OVERLAP
DISTANCE FROM
TOP OF
FLASHING TO
FACE OF CEILING
(take longest
measurement)
Less Than
15”
Measure and
cut adjustable
tube.
(See short shaft
installation)
Less Than
30”
Cut both
adjustable
tubes to fit.
Assemble with
a band of
connecting
tube. Cut for
1” overlap at
each end.
< 48”
< 30”
< 15”
> 48”
Less Than
48”
Use 20”
connecting
tube
to assemble.
Cut for 1”
overlap at
each end.
Greater
Than 48”
Use a
combination
of extension
tubes for
shafts.
Cut for 1”
overlap at
each end.
Greater
Than 72”
See long
shaft
installation.
6
tip:
When trimming extension
tubes,
ALWAYS MEASURE AND
START FROM THE WIDE
END WHERE TUBE
DIAMETER = 14”.
When extension tube is
sized correctly, remove
backing paper from
adhesive strip on edge
of extension tube.
Beginning at one end of
the extension tube, over-
lap the edges of the tube,
aligning the edge of the
tube along the crimp in
the other edge.
(Once contact is made
with adhesive strip, parts
cannot be repositioned.)
O


