background image

PLB3 USER MANUAL

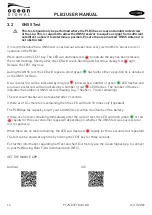
16 

912S-03718 v01.00 

14/11/2022

5. 

LIFE JACKET INSTALLATION

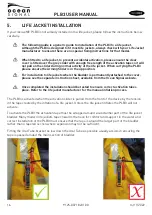
If your rescueME PLB3 is not already installed into a life jacket, please follow the instructions below 

carefully. 

!


The following guide is a generic guide to installation of the PLB3 to a life jacket. 

Although the PLB3 is designed to fit most life jackets, always check with your Life Jacket 

manufacturer to ensure there are no special fixing instructions for that model.

!


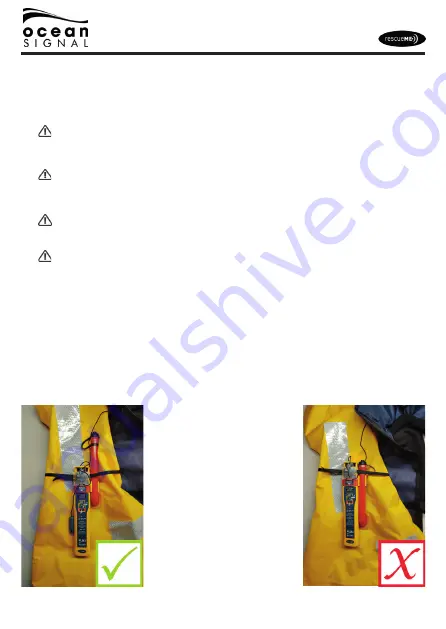
When fitted to a life jacket, to prevent accidental activation, please ensure the clear 

cover is fitted over the grey slider with enough free length of the activation tape so it will 

not pull on the slider during normal activity of the life jacket.  When carrying the PLB3 

please ensure the Arming Slider is in the up position.

!


For installation to life jackets where the bladder is permanently attached to the cover, 

please see the separate instruction sheet, available from the Ocean Signal website.

!


Once completed the installation should be tested to ensure correct activation takes 

place. Refer to the life jacket manufacturer for the manual inflation process.

The PLB3 is activated when the activation slider is pulled from the front of the device by the tension 

in the tape created by the inflation of a life jacket. Unless the life jacket inflates the PLB3 will not 

activate.

To activate the PLB3 the activation tape must be wrapped around a substantial part of the life jacket 

bladder. Many modern life jackets taper towards the neck for comfort and support in the water and 

correct installation of the PLB3 must ensure that the tape is around the larger part of the bladder 

rather than a tapered section where expansion may not be sufficient.

Fitting the Oral Tube bracket as low down the Oral Tube as possible usually assists in ensuring the 

tape is passed around the main section of bladder.

Summary of Contents for rescueME PLB3

Page 1: ...User Manual www oceansignal com English Personal Locator Beacon with AIS and RLS PLB3 OWNER DETAILS Name Organisation CONTACT Tel Email ...

Page 2: ...change specifications and other information contained in this manual as part of our continual improvement process No part of this manual may be reproduced stored in a retrieval system or transmitted in any form electronic or otherwise without the prior permission of Ocean Signal Ltd No liability can be accepted for any inaccuracies or omissions in this manual Ocean Signal and rescueME are register...

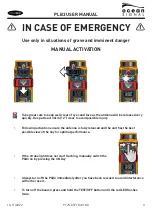
Page 3: ... 12 clear to avoid possible injury Following activation ensure the antenna is fully released and the unit has the best possible view of the sky for optimal performance If the strobe light does not start flashing manually switch the PLB3 on by pressing the ON Key Always turn off the PLB3 immediately after you have been rescued to avoid interference with other users To turn off the beacon press and ...

Page 4: ... False Alerts 12 3 TESTING 12 3 1 Functional test 13 3 2 GNSS Test 14 4 BEACON REGISTRATION 15 4 1 Advice to owners of Personal Locator Beacons PLBs 15 4 2 Country Specific Registration information 15 5 LIFE JACKET INSTALLATION 16 5 1 Remove the Activation Slider 17 5 2 Securing the Activation System 17 5 3 Attach the tape to the Activation Slider 18 5 4 Insert the Activation Slider 19 5 5 Attach ...

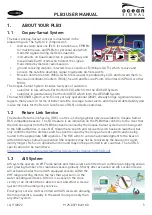
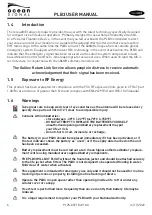
Page 5: ... Return Link Service RLS is a free of charge global service available to Cospas Sarsat RLS compatible beacons The RLS feature is an indication on the PLB3 that confirms to the User that the distress signal from the PLB3 has been localised by the Cospas Sarsat system and is being sent to the SAR authorities It does NOT mean that a search and rescue mission has been launched but only confirms that t...

Page 6: ...omplies with EN62479 EU and RSS 102 Canada 1 6 Warnings Take great care to keep well clear of eyes and face as the antenna will be released very quickly Keep at least 30cm 12 clear to avoid possible injury Contains Lithium batteries store between 30 C 22ºF to 70 C 158ºF DO NOT ATTEMPT TO REPLACE THE BATTERIES YOURSELF unauthorised opening and battery replacement may put your life at risk do not sh...

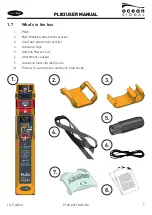
Page 7: ... s in the box 1 PLB3 2 Belt Webbing attachment bracket 3 Oral Tube attachment bracket 4 Activation Tape 5 Antenna Rewind Tool 6 Attachment Lanyard 7 Activation Slider Armed Cover 8 Product Documentation and Quick Start Guide PLB3 USER MANUAL 1 2 3 4 5 6 7 8 ...

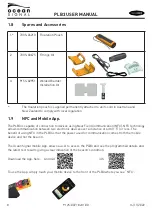
Page 8: ...devices using Near Field Communication NFC NFC technology allows communication between two electronic devices over a distance of 4cm 1 5 or less The benefit of using NFC in the PLB3 is that the power used for communication comes from the mobile device and not the beacon The Ocean Signal mobile App allows a user to access the PLB3 and see the programmed details and the latest test results giving a ...

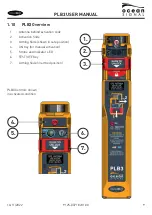
Page 9: ...verview 1 Antenna behind activation slide 2 Activation Slide 3 Arming Slide shown in safe position 4 ON Key for manual activation 5 Strobe and Indicator LED 6 TEST OFF Key 7 Arming Slide in armed position PLB3 Controls shown in activated condition 1 2 3 4 5 6 7 ...

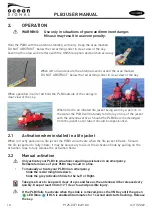
Page 10: ...ecome dislodged from the jacket s oral tube it should be repositioned 2 1 Activation when installed in a life jacket When correctly packed in a life jacket the PLB3 will activate when the life jacket inflates Should the life jacket fail to fully inflate it may be necessary to assist the Activation Slide by pulling on the Activation Tape to fully release the Activation Slide 2 2 Manual activation O...

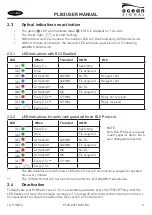
Page 11: ... 2 5 s 121MHz Reply received x1 Every 2 5 s 2 3 2 LED Indications for units configured with non RLS Protocol LED When Transmit GNSS x1 Every 5 s Searching x3 Once Fix acquired x5 At transmit 406MHz No Fix x5 At transmit 406MHz Fix acquired x8 At transmit AIS No Fix x8 At transmit AIS Fix acquired x1 Every 2 5 s 121MHz x1 Every 2 5 s The AIS transmissions will show as 8 flashes 1 every 2 seconds as...

Page 12: ...the PLB3 is accidentally activated it should be immediately turned off If the unit was active for more than 30 seconds the nearest Coast Guard Centre or Rescue Coordination Centre should be contacted to explain that the PLB3 has been activated in error and there are no follow up rescue actions required See inside the back cover for information required in the event of a false activation If appropr...

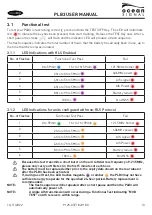
Page 13: ...ED Indications for units configured with non RLS Protocol No of Flashes Functional Test Pass Fail 1 0 to 59min 1hr to 1hr 59min 121 5MHz homer 2 2hrs to 3hrs 59min 406MHz power 3 4hrs to 5hrs 59min AIS signal 4 6hrs to 7hrs 59min AIS Power 5 8hrs to 9hrs 59min Battery failure 6 10hrs No GNSS Because this test transmits a short burst on the aircraft distress frequency of 121 5MHz please only carry ...

Page 14: ...cated by long red followed by a number of green LED flashes and an unsuccessful test will be indicated by a number of red LED flashes The number of flashes indicates the number of GNSS tests remaining e g 7 flashes 7 tests remaining The test result flashes will be repeated after 2 seconds If there are 10 or more tests remaining then the LED will flash 10 times only repeated The PLB3 has the capaci...

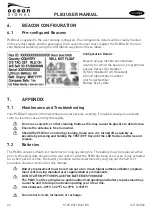
Page 15: ...egistration card This obligation transfers to all subsequent owners Some National Authorities require periodic renewal It is the owner s responsibility to ensure registration details are current and valid 4 2 Country Specific Registration information USA NOAA Sarsat USMCC NSOF E SPO53 1315 East West Hwy Silver Spring MD 20910 Fax 1 301 8174565 Tel 1 301 8174515 1 888 2127283 Email beacon registrat...

Page 16: ...er is permanently attached to the cover please see the separate instruction sheet available from the Ocean Signal website Once completed the installation should be tested to ensure correct activation takes place Refer to the life jacket manufacturer for the manual inflation process The PLB3 is activated when the activation slider is pulled from the front of the device by the tension in the tape cr...

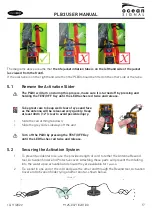
Page 17: ...d face as the antenna will be released very quickly Keep at least 30cm 12 clear to avoid possible injury Slide the red arming tab down Slide the grey slide sideways off the unit Turn off the PLB3 by pressing the TEST OFF Key until the LED flashes red twice and release 5 2 Securing the Activation System 1 To prevent accidental loss use the provided length of cord to tether the Antenna Rewind tool A...

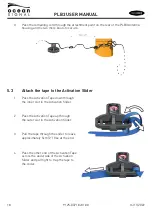
Page 18: ...to the Activation Slider 1 Pass the Activation Tape down through the inner slot in the Activation Slider 2 Pass the Activation Tape up through the outer slot in the Activation Slider 3 Pull the tape through the slider to leave approximately 5cm 2 free at the end 4 Pass the other end of the Activation Tape across the underside of the Activation Slider and pull tight to trap the tape to the slider ...

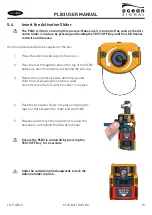
Page 19: ... the tool through the hole in the top of the PLB3 and place over the antenna just behind the end cap 3 Rotate the tool anticlockwise until fully wound Hold the tool keeping the antenna coiled Do not remove the tool until the slider is in place 4 Push the Activation Slider into place ensuring the tape lies flat between the slider and the PLB3 5 Release and remove the rewind tool to allow the antenn...

Page 20: ...ral tube 5 Feed the tape into the rearmost slot in the side of the PLB3 so that it emerges from the front slot 6 Loop the tape around and into the foremost slot on the side of the PLB3 so that it emerges alongside the inserted tape 7 Pull approximately 25mm 1 of tape through the slots in the PLB3 8 Clip the PLB3 into the Oral Tube bracket taking care not to trap any loose tape 9 Pull the tape tigh...

Page 21: ...ided to protect the PLB3 from accidental activation if the grey slide is knocked or otherwise moved under the life jacket cover After arming the PLB3 fit the protective cover then clip the protective cover into the slots immediately adjacent to the arming slider Make sure that both sides of the cover are clipped in place Ensure the PLB3 is securely tied to a fixed point on the life jacket that wil...

Page 22: ...ay cause the plastics to deteriorate Ensure the antenna is free to unwind Should the PLB3 turn on during cleaning make sure it is turned off as quickly as possible by pressing and holding the TEST OFF Key until the LED flashes red twice and release 7 2 Batteries The PLB3 contains Lithium iron batteries for long operating life The battery must be replaced either prior to the expiry date shown on th...

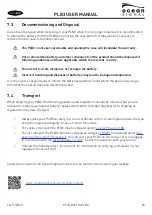
Page 23: ...the beacon has been decommissioned 7 4 Transport When shipping your PLB3 the following guidance and regulations should be followed but you are advised to contact your nearest battery replacement centre or Ocean Signal prior to shipping as regulations may have changed Always pack your PLB3 securely in a stout cardboard carton Ocean Signal advises that you keep the original packaging in case of retu...

Page 24: ...nsity 1 candela Flash Rate 20 30 per minute Infra Red Strobe Light Type IR LED Light Colour 850nm Intensity 7 5mW sr Flash Rate 20 30 per minute Battery Type Lithium Iron Disulfide Li FeS2 Operating lifetime 24hours 20ºC 4ºF Lithium Metal Weight for air transport 2g per battery Replacement Interval 6 years from date of manufacture or 5 years from being placed into service GNSS Receiver Satellite C...

Page 25: ...is approved for use in Canada with AIS only under RSS287 7 6 3 European Declaration of Conformity Hereby Ocean Signal Ltd declares that the radio equipment type PLB3 is in compliance with Directive 2014 53 EU Country of Intended Use The Country of Intended Use table is an EU requirement only Austria P Finland P Latvia P Romania P Belgium P France P Lithuania P Slovakia P Bulgaria P Germany P Luxem...

Page 26: ...aterial or accessory that is not manufactured by Ocean Signal the consumer will be covered by the guarantee warranty offered to Ocean Signal by the manufacturer or supplier of such a component for product which has not been fully paid for for any product supplied by Ocean Signal to a customer under an alternative warranty or commercial agreement for the cost of shipping product to and from the cus...

Page 27: ...Centre or Rescue Coordi nation Centre to explain that the PLB3 has been activated in error and there are no follow up rescue actions required Information required is the 15 digit HEX ID UIN shown above the date time duration and cause of activation the location at the time of de activation ATTACH YOUR REGISTRATION DOCUMENTS HERE FOR SAFE KEEPING ...

Page 28: ...Ocean Signal Ltd Unit 4 Ocivan Way Margate CT9 4NN United Kingdom info oceansignal com www oceansignal com ...

Reviews: