LTMS
Liquid Transmission Measurement System
Installation and Operation Manual
For Products
: LTMS
Page 1: ...LTMS Liquid Transmission Measurement System Installation and Operation Manual For Products LTMS...
Page 2: ......
Page 3: ...pying recording or otherwise without written permission from Ocean Insight This manual is sold as part of an order and subject to the condition that it shall not by way of trade or otherwise be lent r...
Page 4: ...armer than 60 C Caution Never operate the fluid handling system with the guards removed Caution Never operate the fluid handling system with the hoses removed Caution Do not immerse the device in any...
Page 5: ...pment The WEEE symbol on the product indicates that the product must not be disposed of with normal household waste Instead such marked waste equipment must be disposed of by arranging to return to a...
Page 6: ...ntenance of the system The uniqueness and high degree of customization may require different or additional steps that will be outlined during the installation and training received from Ocean Insight...
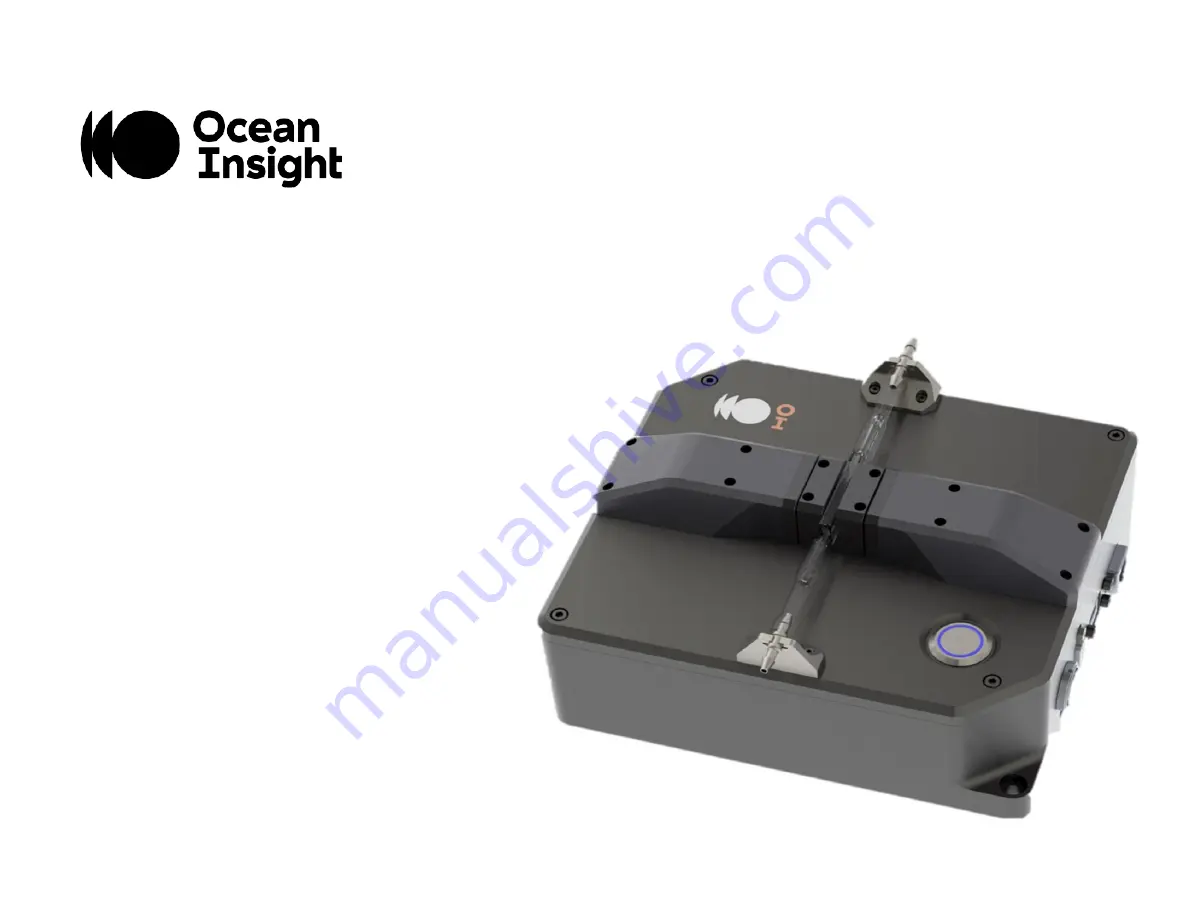
Page 7: ...mp Sample Peristaltic Pump Water Pinch Valve Water Pinch Valve Waste Pinch Valve Sample Waste Sample Inlet Water Inlet Flow Cell Ethernet Serial Wye fitting 4 Way fitting Figure 1 The fully assembled...
Page 8: ...is as follows Calibration Verification of the calibration Saving a master calibration Loading a concentration model Making a measurement Installing the GUI Install MATLAB Runtime Engine on the user c...
Page 9: ...MNL 1017 Rev A 4 Calibration Set the Fluid Handling toggle button to On if you want to use the fluid handling Set the IP Address o 10 14 15 x o X is the serial number Press Connect to LTMS...
Page 10: ...e Ensure the water inlet tube is installed in a vessel of clean water The clean water should be as clean as possible distilled or RO water is preferred If using the system fluid handling press the Sam...
Page 11: ...e Verify that the temperature did not change more than 0 2 C o Calibration and Current temps should be within 0 2 C for each spectrometer S0 and Ref See arrows Make sure transmission measurement is be...
Page 12: ...ement Load Model o Enable Concentration Mode by toggling the switch above Conc Mode as seen in the screenshot o Load sample model file Setup Data Saving o Enable saving data o Select directory for dat...
Page 13: ...you want to make in the Reps field Enter the desired delay time in seconds between measurements Check Auto Fluid Handling and the system will run the following sequence for each measurement o Sample t...
Page 14: ...d Cleaning Methods Aqueous Protein DNA Biologics Warm water with detergent Dilute acid rinse Copious water rinse Aqueous Salt solution Warm water Acid rinse copious water rinse Aqueous Basic solutions...
Page 15: ...ged and need to be replaced Here are the instructions for maintenance and tubing replacement Required Tools Scissors or sharp cutters something to cleanly cut the tubing Required supplies Tubing Rubbe...
Page 16: ...id handling system should be off or disconnected All tubing in the LTMS system is replaceable Prior to installing new tubing remove all old tubing except the flow cell and tubing directly coupled to t...
Page 17: ...MNL 1017 Rev A 12 Peristaltic Pumps Remove the 3 thumb screws and the plastic cover Unhook the tubing at the check valve and the wye Remove the old tubing grommet and clip...
Page 18: ...o use a new retention clip and grommet skip to the Assembling the New Tubing section below To remove the retention clip and grommet for reuse Open the retention clip by pressing the middle section tow...
Page 19: ...Tubing Cut a 27 cm piece to new tubing Slide the rubber grommet onto the tube as shown below Leave about 1 5 cm of tubing protruding A drop of water can be used to aid in sliding the grommet on if ne...
Page 20: ...017 Rev A 15 Installing New Tubing Cut a 13 5 cm piece of tubing and install here Attach the bottom of the tubing to the 4 way fitting at the bottom as shown Cut a 15 5 cm piece of tubing and install...
Page 21: ...MNL 1017 Rev A 16 Cut two 2 5 cm pieces of tubing and install below the pumps Install check valves in the direction shown where the arrow indicates flow direction...
Page 22: ...ach piece Install the other end of each piece onto the check valves installed in the previous step Install each piece into the peristaltic pump by rotating the pump counter clockwise for the left hand...
Page 23: ...the grommet end of the pump tubing for both pumps Cut two 15 0 cm pieces of tubing and attach to the other side of the wye fitting Install the other end of the tubing into the pinch valve Replace the...
Page 24: ...to the wye fitting on the left side Attach a check valve in the orientation shown below to the bottom of the tubing Cut an 11 cm piece of tubing and attach to the wye fitting on the right side Attach...
Page 25: ...heck valves Attach the other end of the tubing to the barbs installed on the system plate Cut an 18 cm piece of tubing and attach to the bottom of the wye Insert the tubing into the drain some will po...
Page 26: ...hangeover Procedure Remove the strain relief brackets held by M2 SHCS one bracket at a time and detach the tubing from the glass flow cell by gently pulling along the long axis of the flow cell to pre...
Page 27: ...MNL 1017 Rev A 22 Remove the four M2 SHCS from the flow cell mounting block The flow cell mounting block can now be removed...
Page 28: ...there are two dowel pins installed on the measurement cover that align to a hole and slot on the underside of flow cell block Verify the mount is flush with the measurement head cover Then fasten int...
Page 29: ...ng to the instrument via ethernet Ensure the computer you are using has an IP address of 10 14 15 XX XX can be any number except for the system serial number If your sample is measuring too dark maxim...
Page 30: ...ustomized hard fixturing also available SPECTROSCOPIC Wavelength range 400 700 nm Optical resolution FWHM 3 1 0 nm Signal to noise ratio at full signal 8000 1 Cycle time 40 ms minimum to 3 5 seconds O...
Page 31: ...MNL 1017 Rev A 26 Questions Chat with us at OceanInsight com info oceaninsight com US 1 727 733 2447 EUROPE 31 26 3190500 ASIA 86 21 6295 6600...