71
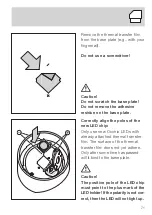
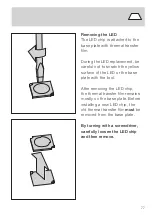
Remove the thermal transfer film
from the base plate (e.g., with your
fingernail).
Do not use a screwdriver!
Caution!
Do not scratch the base plate!
Do not remove the adhesive
residue on the base plate.
Correctly align the poles of the
new LED chip:
Only use new Occhio LEDs with
already attached thermal transfer
film. The surface of the thermal
transfer film does not yet adhere.
Only after some time has passed
will it bind to the base plate.
Caution!
The positive pole of the LED chip
must point to the plus mark of the
LED holder! If the polarity is not cor
rect, then the LED will not light up.
Summary of Contents for io Series
Page 1: ...LED Wechsel LED Replacement Montageanleitung Mounting instructions Sento io lui lei...
Page 2: ......
Page 4: ......
Page 5: ...LED Wechsel Montageanleitung...
Page 8: ......
Page 9: ...09 Sento LED Wechsel...
Page 16: ......
Page 17: ...17 io LED Wechsel...
Page 23: ...23...
Page 24: ......
Page 25: ...25 lui LED Wechsel...
Page 32: ......
Page 33: ...33 lei LED Wechsel...
Page 39: ...39...
Page 41: ...41 Achtung Bei anhaltender Funktions st rung den Occhio Kunden service kontaktieren...
Page 42: ......
Page 43: ...43 Anhang...
Page 46: ......
Page 47: ...LED Replacement Mounting instructions...
Page 50: ......
Page 51: ...51 Sento LED Replacement...
Page 58: ......
Page 59: ...59 io LED Replacement...
Page 65: ...65...
Page 66: ......
Page 67: ...67 lui LED Replacement...
Page 74: ......
Page 75: ...75 lei LED Replacement...
Page 81: ...81...
Page 83: ...83 Caution If a malfunction persists then contact Occhio customer service...
Page 84: ......
Page 85: ...85 Appendix...


