Safety precautions
Product description
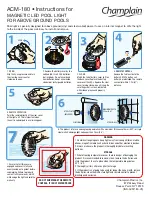
Read through the mounting/
use instructions carefully before
installing the luminaire. Follow
the safety precautions in these
instructions closely and keep the
instructions in a safe place.
The assembly and installation of elec-
trical components must be carried
out only by qualified personnel.
Repairs must be carried out only by
authorised, qualified personnel or the
manufacturer. Before performing any
work on the spotlight (installation,
changing the light source, cleaning,
etc.), it must be disconnected from
the mains supply.
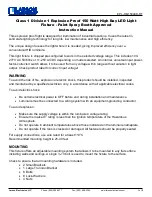
0.2 m
Maintain the minimum safety distan-
ce from flammable materials: 20 cm.
This symbol warns you of hot
surfaces, which could cause burns
if touched. Caution: When used
for prolonged periods, the surface
of the spotlight can become hot.
Before performing any work on
the spotlight (fitting the spotlight,
changing the light source or insert,
etc.), always switch the spotlight off
and let it cool for at least 30 minu-
tes. Only for installing in a position
which is out of arm‘s reach.
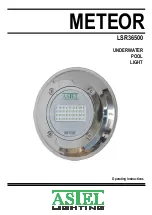
LED ceiling spotlight with cylindrical
head and replaceable optics; moun-
ting flush with ceiling for hollow
ceilings or solid ceilings with ceiling
box. Version with remote power
supply unit; connection to external
power source (driver). Dimmable via
customer-supplied dimmable power
supply unit. Zoom optic, which of-
fers a continuous beam of light that
can be set from 20° to 60°, Lens
optic, which has an internal lens
combined with various inserts. The
Occhio LED is replaceable.
Summary of Contents for lui piano v
Page 1: ...lui piano v Montageanleitung Mounting instructions cc...
Page 6: ...Inserts in Objektiv einsetzen Put in inserts to optic Click...
Page 8: ...Head einsetzen Put in the head 3 x...
Page 9: ......
Page 10: ...lui piano v Bedienungsanleitung User manual cc...
Page 11: ...Bedienung Zoom Objektiv Zoom optic handling 20...
Page 12: ...Bedienung Zoom Objektiv Zoom optic handling 60...
Page 13: ......
Page 14: ......