background image

Objet Geometries Ltd                                       Eden330\333 User Manual


                                                                                                                            4  - 22  


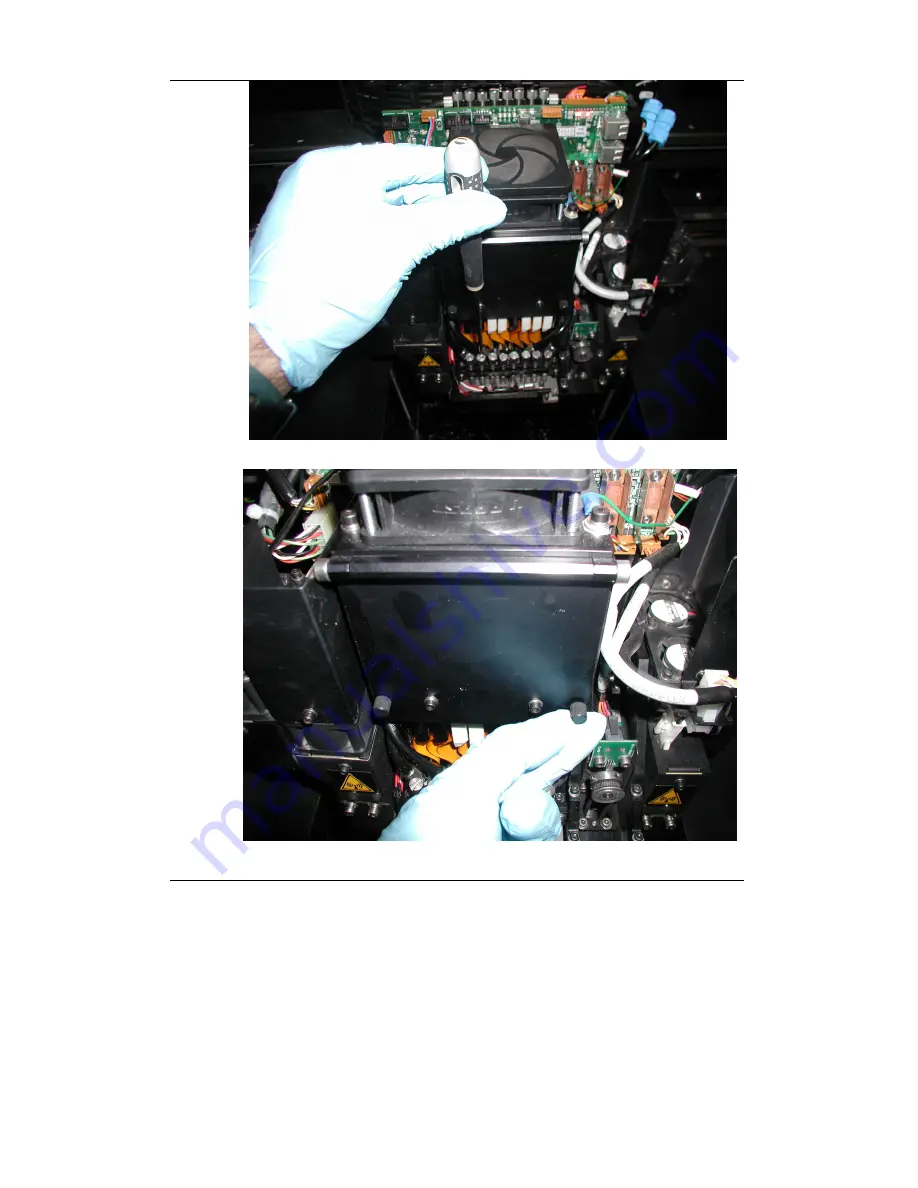
Figure 23

: Use a Flat-End screwdriver if necessary 


Figure 24

: Open the ‘Heads Driver’ compartment by releasing the door screws


Created by Neevia Personal Converter trial version

 http://www.neevia.com

Summary of Contents for Eden330

Page 1: ...ort representative from Objet Geometries Ltd will perform the following tasks Unpack install assemble and completely check the Eden330 333 system before approving it for operation Train the selected p...

Page 2: ...menu and select the Shut Down option 2 Press OK when ready or Cancel to abort operation 3 The system will empty existing material in printing heads and perform wiping Please note that this sequence w...

Page 3: ...nozzles status In order to perform a pattern test follow the next steps 1 Enter the main menu and select the Pattern Test icon 2 Pattern test would be printed onto tray as shown in figure 3 below 3 C...

Page 4: ...Objet Geometries Ltd Eden330 333 User Manual 4 4 Figure 3 Pattern Test Printed onto Removable Tray Figure 4 Pattern Test Mapping Created by Neevia Personal Converter trial version http www neevia com...

Page 5: ...er a Pause 1 Check that there is sufficient material in the cartridges see Loading and Replacing Material Cartridges 2 Click the Options pull down menu and select the Pattern Test option 3 The system...

Page 6: ...Objet Geometries Ltd Eden330 333 User Manual 4 6 Figure 5 Wiper Cleaning Screen Figure 6 Wiper Blade Removal Created by Neevia Personal Converter trial version http www neevia com...

Page 7: ...re to load Model material into the Model drawer and Support material into the Support drawer resin containers are keyed in order to prevent misplacement 3 Grasp the handle of the cartridge firmly and...

Page 8: ...Eden330 333 User Manual 4 8 Figure 7 Opening the cabinet drawer Figure 8 Pulling cartridge out Figure 9 Support Model Housing Figure 10 MMS Display Created by Neevia Personal Converter trial version...

Page 9: ...l container and replace it accordingly during the daily maintenance To replace and load the waste container follow the next steps 1 Open the Eden330 333 front left door 2 Gently pull out the external...

Page 10: ...is jetting a very low weight 2 The following are general guidelines as to when to avoid head replacement 2 1 Do not remove single heads if the printing block is full of resin The printing block must...

Page 11: ...tive Always perform purges manual head cleaning and wiping before determining final status of missing nozzles 1 2 Preparing the printing block for head replacement This step is done automatically by t...

Page 12: ...arily by performing a Test Pattern which will determine if head needs to be replaced according to number and location of missing nozzles on this head Please note that missing nozzles spread out over t...

Page 13: ...Objet Geometries Ltd Eden330 333 User Manual 4 13 Figure 12 Performing Test Pattern Created by Neevia Personal Converter trial version http www neevia com...

Page 14: ...mple of peeling orifice plate Note that when an orifice plate peels at either end this might not necessarily affect nozzles status and therefore Single Head Replacement should be reconsidered Created...

Page 15: ...Objet Geometries Ltd Eden330 333 User Manual 4 15 Figure 14 Example of a severe case of missing nozzles Created by Neevia Personal Converter trial version http www neevia com...

Page 16: ...note that head replacement does not require washing the heads with washing detergent Nevertheless as uncured resin would be exposed in the material entry holes located in the block please perform the...

Page 17: ...to replace You may have multiple selections of a few heads at the same time Please note the head order as shown in the picture Head S3 is first left Head M0 is far right When done Click Next to conti...

Page 18: ...ally be positioned over the wiper location and the head will drain Please note that this step may take few minutes as it requires heating of the heads prior to the draining process When done Click Nex...

Page 19: ...o replace the head s selected For information of how to remove an insert a new head follow the next steps When done Click Next to continue the Head Replacement Wizard or Cancel to abort 5 Replacing a...

Page 20: ...User Manual 4 20 Figure 19 Open the new SHR box and carefully read the enclosed safety instructions Figure 20 Wear the safety gloves prior to the SHR procedure Created by Neevia Personal Converter tr...

Page 21: ...den330 333 User Manual 4 21 Figure 21 Release lower locking screw Head S2 in this example Figure 22 Release Upper locking screw Head S2 in this example Created by Neevia Personal Converter trial versi...

Page 22: ...den330 333 User Manual 4 22 Figure 23 Use a Flat End screwdriver if necessary Figure 24 Open the Heads Driver compartment by releasing the door screws Created by Neevia Personal Converter trial versio...

Page 23: ...s Ltd Eden330 333 User Manual 4 23 Figure 25 Lift the Heads Driver compartment door to vertical position Figure 26 Press the lower head s screw Created by Neevia Personal Converter trial version http...

Page 24: ...30 333 User Manual 4 24 Figure 27 Press the upper head s screw Figure 28 Pull out the head s driver card about 5mm until it is released from its connector Created by Neevia Personal Converter trial ve...

Page 25: ...ould already be almost falling out Hold your hand underneath it and gently withdraw it from the printing block Figure 30 Pull the entire head out Make sure the head card is slides easily down and out...

Page 26: ...Figure 31 Gently remove the head from its packing Figure 32 Insert the new head into position Note the Front and Back markings on head driver s cover connector on head driver should be on the back of...

Page 27: ...ng from the removed head In this case the O ring may still be in the head s entry holes and must be removed prior to head replacement Figure 33 Insert the head driver into its slot by pressing it gent...

Page 28: ...al 4 28 Figure 34 Lock and tighten the lower and upper screws by hand Figure 35 Lock and tighten the head driver compartment as shown above and remove all tools from tray Created by Neevia Personal Co...

Page 29: ...ides the user after head replacement in order to ensure that the new head was inserted correctly Screen 37 Ensure the replaced head is level with all other heads This should be done by passing your fi...

Page 30: ...s and damaged heads have been removed from the tray and machine working area Screen 39 If the newly inserted head is not recognized by the software the user will be requested to reinsert the head s dr...

Page 31: ...e factory data the user will be requested to insert a new version of the head Screen 41 At this stage the system will perform an automated vacuum test to ensure there is no vacuum leakage as a result...

Page 32: ...on The wizard will guide the user how to remove and reinsert the head This may take some time as the system will empty the heads once again Screen 43 At this stage the system will perform an automated...

Page 33: ...y the system prints a set of 8 rectangles one from every head lasting about 25 minutes Examination of these rectangles from each head will assist in determining the heads exact jetting properties Once...

Page 34: ...will find a number of rectangles on the tray as detailed below Please pay special attention to the order of the rectangles S3 being the furthest left M0 being the furthest right You may use an ink ma...

Page 35: ...Objet Geometries Ltd Eden330 333 User Manual 4 35 Figure 46 The Weight Test Order Figure 47 Removing the Weight Test rectangles Created by Neevia Personal Converter trial version http www neevia com...

Page 36: ...ure rectangles of all heads including the replaced head s and insert results into the wizard screen Tip Required Model weight should be approximately 3 65 grams per rectangle Required Support weight s...

Page 37: ...et Geometries Ltd Eden330 333 User Manual 4 37 Screen 49 Entering the weight test data Screen 50 SHR has been successfully completed Created by Neevia Personal Converter trial version http www neevia...

Page 38: ...d Preventive Maintenance The following preventive parts would be provided with every machine to end user Each end user shall appropriately conduct preventive maintenance periodically in accordance wit...

Page 39: ...e is no model on the tray Select the Move to Head Maintenance Position command from Eden330 333 main menu Place a mirror onto the tray and carefully clean the heads with a cloth soaked with Propanol N...

Reviews: