background image

-  EN  - 

15 


Commissioning/start-up 


N O T E


The LED light cannot be dimmed. The brightness of an LED reduces as the operating time increases.


Switching on:

 Insert the power plug of the driver into the mains socket.  

  Check the function of the spotlights. 

Switching off:

 Disconnect the driver power plug. 


Remedy of faults 


Malfunction 

Cause 

Remedy 

None of the lamps are lit. 

No supply voltage 

Check all cables and connections. 

Driver defective 

Replace the driver. 

One of the spotlights is not lit. 

Spotlight not connected 

Check the connection between spotlight and 

driver. 

LED chip of the spotlight defective 

Replace the LED chip. 

Spotlight defective 

Replace the spotlight. 

Driver output defective. 

Replace the driver. 

Luminous intensity of a spotlight is insufficient. 

Protection lens soiled 

Clean the protection lens. 

LED chip shortly before the end of its life span.  Replace the LED chip. 


Cleaning 


A T T E N T I O N !

 Dangerous electrical voltage. 

Possible consequences:

 Death or severe injury. 

Protective measures: 

  Electrical units and installations with a rated voltage of U > 12 V AC or U >30 V DC located in the water: 

Isolate the units and installations (switch off and disconnect from the power supply) before reaching into the 

water. 

  Isolate the unit before starting any work. 

  Secure the unit to prevent unintentional switching on. 


If necessary, clean the unit with clear water using a soft brush. 


  Ensure that no moisture can enter the unit. 
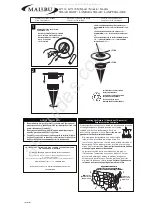


Replacing the bulb 


An LED chip, fixed by a socket and thermal paste in the spotlight, serves as the light source. After removing the chip, it 

is necessary to remove the residual thermal paste and apply new thermal paste. 

How to proceed: 


 J 


Use a leather or textile cloth (for a be

tter grip) to hold the front cap and unscrew it counter

-clockwise. 

Gently tap to remove the protection lens, O-ring and reflector from the lamp. 

Undo the small screws on the LED chip holder and lift the chip holder up. Then remove the LED chip itself from the 

bottom of the housing.  

–  When lifting up the chip holder, take particular care not to damage the electrical connection. 

Apply a small amount of new thermal paste to the bottom of the housing and spread it using a credit card or similar. 

The layer of paste on the bottom of the housing must be large enough to cover the entire bottom surface of the new 

LED chip when it is in position. 

Align the LED chip such that its plus and minus pole make contact with the plus and minus pole of the chip holder. 

Assemble the spotlight in the reverse order. 

Use the O-ring supplied with the LED chip. 

–  Ensure that the O-ring sealing surfaces are clean. 

Screw on the front cap clockwise as far as possible. 


Summary of Contents for LunAqua Power LED Series

Page 1: ...42964 10 15 MH LunAqua Power LED 42964 GA LunAqua Power LED_end_ 20 10 15 08 07 Seite 2...

Page 2: ...2 A LAA0033 B LAA0041 C D LAA0034 LAA0035...

Page 3: ...3 E LAA0036 F LAA0037 G LAA0038...

Page 4: ...4 H LAA0040 I PLX0004 J LAA0039...

Page 5: ...ktrische Leitungen oder Geh use besch digt sind Eine besch digte Anschlussleitung kann nicht ersetzt werden Ger t entsorgen Sicherheitshinweise Vorschriftsm ige elektrische Installation Elektrische In...

Page 6: ...chsanleitung Willkommen bei OASE Living Water Mit dem Kauf des Produkts LunAqua Power LED haben Sie eine gute Wahl ge troffen Lesen Sie vor der ersten Benutzung des Ger tes die Anleitung sorgf ltig un...

Page 7: ...chte und Treiber k nnen im Wasser oder au erhalb des Wassers aufgestellt werden In Schwimmteichen darf der Treiber nicht aufgestellt werden sondern muss au erhalb platziert werden Um eine Font ne zu b...

Page 8: ...r Leuchtenkopf sollte nach oben zur D se hin zeigen Die Anschlussleitung sollte nahe am D senrohr frei nach unten h ngen Leuchten paarweise an einer D senverl ngerung befestigen So gehen Sie vor G Bei...

Page 9: ...halten Gegen unbeabsichtigtes Wiedereinschalten sichern Reinigen Sie das Ger t bei Bedarf mit klarem Wasser und mit einer weichen B rste Darauf achten dass keine Feuchtigkeit in das Ger t gelangt Leuc...

Page 10: ...trocken gelagert werden wenn zu erwarten ist dass die zul ssigen Um gebungstemperaturen nicht mehr gegeben sein werden Verschlei teile LED Chip Ersatzteile Mit Originalteilen von OASE bleibt das Ger...

Page 11: ...may only be carried out by a qualified electrician A person is regarded as a qualified electrician if due to his her vocational education knowledge and experience he or she is capable of and authorise...

Page 12: ...carried out in accordance with these instructions Adhere to the safety information for the correct and safe use of the unit Keep these instructions in a safe place Please also hand over the instructi...

Page 13: ...ide of the water The driver may not be installed in swimming ponds it must be installed outside of the water and at the specified distance away from swimming ponds The spotlight can be mounted on a no...

Page 14: ...tlight head should point upwards in the direction of the nozzle The connection cable should hang down freely near the nozzle tube Fastening spotlights in pairs to a nozzle extension How to proceed G U...

Page 15: ...ate the unit before starting any work Secure the unit to prevent unintentional switching on If necessary clean the unit with clear water using a soft brush Ensure that no moisture can enter the unit R...

Page 16: ...be removed and stored in a dry place if temperatures outside the permissible ambient temperatures are expected Wear parts LED chip Spare parts The use of original parts from OASE ensures continued saf...

Page 17: ...als elektrische snoeren of behuizing be schadigd zijn Een beschadigd aansluitsnoer kan niet worden vervangen Apparaat afvoeren Veiligheidsinstructies Elektrische installatie volgens de voorschriften E...

Page 18: ...et de aanschaf van het product LunAqua Power LED heeft u een goede keuze ge maakt Voordat u het apparaat in gebruik neemt dient u de gebruiksaanwijzing zorgvuldig door te lezen en zich met het appa ra...

Page 19: ...araat B De lampen en de module kunnen in het water of op het droge worden geplaatst In zwemvijvers mag de module alleen op het droge worden opgesteld Om een fontein te verlichten monteert u de lamp op...

Page 20: ...stigingsschroeven weer op de houder bevestigen De lampkop moet naar boven naar de sproeier wijzen De aansluitkabel moet dichtbij de sproeierbuis vrij naar omlaag hangen Lampen per paar op een sproeier...

Page 21: ...spanningsloos schakelen Beveiligen tegen onbedoeld opnieuw inschakelen Reinig het apparaat indien nodig met kraanwater en een zachte borstel Let er op dat er geen vocht in het apparaat komt Lichtmidde...

Page 22: ...geslagen wanneer wordt verwacht dat de toe gestane omgevingstemperaturen niet kunnen worden gewaarborgd Slijtagedelen LED Chip Reserveonderdelen Met originele onderdelen van OASE blijft het apparaat v...

Page 23: ...Str mforbruk SV M tt p Kabell ngd Doppningsdjup Vikt Effekt M rksp nning Brytstr m Anslutningssp n ning Str m f rbrukning FI Mittaukset Kaapelipituus Upotussyvyys Paino Ottoteho Mitoitusj nnite Nimell...

Page 24: ...ali rifiuti domestici Attenzione Leggete le istruzioni d uso DA St vt t Vandt t indtil 4 m dybde Mindsteafstanden til den bely ste genstand skal v re 0 5 m Udskift alle spr ngte glas skiver Sikkerheds...

Page 25: ...redmeta koji se osvjetljava mora iznositi 0 5 m Zamijenite sva naprsnuta stakla Sigurnosni tran sformator Stupanj za tite 3 Za titite od izravnog sun evog zra enja Ne bacati u obi an ku ni otpad Pa nj...

Page 26: ...42964 08 17...

Reviews: