background image

DIRECTIONS 

FOR 

USE

7

DIRECTIONS FOR USE

OPTIONAL ACCESSORY 

AVAILABLE ON SALON TOP ONLY

Manicure Arm Rests

Adjustable Side Arm Rests

1. Insert end of arm rest into 

hole in backrest while holding 

arm rest at 60° angle.

2. Push end all the way into hole and drop arm rest into horizontal 

position. Tug slightly to make sure the armrest is fully locked to 

the table (for patient safety).

To remove the arm rest, simply reverse the procedure above.

TO INSTALL THE ARM REST:

The arm rests adjust automatically as the table’s back support moves to remain parallel to the floor in any position. 

They are designed to be strong and will take a reasonable amount of weight, but they are not designed to be used to 

sustain a person’s weight when getting on or off the table.

CAUTION:  Do not use the arm rest 

for customer weight support during the 

mounting or dismounting of the table. 

The arm rest is not designed to support 

the patient’s weight.

The arm rest height is adjusted to level at the factory. When in use, some of the new 

parts will wear, and you may see some sagging of the arm rest over time. If the arm 

rest is too low the height can easily be adjusted using the enclosed Allen wrench.

1. Loosen bottom 2 set screws 

(turn counter-clockwise).

2. Turn side set screw in (clock-

wise) while lightly raising the arm 

rest with your other hand (to make 

the adjustment easier).

3. When you have achieved the desired 

height, tighten the two bottom set screws 

(turn clockwise).

1. Loosen bottom 2 set screws 

(turn counter-clockwise).

2. Turn side set screw out (turn 

counter-clockwise).

3. When you have achieved the desired 

height, tighten the two bottom set screws 

(turn clockwise).

To Raise the Arm Rest

To Lower the Arm Rest

TO LEVEL THE ARM REST:

ARM REST INSTALLATION AND ADJUSTMENT INSTRUCTIONS

Summary of Contents for Clinician Premiere

Page 1: ...Clinician Premiere www oakworks com 717 235 6807 Electric Salon Top Shown with optional Adjustable Side Arm Rests and Universal Table Extender Flat Top Shown with optional QuickLock Face Rest and Boi...

Page 2: ...not be construed as a commitment by Oakworks Inc Oakworks Inc assumes no responsibility for any errors that may appear in this document nor does it make expressed or implied warranty of any kind with...

Page 3: ...ontrol 3 Table Key Switch 4 Under Table Cabinet 4 6 Side Arm Rests 7 Accessory Option QuickLock Face Rest 8 9 Accessory Option Table Extender 10 Moving the Premiere 10 Section IV Troubleshooting If Ta...

Page 4: ...ntation on this product indicates that the product should be protected from moisture The humidity specifications for Transport Storage are listed on page 18 This symbol when used in documentation on t...

Page 5: ...able in standing water Before moving the table disconnect the power cord from the power outlet and secure the electrical cord hand control and foot control out of the way for moving Risk of Electrical...

Page 6: ...and fall Do not leave clients unattended when table is set at its highest level The table weighs as much as 200 lbs DO NOT lift or move the unit without using proper safely procedures or equipment DO...

Page 7: ...cause damage to top and or hood and will void the warranty Maximum Working Load Rating client and accessories 500 lbs 227 kg Plug table into an outlet that is surge protected to a level of 750J or hig...

Page 8: ...by natural material variations in padding published weight may differ due to options chosen natural material variations and padding density Self Adjusting Removable Arm Rests 2 optional Sliding Cabin...

Page 9: ...ench Adjust each leg individually in turn by adjusting the height of each leveler foot until the unit rests level and steady This adjustment will not effect the function of the table The feet can be a...

Page 10: ...Press and hold the appropriate button until the position desired is achieved and then release The arm rests available on Salon Top will adjust automatically to provide the most in comfort and ergonomi...

Page 11: ...or holding anything Damage can occur to the table especially when commands that are accessed by the foot or hand control are activated Placing anything on this area will prohibit movement of the backr...

Page 12: ...cabinet Before any work is started unplug the power cord from the receptacle To remove this panel unscrew and remove the 4 screws from the panel retaining strips found on both sides of the head end of...

Page 13: ...or the times when an optional electrical appliance such as a facial massager is used the Premiere comes equipped with an opening to allow the cord of the appliance to pass through the cabinet and acce...

Page 14: ...arm rest for customer weight support during the mounting or dismounting of the table The arm rest is not designed to support the patient s weight The arm rest height is adjusted to level at the facto...

Page 15: ...le and then locking the cam locks into that position The Premiere has outlets at the head of the table for a variety of uses and outlets at the other end that work as well for additional procedures At...

Page 16: ...e open ends together or spread them apart to achieve the most comfortable support for any size face To avoid your client s chin from hitting the spacebar make sure the pad is narrow enough to support...

Page 17: ...ft the table from the base As when moving any piece of heavy equipment bend at the knee and lift with your legs beneath you and not with your back Be aware and use proper safe procedures for moving a...

Page 18: ...urn the Premiere on its side for any reason To do so could cause damage to the base and will void the warranty There are no serviceable items that require this action Never lift the table by grasp ing...

Page 19: ...warranty Use both ends of the table evenly Occasionally switch the face rest from one end of the table to the other to reduce uneven wear Protect your table and accessories with sheets and fleeces We...

Page 20: ...works Part Voltage ACE Power Cord Plug 7791 120v 60 Hz 3 prong grounded North America 7791 03 220v 50 Hz Continental Plug Europe Italy 7791 04 220v 50 Hz Swiss plug Switzerland 7791 02 220v 50 Hz Brit...

Page 21: ...Outside Dimensions Inside Dimensions Opening Dimensions Storage Area 1 Head End Opening Dimensions Storage Area 2 Foot End 20 5 h x 24 5 w x 50 5 l 11 5 h x 20 w x 48 l 12 h x 20 4 l 12 h x19 9 l Cab...

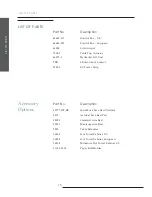
Page 22: ...Button Foot Control 2083 5 US Power Strip LIST OF PARTS 15 LIST OF PARTS Part No Description 60777 WT BK QuickLock Face Rest Platform 2410 AeroCel Face Rest Pad 18020 Standard Arm Rest 18035 Manicure...

Page 23: ...ll liability by Oakworks for the product or damages caused by its use The buyer and its customers shall be responsible for proper set up and use of the products as well as any supervision required for...

Page 24: ...A 17349 Phone 717 235 6807 FAX 717 235 6798 www oakworks com Edition 1 February 2012 Printed in U S A Complies with UL 962 CAN CSA C22 2 No 68 09 EN60335 1 EN60335 2 32 3034177 European Authorized Rep...

Reviews: